
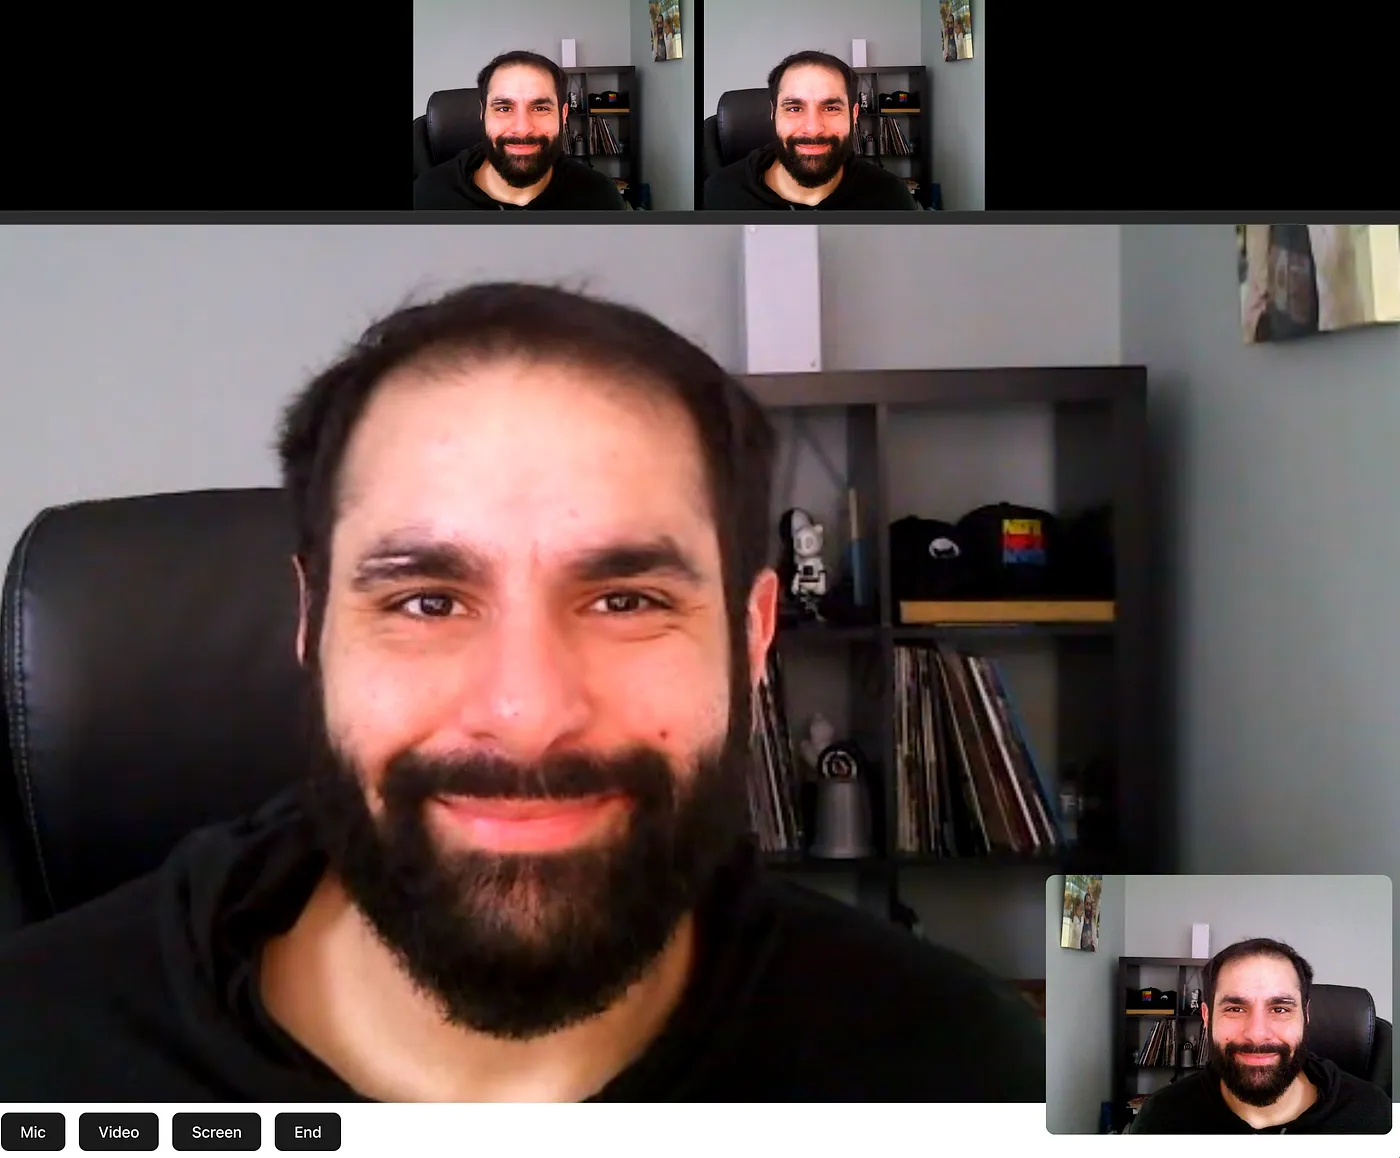
There’s something profoundly powerful about visual connection, a sense of presence that texts or emails can’t convey. In today’s digital hybrid world, voice and video chat features have become a common requirement for web and app projects.
That’s what we’re aiming to recreate, live video communication similar to Google Hangouts, and Skype. Building a group video chat app doesn’t have to be complicated, and given today’s fragmented JS landscape I decided to write this tutorial using HTML, CSS, and vanilla JS.
Prerequisites
- Node.JS
- A basic understanding of HTML/CSS/JS
- A code editor — I like to use VSCode
- A developer account with Agora.io
Setup Dev Environment
In this guide, we’re using Vite to handle the dev environment. To set up our project open the terminal, navigate to your dev folder, and use the NPM create Vite command.
npm create vite@latest
Follow the Vite instructions: give your project a name, select Vanilla as the framework, and select javascript as the variant and hit enter. Once the project is set up, follow the instructions to install the npm dependencies and open the project folder in your code editor.
Install the Agora SDK
With the new project setup, navigate to the project folder in the terminal and use npm to install the Agora Video Web SDK
npm i agora-rtc-sdk-ng
Core Structure (HTML)
Let’s start by laying out our basic html structure. There are a few must-have UI elements, such as the local video, the remote videos, a toolbar that contains buttons for muting and unmuting the audio/video, a button to screen-share, and a button to leave the chat. Open the index.html file and replace it with the code below.
<!doctype html>
<html lang="en">
  <head>
    <meta charset="UTF-8" />
    <link rel="icon" type="image/svg+xml" href="/agora-box-logo.svg" />
    <meta name="viewport" content="width=device-width, initial-scale=1.0" />
    <link rel="stylesheet" type="text/css" href="style.css" />
    <title>Agora Live Video Demo</title>
  </head>
  <body>
    <div id="container">
      <div id="full-screen-video"></div>
      <div id="remote-video-container"></div>
      <div id="local-video-container">
        <div id="local-video"></div>
      </div>
      <div id="local-media-controls">
        <button id="mic-toggle" class="media-active">Mic</button>
        <button id="video-toggle" class="media-active">Video</button>
        <button id="screen-share" class="media-active">Screen</button>
        <button id="leave-channel" class="media-active">End</button>
      </div>
    </div>
    <div id="overlay" class="modal">
      <div id="modal-container">
        <div id="modal-header">
          <div id="title">
            <h1>Join Channel</h1>
          </div>
        </div>
        <form id="join-channel-form">
          <div id="modal-body">
            <div class="form-group">
              <label for="form-channel-name">Channel Name</label>
              <input type="text" id="form-channel-name" class="form-control">
            </div>
            <div id="modal-footer">
              <button type="submit" id="join-channel-btn">Join Channel</button>
            </div>
          </div>
        </form>
      </div>
    </div>
    <script type="module" src="/agora-live-video.js"></script>
  </body>
</html>
Let’s take a look at the index.html page. The body contains two main elements, a container for the video call UI and a modal overlay with a form to join the video chat.
Let’s start with the container, it wraps the three divs used to display the local and remote video streams, along with the media controls. Working our way from the top down, the full-screen-video div is for playing one of the remote users in full-screen mode. This remote-video-container is for dynamically adding/removing the remote video tracks as they are published into the channel. The local-video-container to display the local user’s camera. Lastly, thelocal-media-controls div contains the buttons to control muting and unmuting the mic and camera tracks, starting and stopping the screen share, and leaving the channel.
Now looking at the overlay div, we can see it’s a simple modal with an embedded form, a single input for the Channel Name, and a button to Join Channel. The Channel Name is used to group users together into the same video chat.
Adding in CSS and JS
Now that our HTML is set up, we can add simple CSS styles. Open the style.css file and add this CSS below the existing style tags.
/* Video Call container */
#container {
  width: 100vw;
  height: 100vh;
}

/* media controls */
#local-media-controls {
  width: 100vw;
  position: absolute;
  bottom: 0;
  background: #fff;
  padding: 10px 0;
  display: none;
}

#local-media-controls button {
  margin: 0 5px;
}

.media-active {
  background-color: #1a1a1a;
}

/* only show hover if button not focused */
.media-active:hover:not(:focus) {
  background-color: #FFF;
  color: #cd3333;
  border: 1px solid #cd3333;
}

.muted{
  background: #b62b2b;
}

/* only show hover if button not focused */
.muted:hover:not(:focus) {
  background-color: #b62b2b73;
  color: #1a1a1a;
  border: 1px solid #1a1a1a;
}

/* UI */
#buttons-container {
  position: absolute;
  z-index: 2;
  width: 100vw;
}

#full-screen-video {
  position: absolute;
  width: 100vw;
  height: 100vh;
}

#local-video-container {
  position: absolute;
  float: right;
  bottom: 27px;
  right: 10px;
  width: 360px;
  height: 270px;
}

#local-video {
  position: absolute;
  z-index: 1;
  width: 360px;
  height: 270px;
}

#local-video div {
  border-radius: 10px;
}

#remote-video-container {
  position: absolute;
  width: 100vw;
  left: 0;
  top: 0;
  display: flex;
  flex-direction: row;
  align-items: center;
  justify-content: center;
  flex-wrap: nowrap;
  gap: 10px;
  background-color: #000;
  overflow-x: scroll;
  overflow-y: hidden;
}

.remote-video {
  width: 20vw;
  max-width: 312px;
  min-width: 0;
  aspect-ratio: 1.33;
}

/* Join Channel Modal */
#overlay {
  position: fixed;
  left: 0;
  top: 0;
  width: 100vw;
  height: 100vh;
  overflow: hidden;
  background-color: rgba(0, 0, 0, 0.5);
}

.modal {
  display: none;
  opacity: 0;
  z-index: -10;
  transition: opacity 0.5s ease;
}

.show {
  display: block;
  opacity: 1;
  z-index: 10;
}

#overlay > * {
  margin: 0 0 25px;
  color: #2d2929;
}

#modal-overlay button[type=submit]{
  max-width: 20vw;
  margin: 0 auto;
}

#modal-container {
  display: flex;
  flex-direction: column;
  width: 50vw;
  max-width: 650px;
  margin: 30px auto;
  background: #fff;
  padding: 25px;
  border-radius: 25px;
}

#modal-header, #modal-footer {
  display: flex;
  justify-content: space-between;
  align-items: center;
}

#modal-body {
  margin: 20px 0;
}

.form-group {
  margin: 0 0 20px;
}

.form-control {
  width: 95%;
  padding: 10px;
  margin: 10px 0;
  border: 1px solid #000;
  border-radius: 5px;
}

#join-channel-btn {
  cursor: pointer;
  padding: 10px 20px;
  background-color: #099DFD;
  color: #FFF;
  border: 2px solid #FFF;
  border-radius: 5px;
  transition: background-color 0.3s ease;
}

#join-channel-btn:hover {
  background-color: #FFF;
  color: #099DFD;
  border: 2px solid #099DFD;
  border-radius: 5px;
}
Core Structure (JS)
Now that we have the HTML/DOM structure laid out we can add in the JS. We’ll use Agora’s Video SDK to simplify the build and allow us to build scalable real-time video applications. The Agora SDK is pretty straightforward in how it works: you initialize the SDK, create a Client, use that Client to connect to an Agora Channel, and then use the Client to publish the mic and camera streams into the channel.
In the code below, we start by importing the AgoraRTC object from the Agora SDK. Next, we set up a constant for our Agora App ID and load that value from our environment file. Next, we’ll use cameraVideoPreset to set the video profile for the local camera stream to 360p_7, which sets the video to 480 x 360p at 15fps and a bitrate of 320 Kps. We’ll use audioConfigPreset and screenShareVideoPreset to set the Agora presets for the audio track and screen share config. View the full list of presets on the Agora Documentation.
Next, declare and instantiate an Agora Client, with an initial config of vp9 for the codec, we’ll set the mode to live and the role to host, but you can also set the mode to rtc and omit the role.
Agora’s 4.x SDK organized the audio and video streams into tracks to more closely align with the WebRTC equivalents. To keep our local tracks organized, create an object localTracks and create the structure to store a reference to audio, and video tracks from the mic, camera, and a/v from the screen-share. The Agora SDK provides a way to check if the track is active, but that function samples the mic/camera tracks over a “period of time” to check for activity. This check is relatively fast when the stream is active so mute is quick, but the function is slow to return when the track is muted and causes a delay when trying to unmute. To make sure the UI is responsive on mute/unmute, we’ll use localTrackActive to keep track of the local mic, camera, and screen-share states.
When new remote users join the channel we’ll use an object (remoteUsers) to keep track of their video and audio tracks. Each remote user will have a unique ID (UID) that we’ll use as the keys in the remoteUsers object. The variable mainStreamUid will keep track of the UID for the remote user that is being displayed in the full-screen div.
// Import the Agora SDK
import AgoraRTC from 'agora-rtc-sdk-ng'

const appid = import.meta.env.VITE_AGORA_APP_ID
const cameraVideoPreset = '360p_7'          // 480 x 360p - 15fps @ 320 Kps
const audioConfigPreset = 'music_standard'  // 48kHz mono @ 40 Kbps
const screenShareVideoPreset = '1080_3'     // 1920 x 1080 - 30fps @ 3150 Kps

// Create the Agora Client
const client = AgoraRTC.createClient({
  codec: 'vp9',
  mode: 'live',
  role: 'host'
})

const localTracks = {
  camera: {
    audio: null,
    video: null
  },
  screen: {
    audio: null,
    video: null
  }
}

const localTrackActive = {
  audio: false,
  video: false,
  screen: false
}

let remoteUsers = {}        // Container for the remote streams
let mainStreamUid = null    // Reference for video in the full screen view
Next, add a listener for the DOMContentLoaded event, so we can add all of our event listeners once the page has loaded. I created a simple function getById() as a shorthand for document.getElementById().
// Listen for page loaded event
document.addEventListener('DOMContentLoaded', () => {
  console.log('page-loaded')
  addAgoraEventListeners()                          // Add the Agora Event Listeners
  addLocalMediaControlListeners()                   // Add listeners to local media buttons
  const joinform = getById('join-channel-form')     // Get the join channel form
  joinform.addEventListener('submit', handleJoin)   // Add the function to handle form submission
  showOverlayForm(true)                             //Show the overlay form
})
When the page is loaded, add the Agora Event Listeners. The Agora SDK provides many events to give the developer full control over the experience. These events notify our client application of various events such as when a remote user has joined or left the current channel.
// Add client Event Listeners -- on page load
const addAgoraEventListeners = () => {
  // Add listeners for Agora Client Events
  client.on('user-joined', handleRemotUserJoined)
  client.on('user-left', handleRemotUserLeft)
  client.on('user-published', handleRemotUserPublished)
  client.on('user-unpublished', handleRemotUserUnpublished)
}
As mentioned, the Agora SDK provides many events, but these four events are the core events every live video application needs to have. The first event user-joined is triggered when a remote host client joins the channel, this event will get triggered when a client joins a channel with existing users. It’s worth noting that this event does not get triggered if the client device has its role set to audience. Conversely, the user-left event is triggered when the remote client leaves.
When a remote host user joins we’ll add them to our remoteUsers object, with their uid as the key and the user as the value. When the remote user leaves the channel, we’ll remove them from our list.
// New remote users joins the channel
const handleRemotUserJoined = async (user) => {
  const uid = user.uid
  remoteUsers[uid] = user         // add the user to the remote users
}

// Remote user leaves the channel
const handleRemotUserLeft = async (user, reason) => {
  const uid = user.uid
  delete remoteUsers[uid]
  console.log(`User ${uid} left the channel with reason:${reason}`)
}
Moving down the list, we see the user-published event. This is triggered when a remote user sends their audio/video streams into a channel. This event will get triggered when a client joins a channel with existing users who are sending out audio and video streams. Conversely, when a user stops sending an audio or video stream the user-unpublished event is triggered.
When a new remote video or audio track is detected, we’ll want to subscribe to that track using the Agora client. Regardless of mediaType (audio/video), we’ll want to play the remote track, so for audio tracks, we’ll play them directly, but if the remote track is a video, we’ll want to play it on a specific div. So, add a check to play the remote video on either the full-screen div or create a new div in the remote-video-container using createRemoteUserDiv(). Then we can call .play() on the user.videoTrack we pass in the div ID, and the Agora SDK appends the video element with the video stream and plays it.
When a user unpublishes their stream, Agora will stop playback of the audio and video tracks and will remove the video elements from the DOM, but in the case of video streams, we’ll want to update the UI to either remove the user’s div from the remote-video-container using removeRemoteUserDiv or if the full-screen user is unpublished, display a different user in the full-screen div.
// Remote user publishes a track (audio or video)
const handleRemotUserPublished = async (user, mediaType) => {
  const uid = user.uid
  await client.subscribe(user, mediaType)
  // update remote user reference
  remoteUsers[uid] = user
  if (mediaType === 'audio') {
    user.audioTrack.play()
  } else if (mediaType === 'video') {
    // Check if the full screen view is empty
    if (mainIsEmpty()) {
      mainStreamUid = uid
      // play video on main user div
      user.videoTrack.play('full-screen-video')
    } else {
      // create remote user div
      await createRemoteUserDiv(uid)
      // play video on remote user div
      user.videoTrack.play(`remote-user-${uid}-video`)
    }
  }
}

// Remote user unpublishes a track (audio or video)
const handleRemotUserUnpublished = async (user, mediaType) => {
  const uid = user.uid
  console.log(`User ${uid} unpublished their ${mediaType}`)
  if (mediaType === 'video') {
    // Check if its the full screen user
    if (uid === mainStreamUid) {
      console.log(`User ${uid} is the main uid`)
      const newMainUid = getNewUidForMainUser()
      await setNewMainVideo(newMainUid)
    } else {
      await removeRemoteUserDiv(uid)
    }
  }
}
Now that we have our core Agora events set up, the next set of listeners we add is for the buttons in the local-media-controls.
const addLocalMediaControlListeners = () => {
  const micToggleBtn = getById('mic-toggle')
  const videoToggleBtn = getById('video-toggle')
  const screenShareBtn = getById('screen-share')
  const leaveChannelBtn = getById('leave-channel')

  micToggleBtn.addEventListener('click', handleMicToggle)
  videoToggleBtn.addEventListener('click', handleVideoToggle)
  screenShareBtn.addEventListener('click', handleScreenShare)
  leaveChannelBtn.addEventListener('click', handleLeaveChannel)
}
The mic and video toggle buttons are handled very similarly by the Agora SDK so we can use a couple of simple wrapper functions (handleMicToggle() and handleVideoToggle()) to check and update the active state and then call a single muteTrack() function to handle muting the tracks and updating the button styles to make them appear muted/active.
const handleMicToggle = async (event) => {
  // Get current audio state
  const isTrackActive = localTrackActive.audio
  // Mute/Unmute
  await muteTrack(localTracks.camera.audio, isTrackActive, event.target)
  // Invert the audio state
  localTrackActive.audio = !isTrackActive
}

const handleVideoToggle = async (event) => {
  // Get current video state
  const isTrackActive = localTrackActive.video
  // Mute/Unmute
  await muteTrack(localTracks.camera.video, isTrackActive, event.target)
  localTrackActive.video = !isTrackActive
  // Invert the video state
}

// Single function to mute audio/video tracks, using their common API
const muteTrack = async (track, mute, btn) => {
  // Make sure the track exists
  if (!track) return
  // Mute the Track (Audio or Video)
  await track.setMuted(mute)
  // Add/Remove active class
  btn.classList.toggle('media-active')
  // Add/Remove muted class
  btn.classList.toggle('muted')
}
The next button in the local-media-controls is the screenShareBtn, which calls handleScreenShare to either start or stop the screen-share. Agora makes screen sharing fairly simple, create a screenTrack using AgoraRTC.createScreenVideoTrack() and then publish it into the channel like the camera audio/video streams. In browsers that support Audio Sharing (usually as part of sharing a specific tab), the Agora SDK will return both the audio and video tracks. If there’s only a video track, the Agora SDK will return only the video.
When we publish a screen-share, we need to unpublish the camera stream, since the Agora SDK only supports 1 video stream per client. There’s a way to have both video and screen published using two Agora clients but that’s beyond the scope of this guide. In this guide, we’ll unpublish the local video from the camera and publish the screen-share track(s) in its place. When we unpublish the local video track, we’ll mute the video locally and disable the button to let the user know that their video is muted. We’ll also show the screen-share in the full-screen div, to let the user know their screen is being shared.
When the screen-share stops, we’ll unpublish and close out the screen-share audio/video track(s), then unmute and republish the local camera tracks. Since the screen share was displayed in the full-screen div, we’ll also want to play a remote user in the full-screen div.
const handleScreenShare = () => {
  if (localTrackActive.screen) {
    stopScreenShare()
  } else {
    startScreenShare()
  }
}

const startScreenShare = async () => {
  // create the screen video and audio (if available)
  const screenTrack = await AgoraRTC.createScreenVideoTrack({ encoderConfig: screenShareVideoPreset }, "auto")
  // check if there's an audio track available or just video
  if (screenTrack instanceof Array) {
    localTracks.screen.video = screenTrack[0];
    localTracks.screen.audio = screenTrack[1];
  } else {
    localTracks.screen.video = screenTrack;
  }

  // move the main user from the full-screen div
  await createRemoteUserDiv(mainStreamUid)
  remoteUsers[mainStreamUid].videoTrack.play(`remote-user-${mainStreamUid}-video`)

  // publish the tracks
  let tracks = [localTracks.screen.video]
  if (localTracks.screen.audio) {
    tracks = [localTracks.screen.video, localTracks.screen.audio]
  }

  // unpublish the camera track and mute it
  await client.unpublish(localTracks.camera.video)
  const videoToggleBtn = getById('video-toggle')
  videoToggleBtn.disabled = true
  await muteTrack(localTracks.camera.video, true, videoToggleBtn)
  localTrackActive.video = false

  // publish the new screen tracks
  await client.publish(tracks);

  // set screen-share flag and play on full-screen
  localTrackActive.screen = true
  localTracks.screen.video.play('full-screen-video');

  // Listen for screen share ended event (from browser ui button)
  localTracks.screen.video.on("track-ended", () => {
    stopScreenShare()
  })
}

const stopScreenShare = async () => {
  let tracks = [localTracks.screen.video]
  if (localTracks.screen.audio) {
    tracks = [localTracks.screen.video, localTracks.screen.audio]
  }
  await client.unpublish(tracks)
  // close the tracks
  localTracks.screen.video && localTracks.screen.video.close();
  localTracks.screen.audio && localTracks.screen.audio.close();
  // publish the local video
  const videoToggleBtn = getById('video-toggle')
  await muteTrack(localTracks.camera.video, false, videoToggleBtn)
  localTrackActive.video = true
  await client.publish(localTracks.camera.video);
  videoToggleBtn.disabled = false
  localTrackActive.screen = false
  // ui clean-up
  getById('full-screen-video').replaceChildren()
  setNewMainVideo(mainStreamUid)
}
The last button in the group is the leaveChannelBtn. The Agora SDK makes it pretty simple with client.leave() but in good practice, we want to stop the local camera and mic tracks. We’ll check if the screen-share is active and stop/unpublish those tracks as well.
Once the local user has successfully left the channel, we’ll want to reset the remote-users object and all the flags for tracking the active state of the local mic/camera/screen share. We’ll also want to make sure the media controls are back to their starting state before we hide them and show the Join form overlay.
const handleLeaveChannel = async () => {
  // loop through and stop the local tracks
  for (let trackName in localTracks.camera) {
    const track = localTracks.camera[trackName]
    if (track) {
      track.stop()
      track.close()
      localTracks.camera[trackName] = undefined
    }
  }
  // stop the screenshare
  if (localTrackActive.screen) {
    let tracks = [localTracks.screen.video]
    if (localTracks.screen.audio) {
      tracks = [localTracks.screen.video, localTracks.screen.audio]
    }
    await client.unpublish(tracks)
  }
  // Leave the channel
  await client.leave()
  console.log("client left channel successfully")
  // Reset remote users
  remoteUsers = {}
  // reset the active flagss
  for (const flag in localTrackActive){
    localTrackActive[flag] = false
  }
  // Reset the UI
  const mediaButtons = [getById('mic-toggle'), getById('video-toggle')]
  mediaButtons.forEach(btn => {
    btn.classList.add('media-active')     // Add media-active class
    btn.classList.remove('muted')         // Remove mute class
  });
  getById('remote-video-container').replaceChildren()     // Clear the remote user divs
  getById('full-screen-video').replaceChildren()          // Clear the main div
  getById('local-media-controls').style.display = 'none'  // show media controls (mic, video. screen-share, etc)
  showOverlayForm(true)                                   // Show the Join Form overlay
}
Join the Channel
Now that we’ve added the Agora Events and the button listeners we are ready to show our overlay form and join the channel when the user inputs a channel name. The handleJoin() does a few things: first, it prevents the form submission from reloading the page, then it gets the value of the form-channel-name input, trims the excess spaces, and checks to ensure the user has entered a value. When the user inputs a channel name, we hide the overlay form, initialize the local mic and camera devices, and then join the Agora Channel using client.join(). Once we’ve joined the channel we can publish our local mic and camera tracks into the channel and display the local-media-controls buttons.
// User Form Submit Event
const handleJoin = async (event) => {
  // stop the page from reloading
  event.preventDefault()
  // Get the channel name from the form input and remove any extra spaces
  const channelName = getById('form-channel-name').value.trim()
  // Check if the channel name is empty
  if (!channelName || channelName === '') {
    // TODO: Add error message
    return
  }
  showOverlayForm(false)                                    // Hide overlay form
  await initDevices()                                       // Initialize the devices and create Tracks

  // Join the channel and publish out streams
  const token = null                                        // Token security is not enabled
  const uid = null                                          // Pass null to have Agora set UID dynamically
  await client.join(appid, channelName, token, uid)
  await client.publish([localTracks.camera.audio, localTracks.camera.video])
  // track audio state locally
  localTrackActive.audio = true
  localTrackActive.video = true
  getById('local-media-controls').style.display = 'block'   // show media controls (mic, video. screen-share, etc)
}

async function initDevices() {
  if (!localTracks.camera.audio || !localTracks.camera.video) {
    [ localTracks.camera.audio, localTracks.camera.video ] = await AgoraRTC.createMicrophoneAndCameraTracks({ audioConfig: audioConfigPreset, videoConfig: cameraVideoPreset })
  }
  localTracks.camera.video.play('local-video')    // Play the local video track in the local-video div
}
Putting It All Together
Now that we’ve walked through all the sections of the code, you can see it all together in the agora-live-video.js.
Testing
Vite makes testing locally easy. Open the project folder in the terminal and run the NPM command to start Vite’s built-in web server:
npm run dev
Once the server is running we can open multiple browser tabs and join the same channel to simulate multiple users in the channel and test the code.
If you want to test with multiple devices you’ll need a way to run the project with a secure https connection. You have two options: set up a custom SSL certificate for your local device; or use a service like ngrok, which creates a tunnel out from your local machine and provides a https URL. In my experience, this is one of the simplest ways to run a publicly accessible https secured webserver on your local machine.
Fin
And just like that we are done!
If you would like to see the demo in action, check out the demo of the code in action on GitHub Pages
The full source code for this project is available on GitHub.
Next Steps
This guide demonstrates the basic elements of implementing live video communication in a web application. It’s time to take your application to the next level and tailor the Agora implementation to fit your specific use case. Here are a few next steps to get you going:
- Customize the UI to match the branding /design of your web app. Modify styles, layout, and components to create a seamless and integrated user experience.
- Explore Agora’s advanced features such as interactive live streaming, and real-time messaging. Implement features that align with your application’s requirements and user expectations.
- Make your live video communication secure by implementing authentication mechanisms, end-to-end encryption, and other security measures. Agora provides guidelines on securing your application; refer to the documentation for details.
- Explore Agora’s scalability features. If your application anticipates a large number of users, understand how to scale your application to accommodate a growing user base while maintaining performance and reliability.
Other Resources
- Dive into the Agora Documentation to gain a deeper understanding of the features and capabilities offered by Agora SDK. Explore the API reference, sample codes, and best practices.
- Be part of the Agora developer community: Join the conversation on X(Twitter), or LinkedIn to share experiences, and stay updated on the latest developments. Need support? Reach out via StackOverflow for advice on your implementation.
- Continue your developer journey with more guides from Agora’s Medium publication.


