Creating a React Native Video Chat App in a Few Lines of Code Using Agora UIKit
Update 20-March-22: The blog has been updated to work with v4.0.0 of the Agora React Native UIKit.
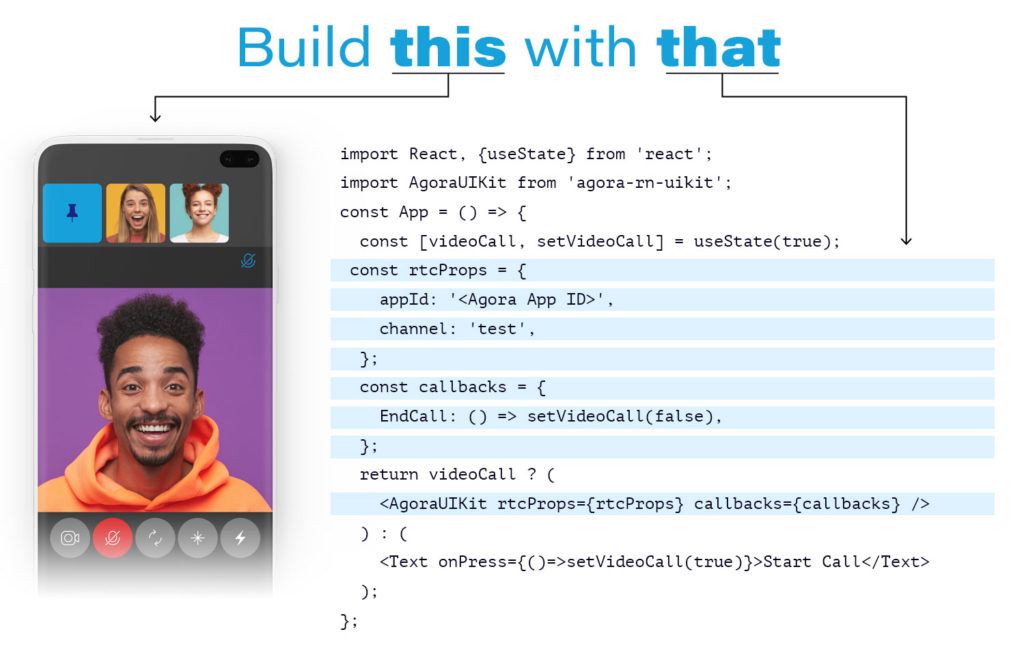
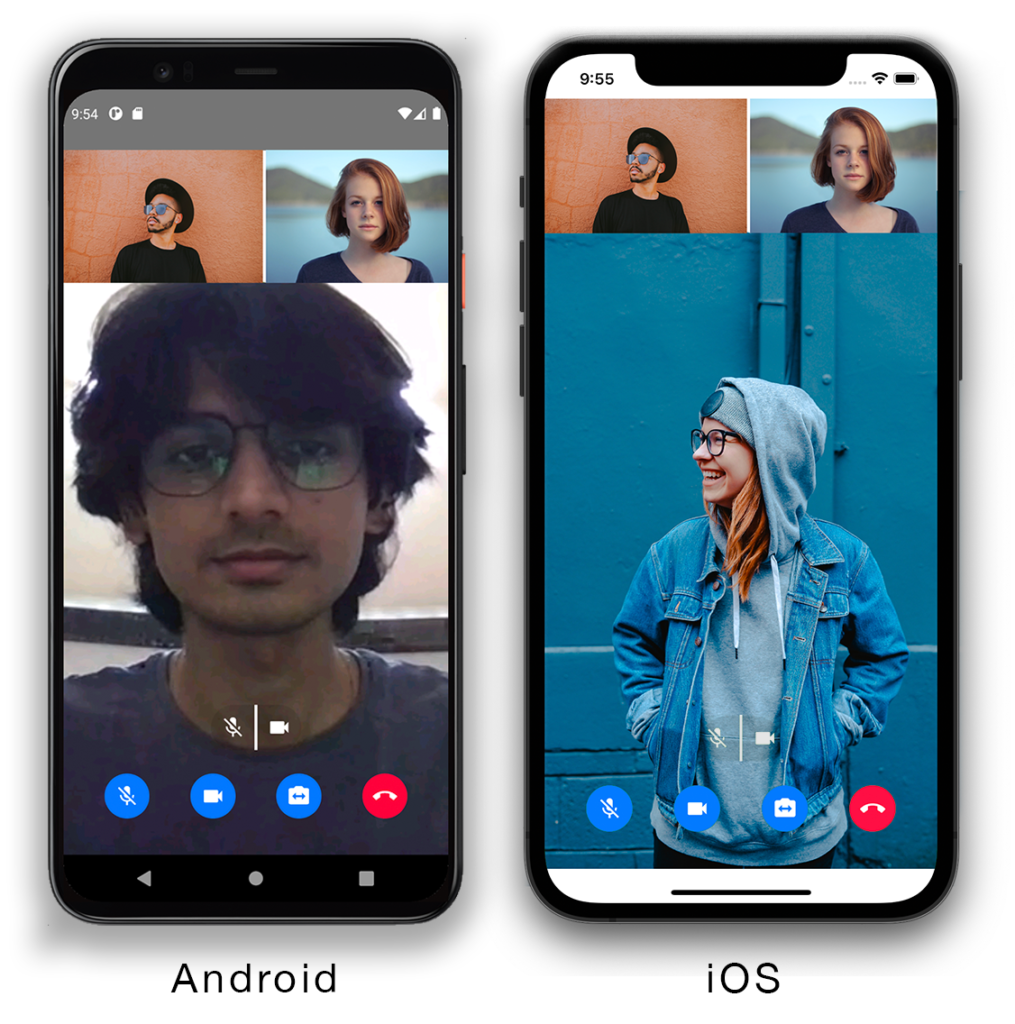
When you’re setting up your video streaming or conferencing application with Agora, a few technical steps might slow you down. Now with Agora UIKit for React Native, you can easily create a cross-platform application for Android and iOS with just 10 lines of code.
What could be better? You can customise the entire user experience without writing much code!
Prerequisites
- An Agora developer account
- Node.js LTS release
- An iOS or Android device for testing
- A high level understanding of React Native development
Setup
You can get the code for the example on GitHub, or you can create your own React Native project. Open a terminal and execute:
npx react-native init demo --template react-native-template-typescript
cd demo
Install the Agora React Native SDKs and UIKit:
npm i react-native-agora agora-rn-uikit agora-react-native-rtmAt the time of writing this post, the current agora-rn-uikit release is v4.0.0 and the current react-native-agorarelease is v3.7.0.
If you’re using an iOS device, you’ll need to run cd ios && pod install and configure app signing by opening ios/.xcworkspace in Xcode.
That’s the setup. You can now run npm run android or npm run ios to start the server and see the barebones React Native app.
Adding Video Streaming
This UIKit is simple to use and contains a high-level component called AgoraUIKit. The component handles the logic and UI for our real-time video experience. We can pass in props to the component to customise the behaviour and functionality. Let’s clear the App.tsx file and start writing the code to build a video chatting app.
We’re importing the AgoraUIKit component from the agora-rn-uikit package. Inside the App component we have a state variable videoCall. We’ll render the UIKit component when it’s set to true and unmount it when it’s false. We define the Agora App ID and channel name in the connectionData object. The rtcCallbacks object contains RTC events as keys and callback functions as their value — we use the EndCall event to update the state and unmount the AgoraUIKit component. In the return statement, we render the AgoraUIKit component with the connectionData and rtcCallbacks object. (Unmounting the AgoraUIKit component performs the required cleanup automatically.)
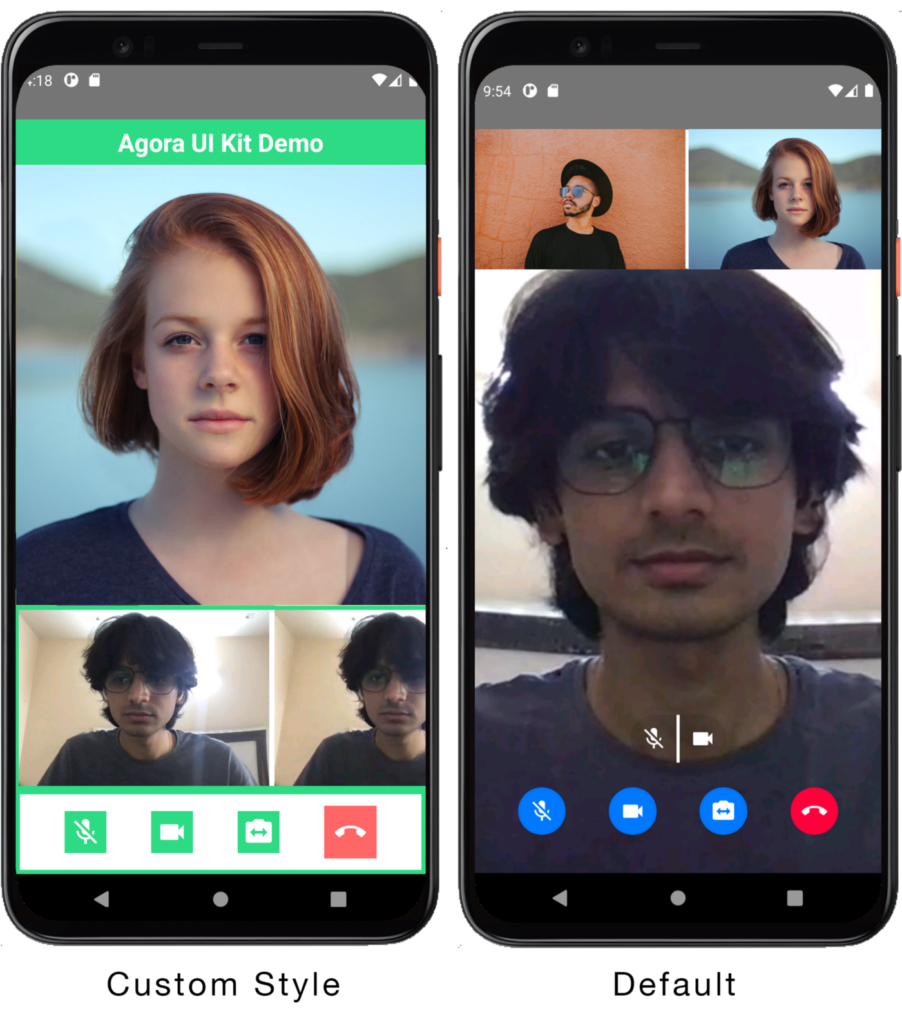
The UIKit component also accepts a third prop, called styleProps, which can be used to customise the look of the application by writing React Native styling.
Default Functionality
By default, Agora UIKit library includes the following functionality before any customisation:
- Automatically laying out all video streams
- Displaying the active speaker in the larger display in the floating layout
- Allowing you to swap any stream to the larger display in the floating layout
- Buttons for disabling the camera or the microphone and switching cameras for the local user
- Buttons for muting the remote users’ audio and video locally in floating layout
- Lots of visual customisation by writing only React Native styling
- Live streaming mode with your role as a broadcast or as an audience
- Two layouts : floating and grid, with an option to build your own layout.
Customising Functionality with RtcProps
The settings object lets you customise how the UIKit works. You can select features and layouts. And there’s a growing list of things to customise using settings. The object type definition can be found here.
Conferencing or Live Streaming
You can use the UIKit in two modes: In communication mode, you can have a maximum of 17 users on a call, and everyone can communicate with everyone else.
In live-streaming mode, you can select user roles. The broadcaster’s video and audio are shared with everyone (maximum of 17 broadcasters). The audience role (up to 1 million) lets users receive video and audio but doesn’t let them send their video and audio to other users.
Communication mode is the default. To use live streaming mode, you can set the mode: mode.LiveBroadcasting in settings. You can then select the role: role.Audience or role: role.Broadcaster (mode and role are enums exported by the library).
Floating or Grid Layout
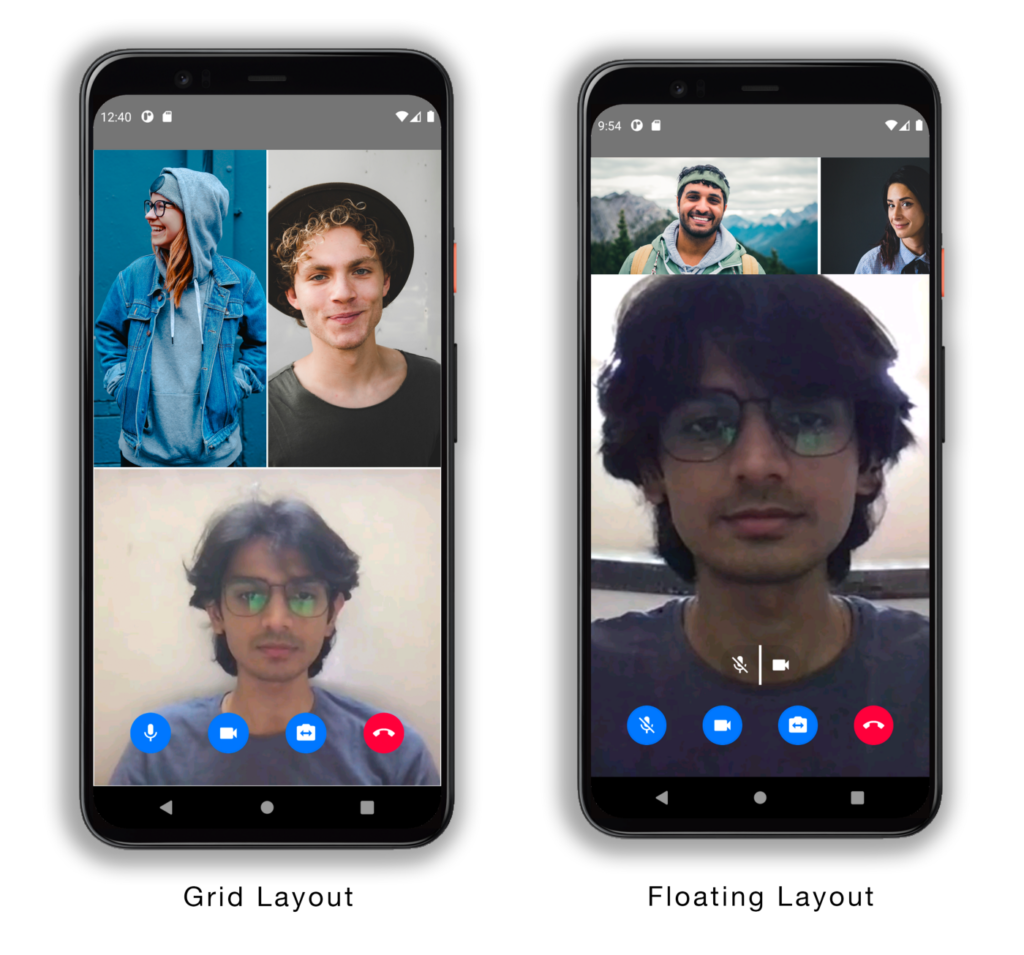
You can select between two layouts: You can have a pinned layout with one user occupying the central screen and other users on a scrolling list at the top (you can customise the position). Or you can have a grid layout where each user takes a cell of a growing grid. The pinned layout supports active speaker detection as well as manual swapping of users.
Display Usernames
You can set a username in the connectionData prop that can then be displayed if you set the displayUsername to true in the settings.
Active Speaker Detection
You can enable this prop to switch the main view to the active speaker in the application. You can also use the callback event ActiveSpeaker to pass in a custom function — to display a toast, for example.
Video Quality Fallback
You can enable dual-stream mode, which temporarily falls back to low-quality video if the user’s internet connection or bandwidth cannot keep up with the source videos. You can even set the fallback option to audio-only for extreme low-bandwidth conditions.
Token Management
If you’re using the UIKit in production, we strongly recommend using tokens to secure your app. We’ve made managing tokens easy. There are two ways to use them: You can supply a token manually to the UIKit with the token property. If you already have a token server set up, you can pass in the token using this property.
Or you can use the tokenUrl property. This can be used to automatically fetch a new access token for the channel and renew it if it expires soon. The functionality for requesting a new token expects the token to follow the URL scheme in the Golang token server found on GitHub: AgoraIO-Community/agora-token-service. If you haven’t set up a token server yet, you can use the Docker image in the repo to deploy it with ease.
Customising the UI with StyleProps
The StyleProps object lets you style various components that make up the AgoraUIKit component. If you want to tweak the layout and move the scrolling list of users to the bottom of the screen, or if you want square buttons instead of round ones, you can pass in React Native styling to achieve that.
You can customise the buttons, layout, colors, and so on. You can find the code for this customisation here.
The UI Kit View
You can set the styling for the UIKit View by passing in React Native styles to the UIKitContainer property. For example, if we want the video call to take up half of the screen:
<View style={{height:'50%'}}></View>
<AgoraUIKit connectionData={connectionData} rtcCallbacks={rtcCallbacks}
styleProps={{ UIKitContainer: {height: '50%', width: '100%'}}}
/>
Similarly, you can customise the controls and their container, the main view, the floating view, overlay and container, the grid container, and cells. You can change the borders, positioning, colors, and so on. You can find a full list here.
Video Settings
videoMode prop lets you choose the AgoraVideoRenderMode for all the videos rendered on your local device, with a choice between fill, fit, and hidden. See the full documentation on AgoraVideoRenderMode here.
Icon Color, Size, and Image
You can change the size and color of the icons using iconSize and theme properties. You can also use your own transparent PNG to replace the default icon by using the customIcon prop and supplying the base64 encoded image. Example: Changing the end call icon — customIcon: {callEnd: ‘<Base64String>’}
If you need finer control or want to build a custom layout for your application that the AgoraUIKit component doesn’t support yet, you can extract and use individual components that make up the UIKit and recompose them together to build your own custom solution without worrying about managing the SDK.
Advanced Customisation: Recomposing the UIKit
The UIKit isn’t limited to using the AgoraUIKit component. It’s a high-level component made up of several other components that makes it easy to get started. You can import and use the individual pieces to compose your app.
RtcConfigure
The RtcConfigure component contains all the logic for the video call. It handles all the SDK events and maintains the users’ data. You can wrap the other UIKit components inside the RtcConfigure component to get access to user objects. (Internally, it wraps the MaxUidProvider and MinUidProvider around the child components.)
LocalControls and RemoteControls
The UIKit exports a LocalControls component that wraps LocalAudioMute, LocalVideoMute, SwitchCamera, and EndCall button components. It also shows the remote mute for the max video view component with an optional showButton prop. And you can use the individual button components in your app.
The library has a RemoteControls component that shows the RemoteAudioMute, RemoteVideoMute, and RemoteSwap (swaps the user with the maxUser) buttons. It takes in the user object and an optional showRemoteSwap prop that disables the RemoteSwap button.
Note: The remote controls mute the remote user’s audio and video only locally. The change isn’t reflected for anyone else on the call.
MaxVideoView and MinVideoView
To render the video of a user, we have two components: MaxVideoView and MinVideoView. Both require a user object as a prop. The difference is that MinVideoView takes another optional prop (showOverlay) to display remote controls as an overlay when the view is pressed.
PropsContext
PropsContext uses the React Context API which gives you access to the provider and consumer components. These together let you access the props we pass to this component elsewhere in the component tree. The library uses this to pass rtcProps, styleProps, and callbacks around the component tree.
MaxUidContext and MinUidContext
The MaxUidContext gives you access to an array containing an object for the user in the MaxView (main view in the floating layout).
The MinUidContext gives you access to an array of objects for the users in the MinView (top floating view in the floating layout).
(Using the MaxUidContext with the MaxView is how the library works, you can use them interchangeably, the swap function swaps the user in the MinUidContext array with the MaxUidContext array object.)
Closer Look at the AgoraUIKit Component
Let’s take a look at how the AgoraUIKit component is composed to understand how to compose an app using the sub components for ourselves.
import React from 'react';
import React from 'react';
import {View} from 'react-native';
import RtcConfigure from './RTCConfigure';
import {PropsProvider, PropsInterface, layout} from './PropsContext';
import LocalControls from './Controls/LocalControls';
import GridVideo from './GridVideo';
import PinnedVideo from './PinnedVideo';
const AgoraUIKit: React.FC<PropsInterface> = (props) => {
return (
  <PropsProvider value={props}>
  <View style={props.styleProps?.UIKitContainer}>
  <RtcConfigure>
  {props.rtcProps?.layout === layout.grid ? (
    <GridVideo />
    ) : (
    <PinnedVideo />
    )}
  <LocalControls showButton={props.rtcProps.layout !== layout.grid} />
  </RtcConfigure>
  </View>
  </PropsProvider>
 );
};
export default AgoraUIKit;
We import all the required components from the library. The AgoraUIKit component takes in props of type PropsInterface (rtcProps, styleProps, and callbacks) and passes them into the PropsProvider that wraps the component tree.
We have a view that applies the UIKitContainer styling. We wrap all the UI components (video views, controls, and so on) with the RtcConfigure component so that we can access the contexts. We have our layouts (GridVideo and PinnedVideo) and our controls.
Let’s take a look at how to use user contexts and render the videos:
<MinUidConsumer>
  {(minUsers) =>
    minUsers.map((user) =>
      <MinVideoView user={user} key={user.uid} />
  )}
</MinUidConsumer>
We’re using the MinUidConsumer to get access to our user object and rendering a MinVideoView for each user. We pass in the user prop and use the uid as a key. You can view the pinnedVideo component to get a full example.
Conclusion
If there are features you think would be good to add to Agora UIKit for React Native that many users would benefit from, feel free to fork the repository and add a pull request. Or open an issue on the repository with the feature request. All contributions are appreciated!
The plan is to grow this library and have similar offerings across all supported platforms. There are already similar libraries for iOS and Android, so be sure to check those out!
Other Resources
For more information about building applications using Agora SDKs, take a look at the Agora Video Call Quickstart Guide and Agora API Reference. You can also take a look at the UIKit GitHub Repo, API Reference, and Wiki.
And I invite you to join the Agora Developer Slack community. Feel free to ask any questions about the UIKit in the #react-native-help-me channel.
Build a React Native video call app with only 3 lines of code