Monitoring Agora Broadcast Performance with a Call Stats UI
In this tutorial you’ll change the channel profile from Agora’s default state (Communication) to the Live Broadcasting state. Then you’ll use Unity’s Canvas UI to display attributes from each broadcaster in real time.
Finally, you’ll include a contingency for how the video feed will respond to difficult network conditions, which you’ll be able to monitor in real time using your call stats UI.
If you want to skip the introductory Agora concepts, scroll down to Adjusting the Partychat Demo to get coding.
To get started, you need an Agora account. If you don’t have one, here is a guide to setting up an account.
This project builds on the agora-party-chat demo. If you don’t have experience with that demo, you can download it and check it out to see basic Agora functionality and PUN2 networking in action. Agora also provides an example demo for implementing spatial audio, which is built on top of the agora-party-chat demo.
Use agora-party-chat as a starting template, and follow the instructions to modify it as necessary to implement these features. The complete version of the code can be found here.
Broadcasting Profile
Agora’s default profile is Communication, which supports a group video chat of up to 17 people. In this example, you’ll enable users to set their channel profile to CHANNEL_PROFILE.CHANNEL_PROFILE_LIVE_BROADCASTING, which requires each user to assume a broadcaster or an audience role. The video feed of broadcasters can be seen by all members in the channel, while audience members cannot be seen or heard. Supporting broadcast audiences of up to 1 million concurrent users, Agora is a very powerful tool for real-time engagement.
Example: You have a group of players in a party about to start another match or raid, and the party leader makes an announcement to the group. Their video feed appears in the UI of each player, and their in-game avatar displays a special effect to show they are the leader and are speaking.
Real-Time Call Stats
Agora includes callbacks in the SDK to receive data from the channel, allowing you to monitor the performance for each broadcaster in the channel. Data such as bitrate, codec type, and quality adaptations can be captured and displayed. In this example, I’ve built a simple UI that allows you to view all the data points in a window next to the broadcast video. You can keep the stats you want and remove the rest.
Stream Fallback
Example: Ideally in a game, the party leader can communicate to the group with voice and video for a richer experience. However, under poor network conditions, it’s critical that the party prioritizes hearing the leader’s message.
Agora allows you to customize how your app responds to bad network conditions, such as by prioritizing quality, frame rate, or audio when there isn’t enough bandwidth to properly support all three. In this example, I show you the setting to prioritize the highest quality video possible until video is no longer feasible and the channel defaults to audio-only.
Adjusting the Party Chat Demo
First, we’re going to make a few adjustments to how the Agora engine is accessed. Create an empty game object inside the VikingeScene named AgoraEngine. Create a script called AgoraEngine.cs and attach it to the new game object. Inside the script, initialize the Agora engine and create a static reference that can be accessed from the other scripts:
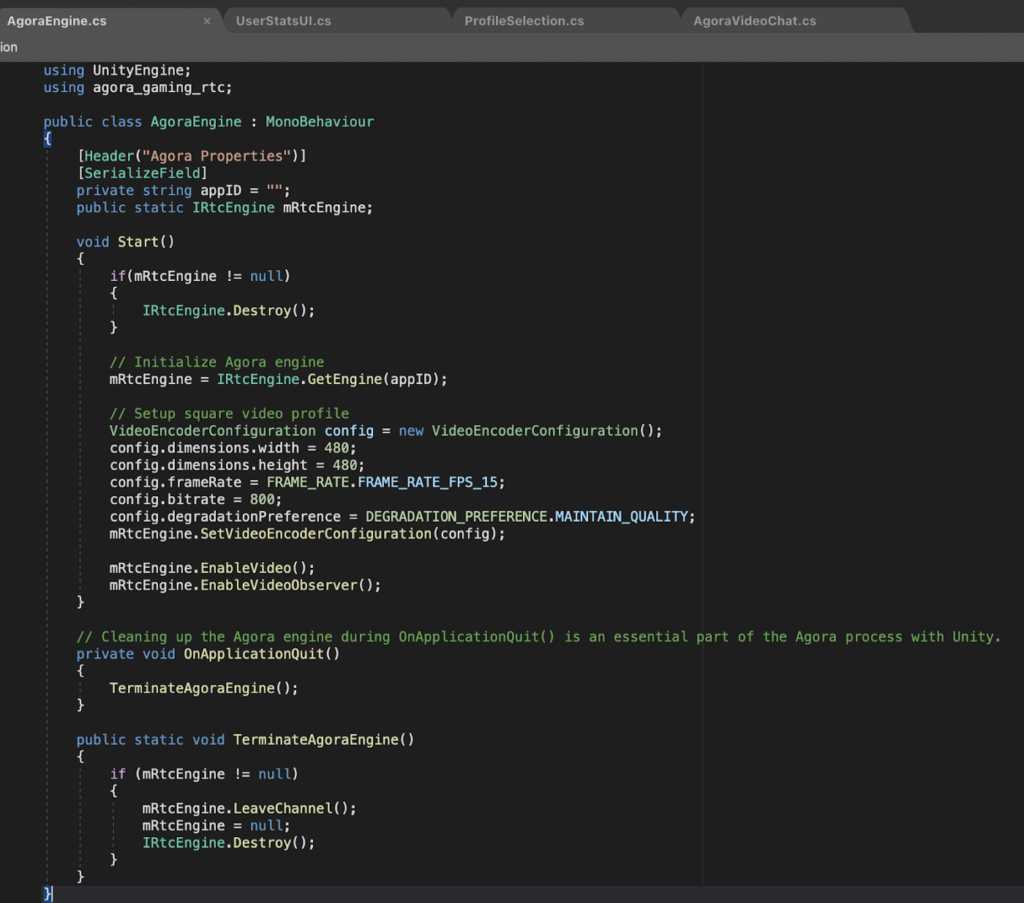
Important: Be sure to include your own App ID from your Agora profile. Otherwise, your project will not work correctly.
In this code you initialize the engine, set up the video to render as a square aspect ratio (matching the square UI images that the video is rendered to), and clean up the engine when the game quits.
Agora Video Chat
Inside the AgoraVideoChat.cs script, remove the Agora engine initialization from the Start() method, adjust the callbacks to reference the new AgoraEngine.cs script you created, and update the JoinRemoteChannel() mRtcEngine references as shown:
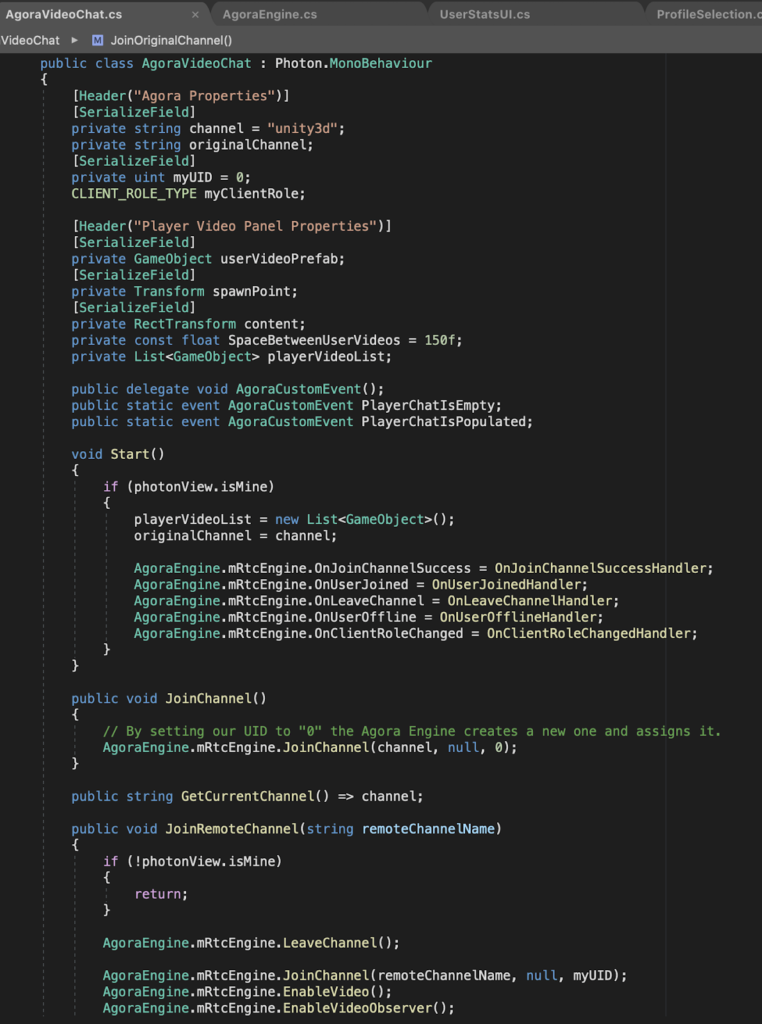
Include this method to destroy the Agora engine whenever you leave the networked game level, and remove theTerminateAgoraEngine() method:

Setting the Broadcasting Profile
Next, you’ll implement the Broadcasting Profile selection.
Create a script called ProfileSelection.cs and attach it to the CharPrefab player game object.
Next, create the UI for joining the channel as a broadcaster or audience member. Feel free to use your own style or create your own UI if you want to add complexity.
Create a panel with two nested buttons for each role:
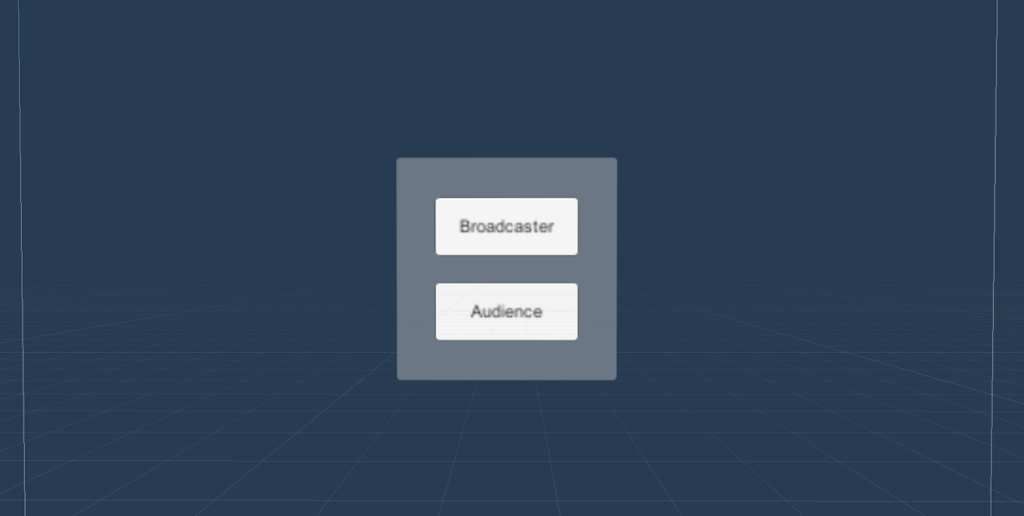
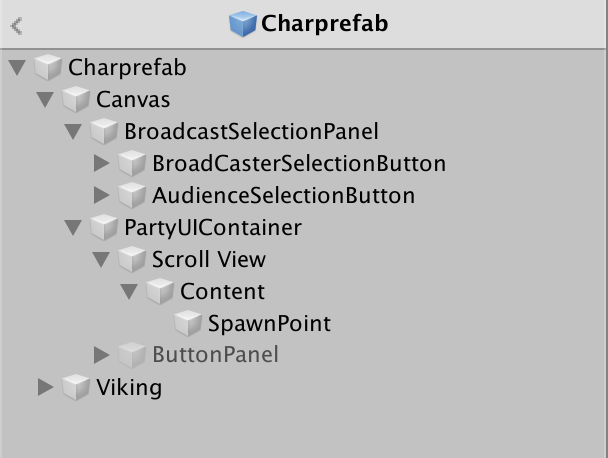
Inside my CharPrefab, the UI hierarchy looks like this:
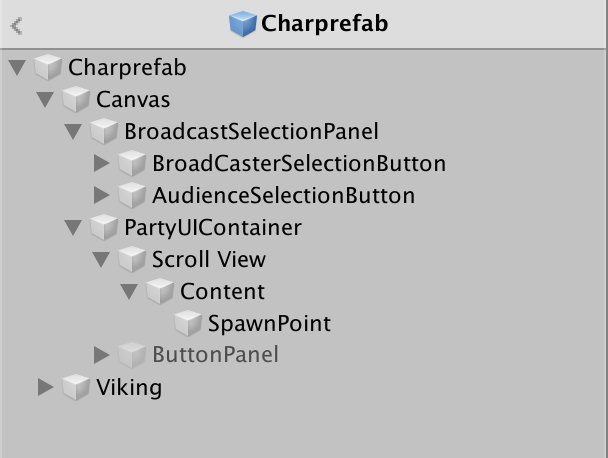
I’ve removed the Viewport UI object from the parent hierarchy of the starter project because it hides the UI panels you’re going to see in a moment.
Set the ButtonPanel to False because you don’t need that functionality for this demo. Last, set the alpha channel for the Scroll View UI object to transparent so it doesn’t clash with the UI stat panels you’ll create in a moment.
With the basic UI created, let’s get into the script. Add these variables. For the UI Elements portion, make sure to drag in the appropriate UI elements from the Scene into the corresponding slots in the Inspector:
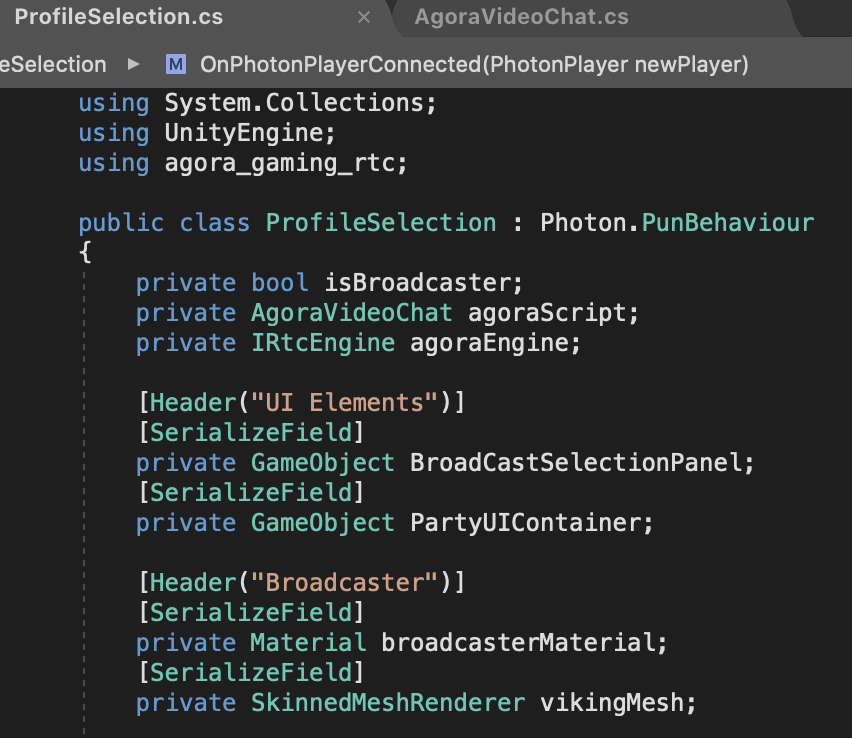
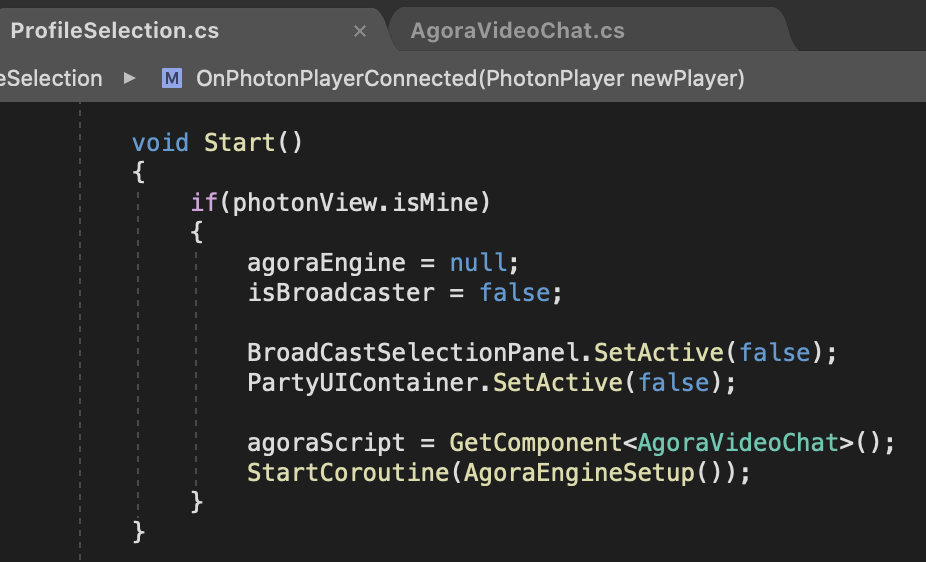
In the Start() method, you initialize the UI and broadcast stats, and start the coroutine to get the Agora engine.
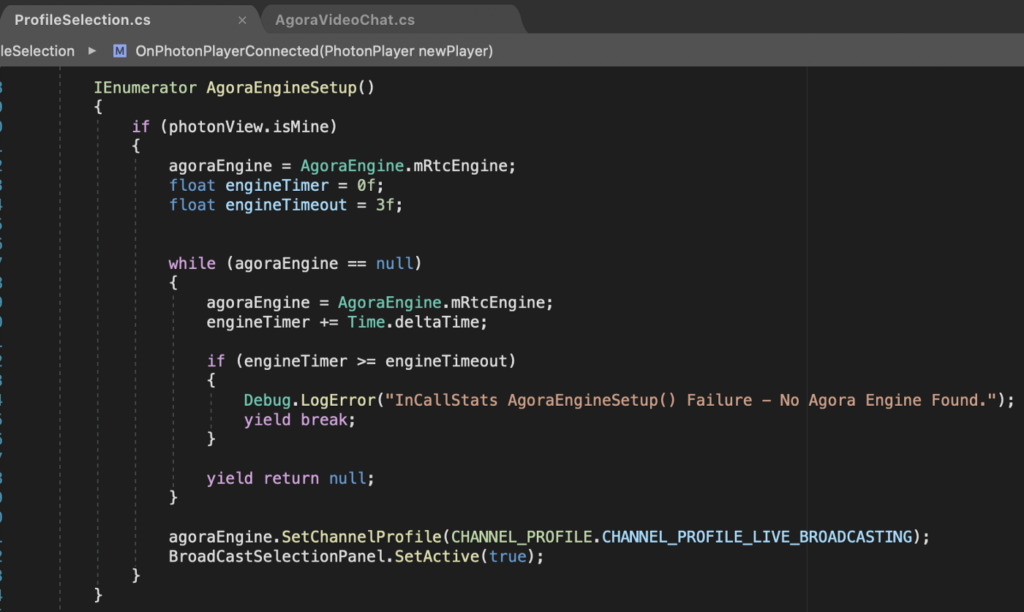
A coroutine is used to retrieve the Agora engine because of its asynchronous functionality. I set a timer for 3 seconds. If the engine is not found by then, the script won’t continue to execute and you’ll be notified with an error. If the engine is retrieved, set the channel profile of the user to Broadcast mode, initialize the broadcast callbacks, and display the two buttons you just created:
Create the function that is fired when you press either the Audience or the Broadcaster button:
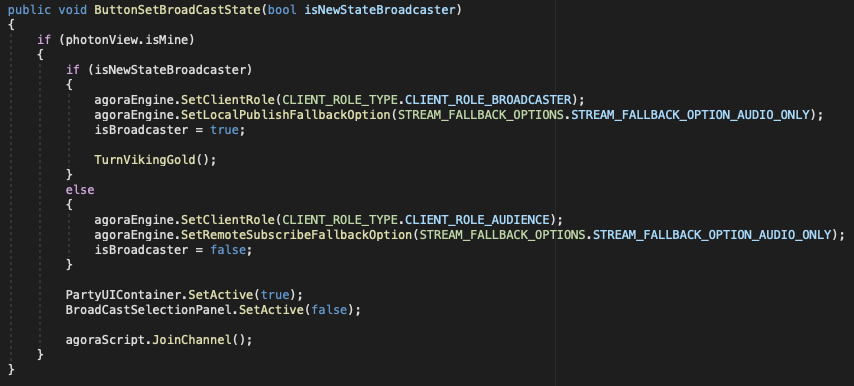
Important: Be sure to drag this function into your buttons. Otherwise, you will be confused why nothing is happening.
For the Broadcaster button, be sure to select the checkbox next to the function, setting the isNewStateBroadcaster parameter to true, and leave the Audience checkbox as false.
Open AgoraVideoChat.cs, remove the mRtcEngine.JoinChannel() call from Start(), and create a public function to join the channel, like this:

In the default Communication profile, users automatically join in. In this case, however, you want to join the channel after the client profile is set via the UI.
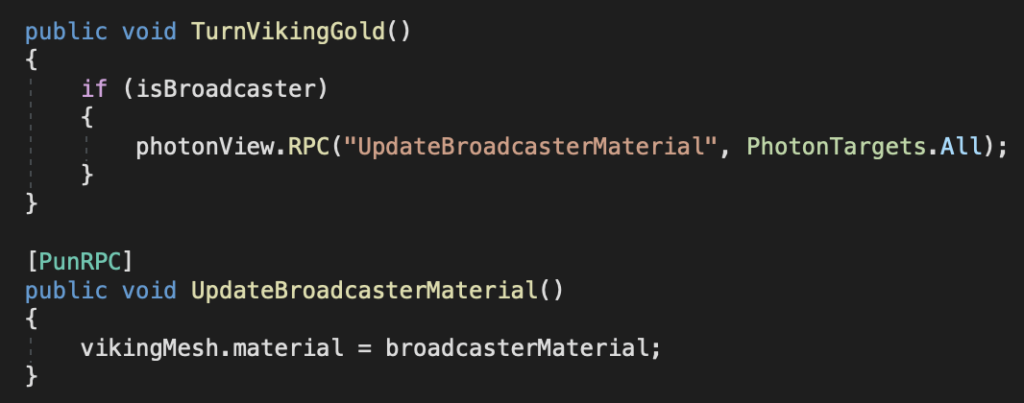
As a finishing touch, any user that joins as a broadcaster has their player model turn gold to indicate who in the game is a broadcaster and who is an audience member. Create a gold material in your project and drag it into broadCasterMaterial. Drag the BaseHuman (SkinnedMeshRenderer) into the vikingMesh variable you created earlier. You can find it in Charprefab > Viking > BaseHuman:

Call Stats
Next, you’ll implement the functionality for displaying the call stats in UI panels next to the broadcaster video frames.
Create a script named UserStatsUI.cs and attach it to the UserVideo prefab.
UI Panel
Create a UI > Panel object as a child of the UserVideo prefab, and give it these attributes:
To display the stream stats, I’ve created 14 separate UI Text objects nested inside the panel, like this:

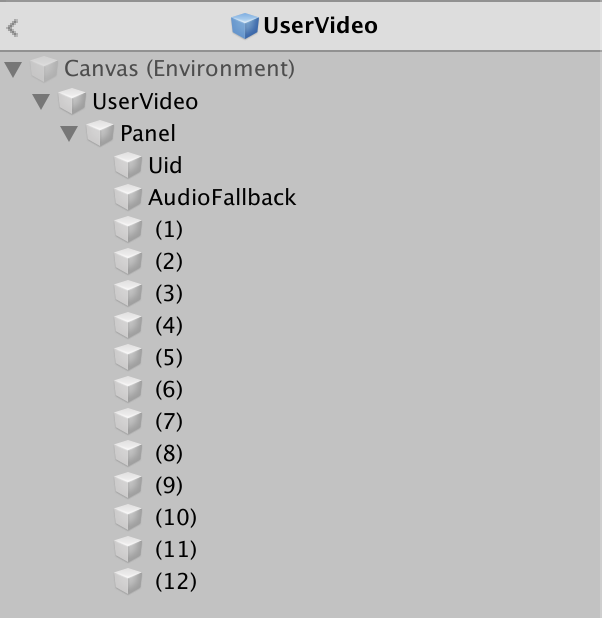
You can arrange yours as you like, but I’ve placed mine in this order:
UID Audio fallback
1 4 7
2 5 8
3 6 9
10 11
12
UI Scripting
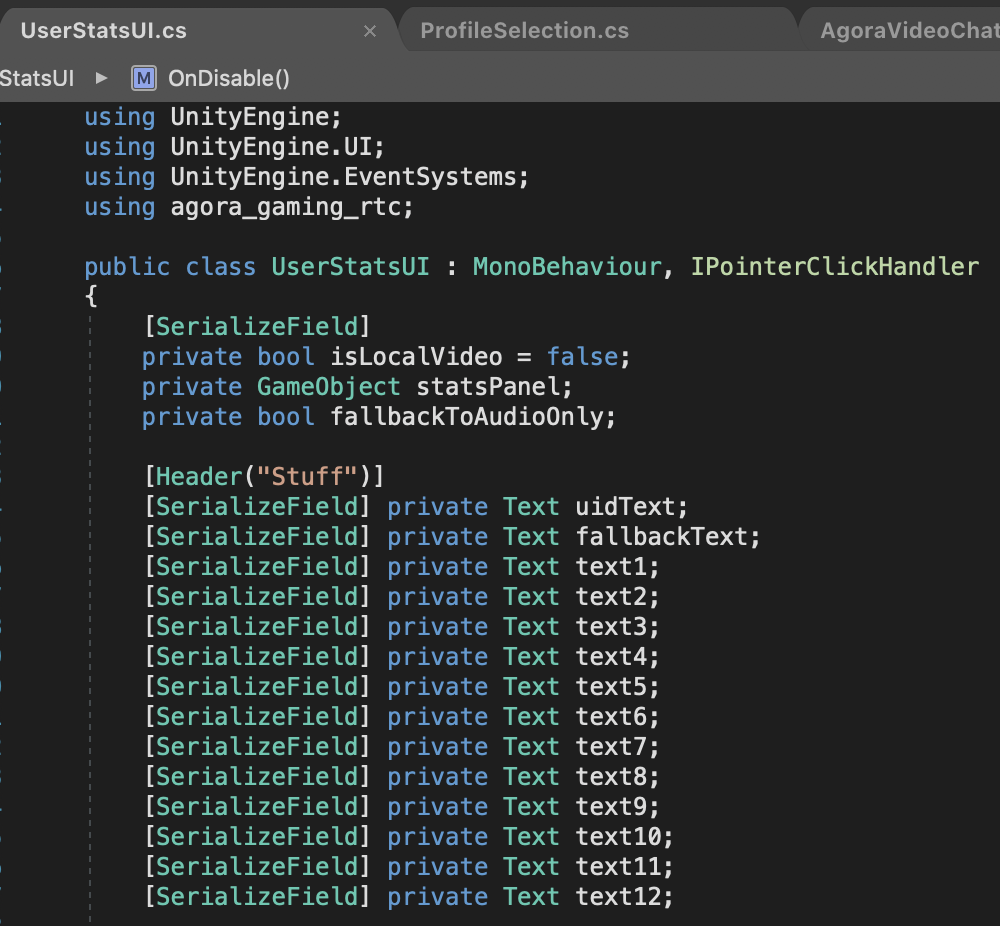
Create these variables, and drag your text objects into the slots in your editor Inspector:
Next, disable the stats panel in the Start() method, and set up the callbacks to grab the stats:
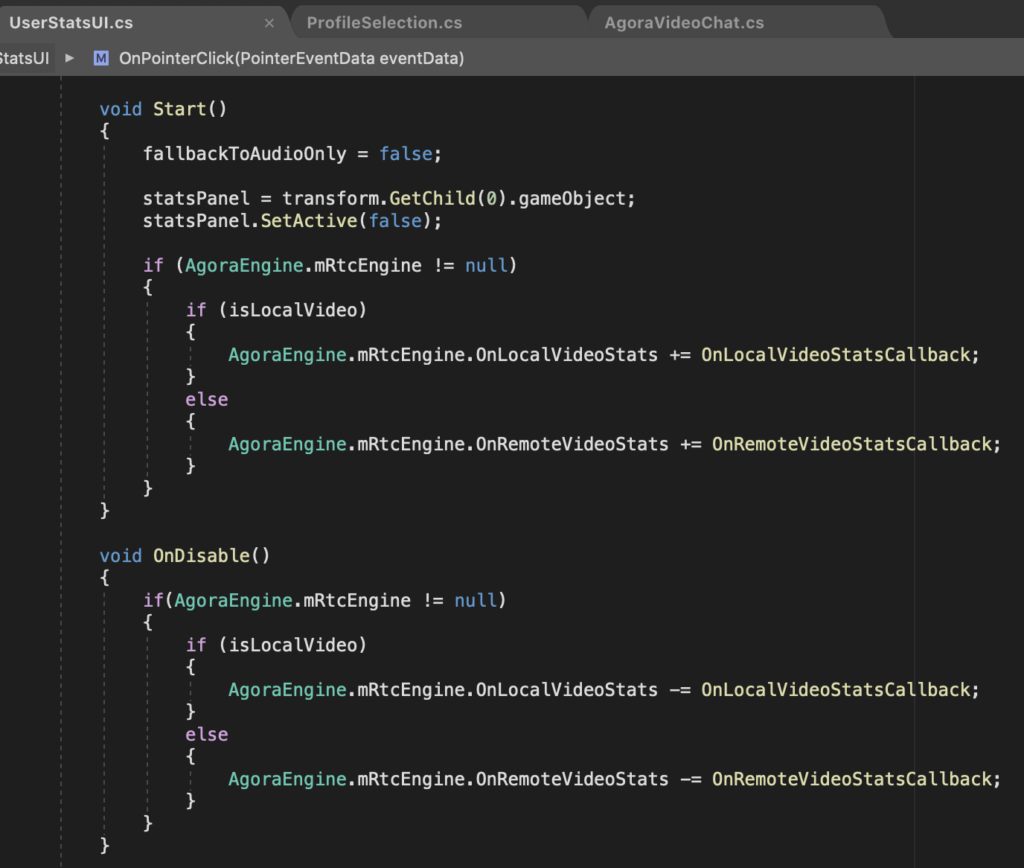
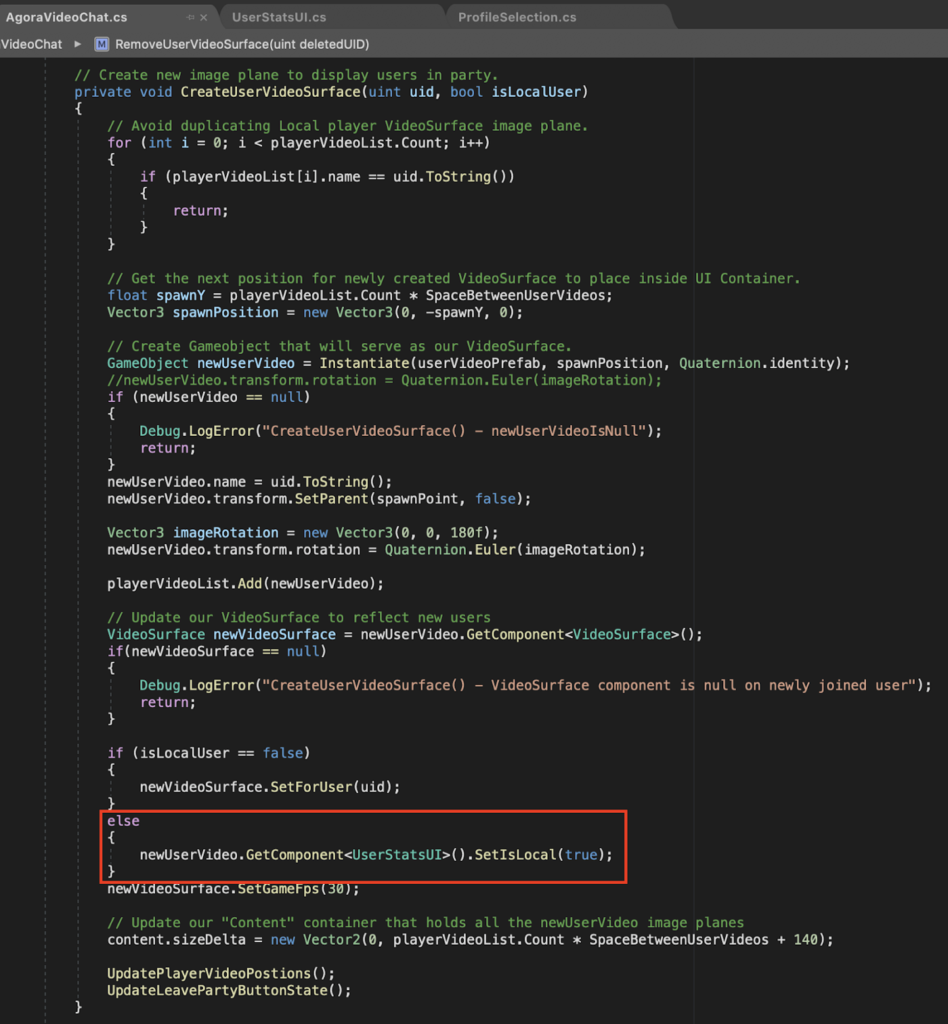
The isLocalVideo attribute is set when the UserVideo prefab is created after a broadcaster joins.
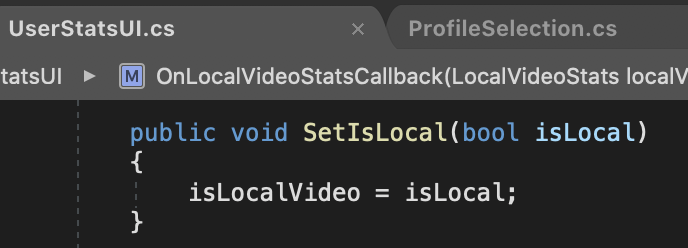
Create the method to set this, and access it inside AgoraVideoChat.cs:
Implement the click handler to toggle the stats panel on and off when a user clicks the square video frame of the broadcaster:
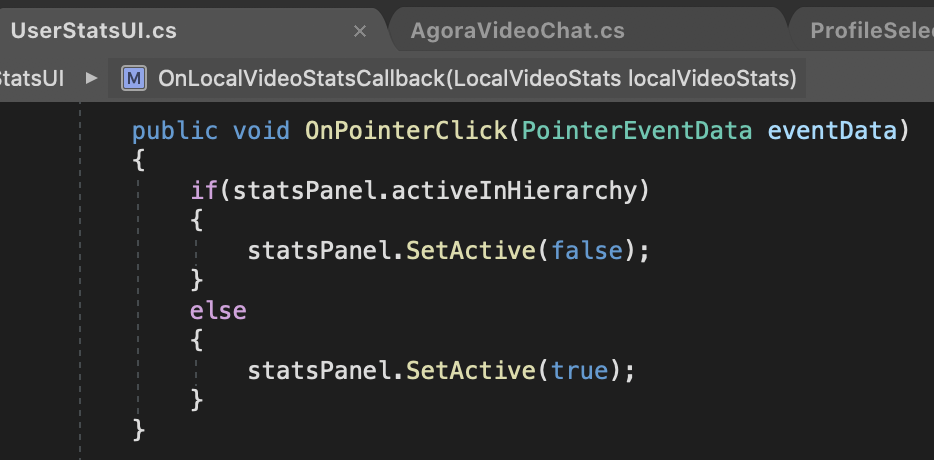
This function is derived from the IPointerClickHandler from using UnityEngine.EventSystems:

If you aren’t registering any click events, it could be that your UserVideo prefab object is flipped around.
Finally, implement Agora’s call stats into the panels:
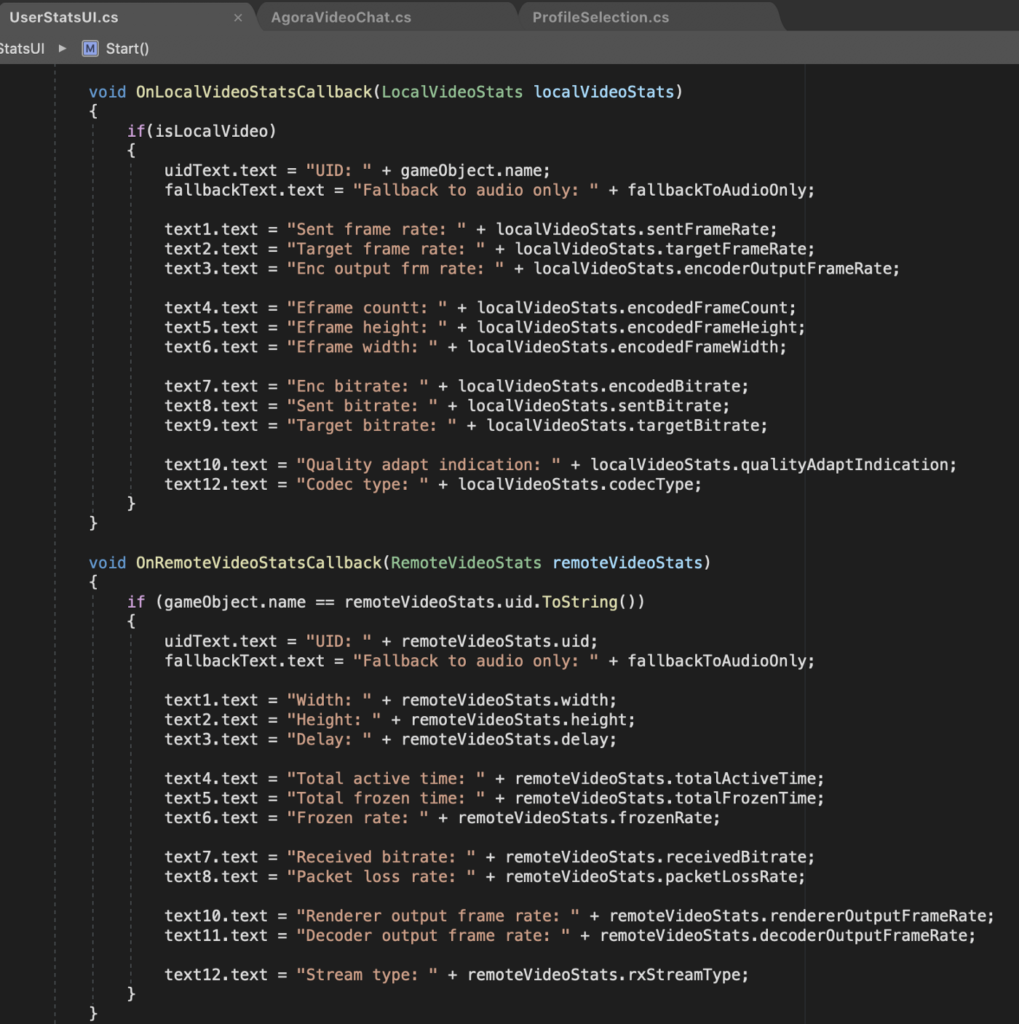
Important: Be sure to look through the Hierarchy view of your newly created scripts and drag in any objects and references that are necessary.
It’s now time to test!
The flow should behave as follows:
- Enter the Photon lobby.
- Create a room or join an existing room.
- The screen is blank except for the broadcaster or audience panel.
- Select Broadcaster or Audience.
- If Broadcaster is selected, your local video populates the left column of square UI videos.
- Click the broadcaster video to toggle stats.
- Join in on another client and click Broadcaster. Click each video feed to local and remote video stats.
That concludes this tutorial! If you learned something, be sure to teach someone else. Find the starting project here and the completed code for reference here.
If you would like to contribute to this project and the broader Agora community as a whole, feel free to submit a pull request on GitHub, and add your changes to the project!

