
What has real-time communication made possible? In this pandemic, real-time communication has been a driving force behind engagement, and it has enabled various industries to run easily from the comfort of home.
In this article, I will walk you through the steps on how to create your own audio streaming application. And you will see how something that is supposedly complex to build can be simplified by using the Agora Flutter SDK. In the next few minutes, we will be making a cross-platform application for streaming, creating a podcast, or streaming. The use cases are endless.
We will walk through how to create multiple rooms or channels that run in parallel such that an audience can join and listen to the streams or podcasts.
Requirements
- An Agora developer account (see How to get started)
- Flutter SDK
- VS Code or Android Studio
- A basic understanding of Flutter Development
Project Setup
- We begin by creating a new Flutter project. So to do that open your terminal and then navigate to your development folder and type out the following:
flutter create agora_audio_streaming- Navigate to your
pubspec.yamlfile and inside that file add the following dependencies:
pubspec.yaml
Be careful with the indentation when adding the packages because you might get an error if the indentation is off.
- In your project folder, run the following command to install all the dependencies:
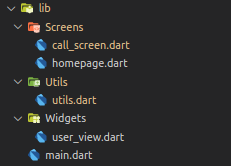
flutter pub get- Once we have all the dependencies, we can create the file structure. Navigate to the lib folder and create a file structure something like this:
Building an Audio Broadcasting Interface
To begin with, we navigate to main.dart. Here, replace the template code with the following code:
main.dart
This code just initializes your flutter application and calls MyHomePage() that we have defined in homepage.dart
Building our Home Page
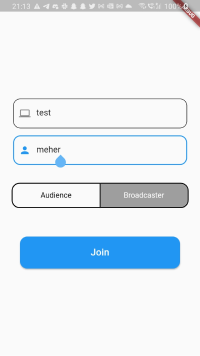
Continuing with our home page, we will keep it very basic with a text field for username and a text field for the channel name. Here, both username and channel name are unique fields that allow a group to join a common channel. We will also use a switch button to toggle the user role between broadcaster and audience. Here, a broadcaster is given access to communicate to the audience but the audience can only listen to the broadcaster.
Here is what the code for that looks like:
homepage.dart
This will give us a page that looks something like this:
Connecting to RTC
Before we begin with our call_screen.dart, let’s just use the App ID that we got from the Agora developer account (Follow the instructions given here to learn how to generate an App ID.) Navigate to utils.dart in your utils folder and create a variable named appID.
var appID = '<--- Enter your app id here --->'Once we have added the appID we can navigate back to call_screen.dart and start connecting to RTC. The process is similar to the video version of the app, where we follow the steps in the same order:
- Create an instance of RtcEngine by passing the App ID.
- Enable audio using the
enableAudio()method on the previously created RtcEngine instance. - Set the channel profile and client role using the
setChannelProfile()andsetClientRole()methods on the same instance. Here, we will use the channel profile as LiveBroadcasting, and the user role will be based on the user input from the home page. - Join the channel by passing the token (optional), channel name, and uid of the user to the joinChannel() function.
Note: This project is meant for reference purposes and development environments, it is not intended for production environments. Token authentication is recommended for all RTE apps running in production environments. For more information about token-based authentication within the Agora platform please refer to this guide: https://bit.ly/3sNiFRs
The process can be summarized as:
connecting to rtc
RTC Event Handlers
Event handlers are callback functions that are triggered when a certain event occurs. Here, these events might be when a user joins a channel, when a user leaves a channel, when a remote user joins the channel, and so on. You might expect the following values as a result of these callbacks: uid, elapsed time, error code, channel name, channel stats, and so on.
Here, we use callbacks not only to maintain the logs but also to maintain a list of all the users in the channel as well as a list of broadcasters.
_addAgoraEventHandlers()
Connecting to RTM
As with the Agora RTC SDK, connecting to RTM SDK is simple and involves almost the same steps:
- Create an instance of AgoraRtmClient by passing the App ID
_client = await AgoraRtmClient.createInstance(appID);- Log in to the Agora RTM by using the
login()method of the same instance we created. The login method is called by passing token (optional) and username (our input field from the home page):
_client.login(null, widget.userName);- Create a channel for a group of people who can share messages. We do this with the
createChannel()method and passing the name of the channel (input value from the homepage):
AgoraRtmChannel channel = await _client.createChannel(widget.channelName);- Join the channel that you just created by calling the
join()method.
await _channel.join();Associating Usernames
Perhaps you’re wondering why we are using the RTM SDK with a project focused on audio streaming. The simplest explanation is that we will be trying to map username with a uid autogenerated by the RTC SDK. The reason is simple: Whenwe want to talk to someone, we don’t call them by their ID or number. We call them by their name instead. We will try to achieve the same thing here.
To create a mapping between this uid and usernames, we will have three scenarios:
- When a user joins the channel: The process is very simple. We just have to send a broadcast message to the channel declaring that a new user has joined the channel. We do this by using the
sendMessage()method, which takes an argument of type AgoraRtmMessage in which we pass a string with the uid of the person and the status.
_channel.sendMessage(AgoraRtmMessage.fromText('$localUid:join'));- When a user leaves the channel: Using a similar process, we send a message to the channel and declare the status as leave.
var reversedMap = _allUsers.map((k, v) => MapEntry(v, k));channel.sendMessage(AgoraRtmMessage.fromText('${reversedMap[member.userId]}:leave'));- To get a list of users in the channel before your joining: Instead of sending a broadcast message to the channel where everyone can see it, we send a peer-to-peer message. This is done by sendMessageToPeer(), where we pass the username of the person to whom we want to send this message and of course the message text. This way every existing user in the channel contacts the new user with their uid and username.
_client.sendMessageToPeer(member.userId, AgoraRtmMessage.fromText('$localUid:join'));Adding Removing People
To get the complete list of users, we read the messages using an onMessageReceived() callback that is triggered when a user gets a channel or a peer-to-peer message. The callback returns an argument of type AgoraRtmMember and AgoraRtmMessage. So through this, we create a map _allUsers<int,String> that contains uid and username.
Now, based on the status message (“leave” or “join”) that we sent in our message, we remove or add a user from the map. Our logic looks something like this:
adding and removing users
Building the User View
The final step is to make our own UI. Let’s do this in three parts:
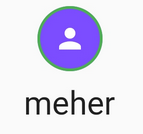
- Displaying a user: To style a user, I simply use a container with a username below it:
Our final widget will look something like this:
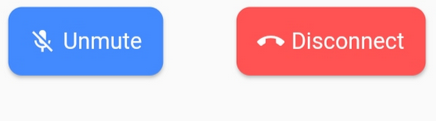
- Creating a toolbar: We will create two buttons for user interaction: to mute the user’s stream and to disconnect from the stream. To style this, we simply use two
RawMaterialButton():
_toolbar widget
On pressing these buttons we call two functions: _onToggleMute() and _onCallEnd(). Here is how you can define it:
_onToggleMute
_onCallEnd
The final result would be something like:
- Displaying all this in your build: We add all these widgets and categorize broadcasters and audiences. To do that, we use the list
_users[]that contains the uid of all the broadcasters that we got from theuserJoined()callback. We use these uids and map them to get the username of the broadcasters, and the remaining username goes into the broadcasters list.
And finally our screen will look something like this:
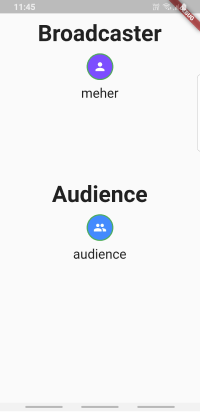
With this, the audience in a channel can hear all the broadcasters present in the channel.
Testing
Once you are done building your audio streaming application using the Agora SDK, we can build this application and test it on our device. Simply navigate to your project directory in your terminal and run this command:
flutter runConclusion
Shazam! You have implemented your own audio streaming application built using the Agora Flutter SDK with some basic functionalities like muting local streams and disconnecting the call.
You can get the complete code for this application over here
Other Resources
To learn more about Agora’s Fluter SDK and other use cases you can refer the developer guide given over here.
You can also have a look at the complete documentation for the functions discussed above and many more over here.
I also invite you to join the Agora Developer Slack Community.


