
Nowadays, there are plenty of live streaming applications for Android devices including Twitch, Facebook Live, and Youtube Live that provide fun features such as face filters and voice changers. But have you ever thought about building a live streaming app on your own? Are you hesitating because some of these features seem too fancy or complicated?
Luckily, using the Agora Video SDK and Banuba Face AR SDK makes developing an android video streaming application with face filters quick and easy. In this step by step guide, I’ll show you how to build a live streaming app for android.
Prerequisites
- A basic-to-intermediate understanding of Java and Android SDK
- Agora account
- Banuba Face AR demo app
- Android Studio and 2 Android devices
Please Note: While no Java/Android knowledge is needed to follow along, certain basic concepts in Java/Android won’t be explained along the way.
Overview
This guide will go over the steps for building an android live streaming application using the Agora SDK. This is a list of the core features that will be included in our app:
- Users (streamers and audience members) can create and login into their account. User account information will be saved in Google Firebase’s Realtime Database.
- Users can set up virtual rooms to host live streams and become a streamer.
- Users can find all live streams and join the virtual room as an audience.
- Streamers can use the face filter feature to stream with a virtual mask or animation.
- Streamers can change their voice through a voice changer.
- Audiences in a virtual room can send text messages which can be seen by everyone in that room.
- Users can search for other users by their name and send private text messages to them.
You can find this Real Time Video Streaming Android demo app as a reference for this article.
Download Banuba FaceAR Demo App
To focus on the real time video streaming aspect, let’s build our android video streaming application on top of the Banuba FaceAR demo app.
First, download the Banuba FaceAR demo app and open it in Android Studio. Follow the online instructions from Banuba to set up the project.
Note: You need to have a Banuba client token to run the project. Contact info@banuba.com for more information.
After you’re done, run the “app” project and you should be able to see something like this with a lot of cool face filter options:
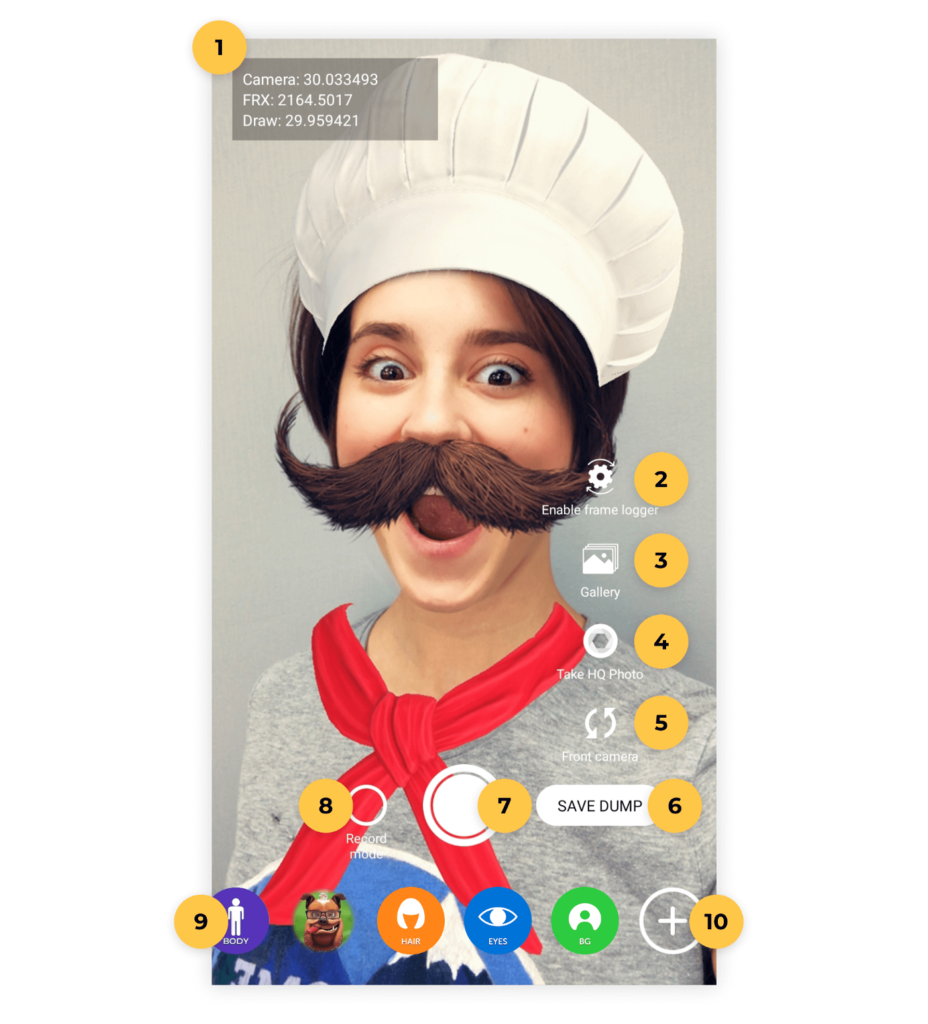
This will be the streamer’s view when they start a live stream. However, the Banuba demo only adds the face filters on the local camera view. To send this to an audience or another broadcaster, is where Agora Video SDK comes in handy.
Integrate Agora Video SDK
To integrate Agora Video SDK in your project, you need to add the following lines in the /app/build.gradle file of the project.
//Agora RTC SDK for video call
implementation 'io.agora.rtc:full-sdk:3.3.0'

//Agora RTM SDK for chat messaging
implementation 'io.agora.rtm:rtm-sdk:1.2.2'

//Agora UIKit
implementation 'io.agora.uikit:agorauikit:2.0.1'
The first implementation is for the Agora Video SDK. While the second one is for the Agora Real-Time Messaging SDK. And the last one is for Agora Android UIKit which is a Agora Android UI wrapper. Using the UIKit, you just need a few lines of code to start a video call or video broadcast. I will demonstrate how to use the UIKit in a later section of this guide, when we are implementing with the audience view.
Add Project Permissions
The next thing we need to do is to add project permissions in the /app/src/main/AndroidManifest.xml file for device access according to your needs:
<manifest xmlns:android="http://schemas.android.com/apk/res/android"
    ...>
<uses-permission
android:name="android.permission.READ_PHONE_STATE" />
<uses-permission android:name="android.permission.INTERNET"
/>
<uses-permission
android:name="android.permission.RECORD_AUDIO" />
<uses-permission android:name="android.permission.CAMERA" />
<uses-permission
android:name="android.permission.MODIFY_AUDIO_SETTINGS" />
<uses-permission
android:name="android.permission.ACCESS_NETWORK_STATE" />
<!-- The Agora SDK requires Bluetooth permissions in case users are using Bluetooth devices. -->
<uses-permission android:name="android.permission.BLUETOOTH"
/>
<uses-permission
android:name="android.permission.ACCESS_WIFI_STATE" />
<uses-permission android:name="android.permission.WRITE_EXTERNAL_STORAGE" />
...
</manifest>
Setup Google Firebase Database
Since our application allows users to search and chat with other users in the app, we need to use Firebase Realtime Database to save users’ account information. Here are the steps you need to connect your application to Firebase Realtime Database:
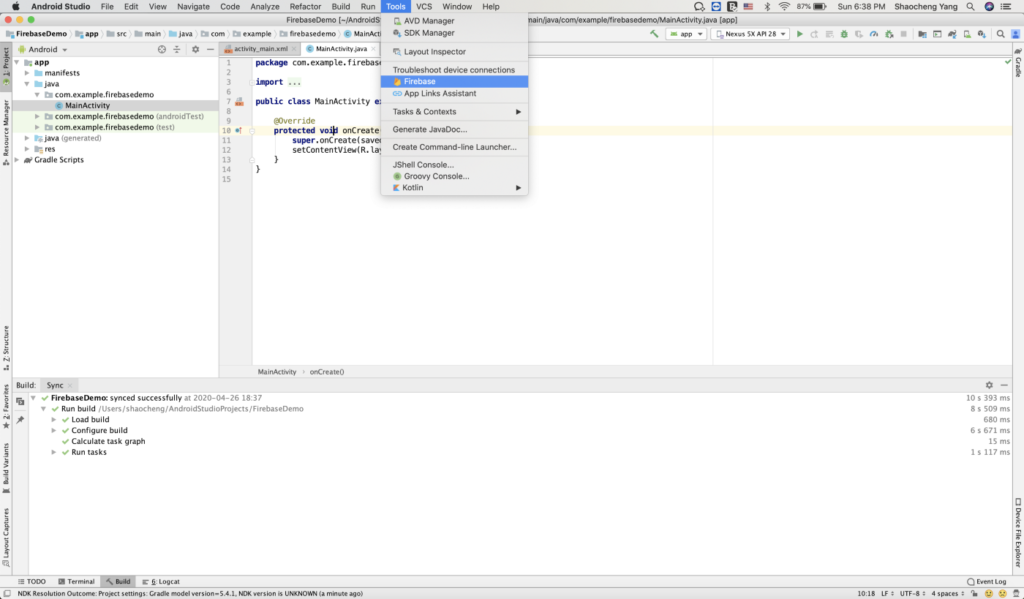
- In your Android Studio, Click “Tools”, then select “Firebase”.
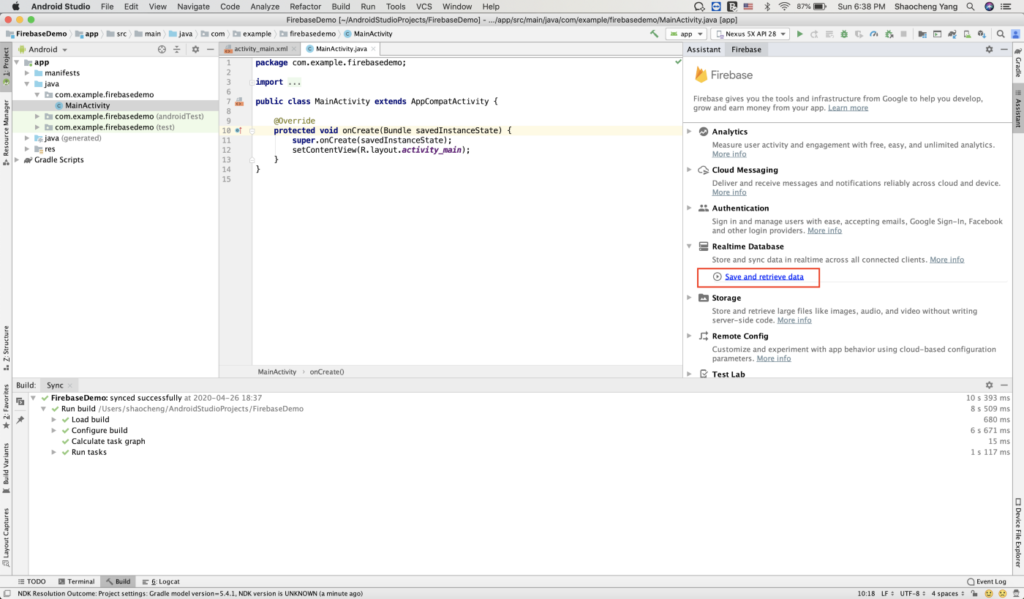
- On the right hand side, you should see a Firebase assistant tab showing up. Find “Realtime Database” and click “Save and retrieve Data”.
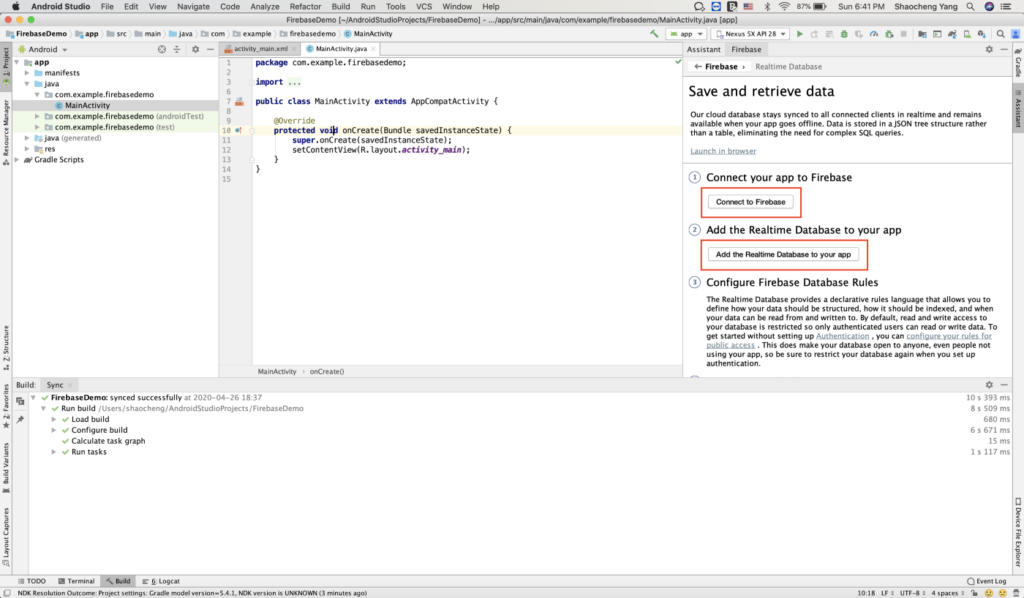
- Then you should see the detailed page for Realtime Database. Click the “Connect to Firebase” button and “Add the Realtime Database to your app” button. Follow the on-screen instruction, if any.
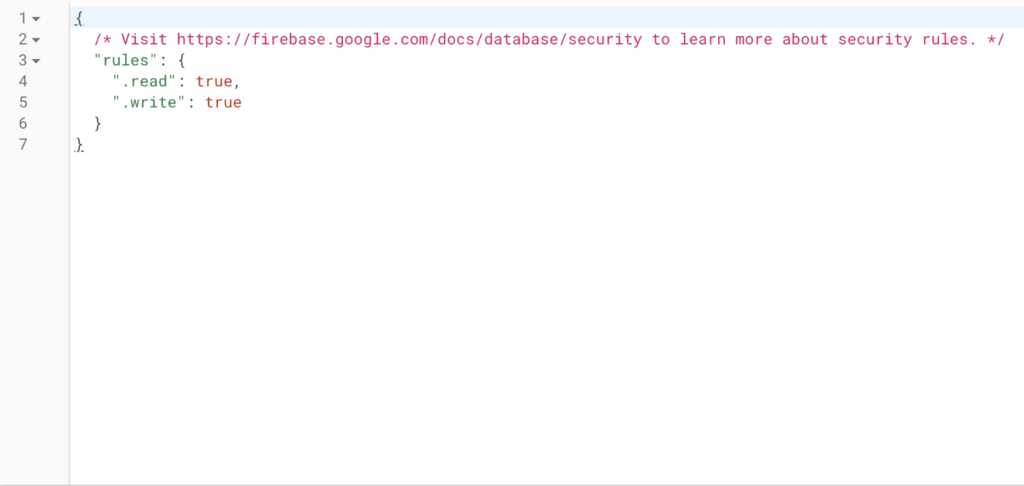
- Now your application is connected to Firebase Realtime Database. The last thing you need to do is to go to your Firebase console and change the database rules. Remember to select the Realtime Database instead of the Cloud Firestore. Change the rules for read and write to “true” so that you can have access to the database.
User Login
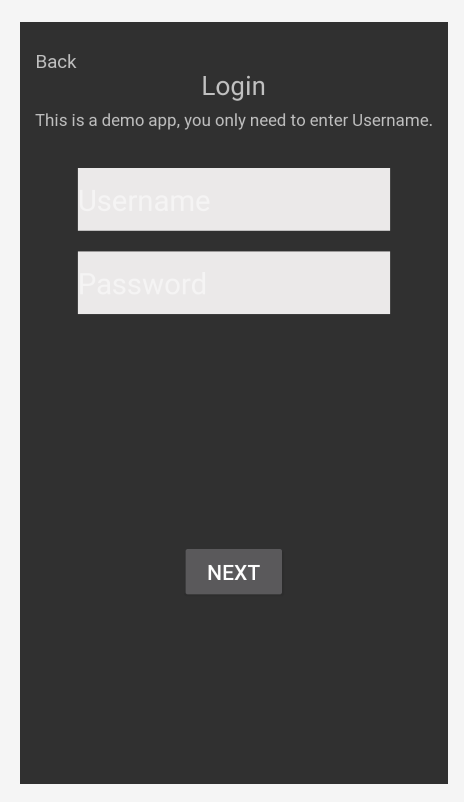
First, let’s build our application from the first page. Same as most of the video streaming apps, our application needs a user login page. And that should look like this:
When the user clicks the “Next” button, we need to get the user’s name and pass that to the next activity, HomeActivity. Here is the code for that.
public void onLoginNextClick(View view) {
    EditText userNameEditText = findViewById(R.id.et_login_user_name);
    String userName = userNameEditText.getText().toString();

    if(userName == null || userName.equals("")) {
        Toast.makeText(this, "user name cannot be empty", Toast.LENGTH_SHORT).show();
    }else {
        Intent intent = new Intent(this, HomeActivity.class);
        intent.putExtra("userName", userName);
        startActivity(intent);
    }
}
Building HomeActivity
In the HomeActivity, we will create a three-page bottom navigation bar with a fragment connected to each page. If the user taps on the first bottom navigation menu, he will be directed to the Live fragment. Similarly, the second menu will direct the user to the Chat fragment and the last one is the Other fragment.
In the onCreate method of the HomeActivity, we will get the user name passed from the previous activity and save that user information on the Firebase Database.
@Override
protected void onCreate(Bundle savedInstanceState) {
    super.onCreate(savedInstanceState);
    setContentView(R.layout.activity_home);
    userName = getIntent().getStringExtra("userName");

    saveUserOnFireDatabase(userName);
}

private void saveUserOnFireDatabase(String userName) {
    mRef = FirebaseDatabase.getInstance().getReference("Users");
    mRef.push();
    mRef.child(userName).setValue(new DBUser(userName, false));
}
Live Fragment
The Live fragment shows all the live streamers’ names and allow other users to join a streamer’s virtual room by clicking a button.
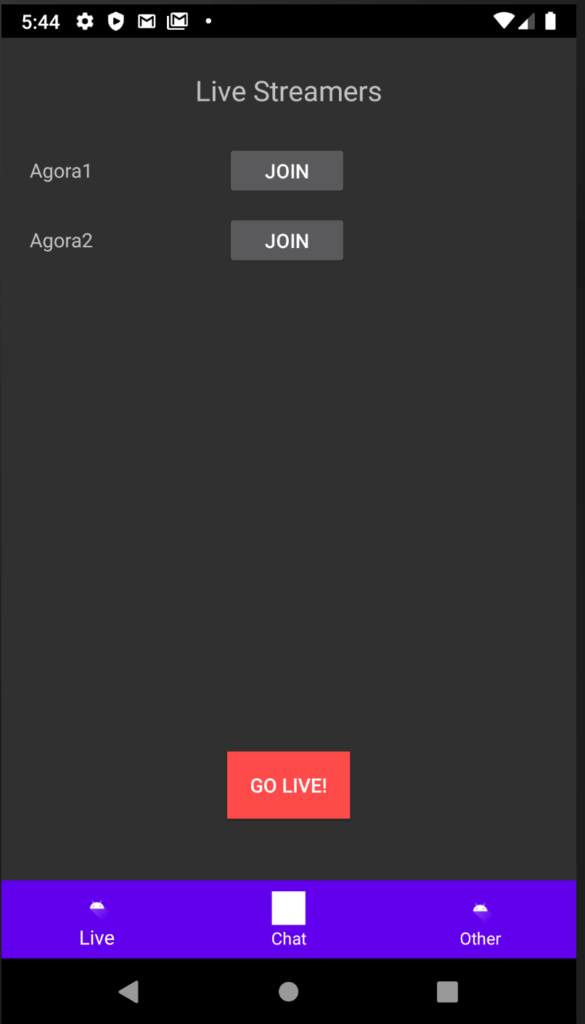
In the center of the fragment is a recycler view displaying all the live streamers. You can retrieve the streamer data from the Firebase database by registering a ChildEventListener on the Firebase database reference.
childEventListener = new ChildEventListener() {
    @Override
    public void onChildAdded(@NonNull DataSnapshot dataSnapshot, @Nullable String s) {
        DBUser result = dataSnapshot.getValue(DBUser.class);
        if (!result.getName().equals(userName) && result.getStreaming() == true) {
            streamerList.add(result);
        }
    }

    ...
};

mRef.orderByChild("name").addChildEventListener(childEventListener);
On the side of the streamer’s name, there is a button for users to join that virtual room. And that will direct users to the Audience activity using an Intent.
private void joinStream(String streamerName) {
    Intent intent = new Intent(getActivity(), AudienceActivity.class);
    intent.putExtra("streamerName", streamerName);
    intent.putExtra("userName", userName);
    startActivity(intent);
}
When the user clicks the “GO LIVE” button on the bottom, they will be directed to the MainActivity using an Intent. The MainActivity is the activity to enable the Banuba face filter features which we have discussed above.
@Override
public void onClick(View v) {
    Intent intent = new Intent(getActivity(), MainActivity.class);
    intent.putExtra("userName", userName);
    startActivity(intent);
}
Chat Fragment
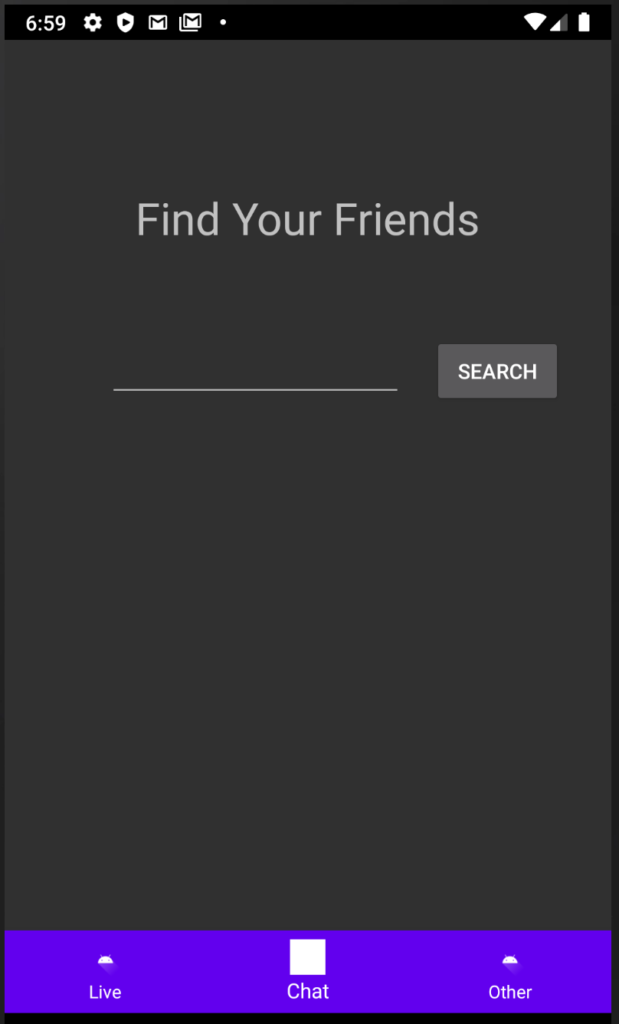
The Chat fragment is the place for users to search for other users and send private text messages to them. So you will build your UI like this:
Send Local Camera View to Remote Users
Let’s open the MainActivity class. From the previous steps, we know this activity is for adding the face filter features on the local camera views. Our job here is to send these local camera views with face filters out to the remote users. This will allow anyone receiving the real-time video stream to see the rendered filter effect.
Initialize RtcEngine and Join Channel
Inside the onCreate callback, get the username passed from the home activity and initialize the Agora RtcEngine.
userName = getIntent().getStringExtra("userName");

try {
    mRtcEngine = RtcEngine.create(getBaseContext(), getString(appID), mRtcEventHandler);
} catch (Exception e) {
    Log.e(TAG, Log.getStackTraceString(e));
    throw new RuntimeException("NEED TO check rtc sdk init fatal error\n" + Log.getStackTraceString(e));
}

mRtcEngine.enableVideo();
Here, you need to put the appID as a parameter when initializing the RtcEngine. In order to get the appID in the parameter, follow these steps:
- Create an Agora project in the Agora Console.
- Click the Project Management tab on the left navigation panel.
- Click “Create” and follow the on-screen instructions to set the project name, choose an authentication mechanism, and click “Submit”.
- On the Project Management page, find the App ID of your project.
The mRtcEventHandler is a handler to manage different events occurring with the RtcEngine.
Then we need to call setExternalVideoSource to switch Agora video input to an external video source which is the camera frame from Banuba SDK.
mRtcEngine.setExternalVideoSource(true, false, true);After that we are ready to join the channel by calling joinChannel() on the RtcEngine instance. The channelName is the user name we get from the previous activity. In this case, each streamer will start a video call channel with his entered user name when he login.
mRtcEngine.joinChannel(token, channelName, "Extra Info", 0);Please Note: This guide does not implement token authentication which is recommended for all RTE apps running in production environments. For more information about token based authentication within the Agora platform please refer to this guide: https://bit.ly/3sNiFRs.
Push External Video Frame
We have already let the Agora RtcEngine know that we will use the external video source as the video input. However, we haven’t provided the video frame yet.
First, call startForwardingFrames() on BanubaSDKManager instance and that will trigger the onFrameRendered() callback.
mSdkManager.startForwardingFrames();Now, in the onFrameRendered() callback, we can get the camera frame data which contains the local camera view and the AR Face Filter view. Then create an AgoraVideoFrame instance and pass this information in. Call pushExternalVideoFrame() on the Agora RtcEngine instance and pass the AgoraVideoFrame instance in the parameter.
@Override
public void onFrameRendered(@NonNull Data data, int width, int height) {
    byte[] arr = new byte[data.data.remaining()];
    data.data.get(arr);

    AgoraVideoFrame agoraVideoFrame = new AgoraVideoFrame();
    agoraVideoFrame.buf = arr;
    agoraVideoFrame.stride = width;
    agoraVideoFrame.height = height;
    agoraVideoFrame.format = AgoraVideoFrame.FORMAT_RGBA;
    agoraVideoFrame.timeStamp = System.currentTimeMillis();
    mRtcEngine.pushExternalVideoFrame(agoraVideoFrame);
    data.close();
}
Now these cool face filters and animations can be sent to the remote users who are in the same Rtc channel.
You can test it by using Agora Web Showcase. Enter your appID, token and channel name and you should be able to see the video.
Add the Voice Changer
To make the live video streaming experience more interesting, we can add a voice changer in the Android application. Create a button in the MainActivity and set the onClick method for that. When the user clicks that, we will call setLocalVoiceChanger to set the voice changer.
public void onVoiceChangerClick(View view) {
mRtcEngine.setLocalVoiceChanger(VOICE_CHANGER_BABYGIRL);
    Toast.makeText(this, "Voice Changer ON", Toast.LENGTH_SHORT).show();
}
There are many different voice changers you can choose. Here I used the baby girl’s voice. For more voice changer options, check the setLocalVoiceChanger api.
Set Up Audience View
Setting up the audience view is easier. Let’s go to the Audience activity and use the Agora Android UIKit.
To use the UIKit, simply call this in the onCreate() method.
@Override
protected void onCreate(Bundle savedInstanceState) {
    ...
    AgoraRTC.instance().bootstrap(this, appID, channelName);
    setContentView(R.layout.group_template);
}
Here, the appID is the same appID we entered in the MainActivity and the channelName is the streamer’s name we passed from the LiveFragment.
For more information, visit UIKit Github.
With just 2 lines of code, you are good to start a video call!
However, in our case, we need to add some customizations to make it to the audience view. First, we don’t want the audience to send the video and audio streams to the channel.
AgoraRTC.instance().muteLocalVideoStream(true);
AgoraRTC.instance().muteLocalAudioStream(true);
Also, we want the remote view (streamer view) always on the main screen. To do this, we need to register the IRtcEnginEventHandler instance.
IRtcEngineEventHandler eventHandler = new IRtcEngineEventHandler() {

    @Override
    public void onRemoteVideoStateChanged(final int uid, int state, int reason, int elapsed) {
        super.onRemoteVideoStateChanged(uid, state, reason, elapsed);

        if (state == REMOTE_VIDEO_STATE_STARTING) {
            runOnUiThread(new Runnable() {
                @Override
                public void run() {
                    agoraView.setUID(uid);
                }
            });
        }
    }
};@Override
protected void onCreate(Bundle savedInstanceState) {
    ...
    agoraView = findViewById(R.id.max_view);
    AgoraRTC.instance().registerListener(eventHandler);
    ...
}
The last customization we need to do is to add a button click listener on the end call button to redirect the user to the previous activity when the user clicks the end call button.
endCallButton.setOnClickListener(new View.OnClickListener() {
    @Override
    public void onClick(View v) {
        finish();
    }
});
Up to this point, our video streaming application allows users to stream with face filters features on or watch the stream as an audience. Let’s make it more robust by adding the text messaging system using Agora RTM SDK.
Text Messaging
Text messaging in a streaming application can be divided into two parts: channel messaging and private messaging. The first one sends messages to the channel and everyone in the channel can receive that message while the second one sends private messages from a peer to another peer.
Channel Messaging
We want to allow all the audiences to send messages in the streamer’s room. To achieve that, we need to create a RtmClient using Agora Messaging SDK.
mRtmclient = RtmClient.createInstance(mContext, appID, new RtmClientListener() {
        @Override
        public void onConnectionStateChanged(int state, int reason){
            for (RtmClientListener listener : mListenerList) {
                listener.onConnectionStateChanged(state, reason);
            }
        }@Override
        public void onMessageReceived(RtmMessage rtmMessage, String peerId) { ... }
});
Here, we pass the same appID as we used when we initialize the Agora Video engine.
In the onCreateView method in the LiveFragment, we need to login RtmClient.
mRtmClient.login(null, userName, new io.agora.rtm.ResultCallback() {
    @Override
    public void onSuccess(Void aVoid) {
        ...
    }

    @Override
    public void onFailure(ErrorInfo errorInfo) {
        ...
    }
});
We use the same userName as the one we used to join the video call channel. In this case, users will join the RTM channel and RTC channel with the same channel name.
In the AudienceActivity onCreate() method, we are going to call createChannel() on the mRtmClient we initialized earlier to create a RtmChannel instance.
mRtmChannel = mRtmClient.createChannel(mChannelName, new MyChannelListener());We need to define the MyChannelListener which implements RtmChannelListener with callback onMessageReceived() to handle the logic when we receive messages sent from any member in the chat room.
class MyChannelListener implements RtmChannelListener {
    @Override
    public void onMessageReceived(final RtmMessage message, final RtmChannelMember fromMember) {
        runOnUiThread(new Runnable() {
            @Override
            public void run() {
                String account = fromMember.getUserId();
                String msg = message.getText();
                MessageBean messageBean = new MessageBean(account, msg, false);
                messageBean.setBackground(getMessageColor(account));
                mMessageBeanList.add(messageBean);
                mMessageAdapter.notifyItemRangeChanged(mMessageBeanList.size(), 1);
                mRecyclerView.scrollToPosition(mMessageBeanList.size() - 1);
            }
        });
    }
    ...
}
Then join the channel by calling join() on the RtmChannel instance.
mRtmChannel.join(new ResultCallback() {
    @Override
    public void onSuccess(Void responseInfo) { ... }@Override
    public void onFailure(ErrorInfo errorInfo) { ... }
});
In the onSuccess() callback, we can call getMembers() on the RtmChannel instance to get the number of members in the chat room.
We also need to add some UI components to let users enter their text messages and see the chat history. The audience layout should be similar to this:
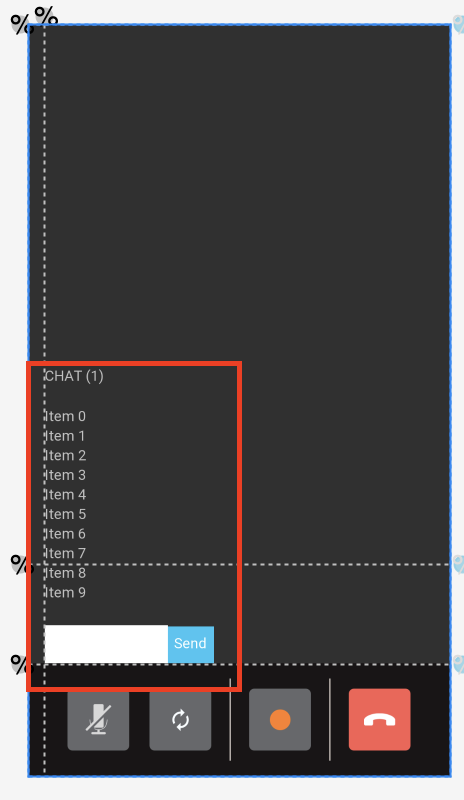
When a user clicks the “Send” button, we will send his message out to the channel by calling sendMessage() method on the RtmChannel instance.
private void sendChannelMessage(String content) {
    // step 1: create a message
    RtmMessage message = mRtmClient.createMessage();
    message.setText(content);

    // step 2: send message to channel
    mRtmChannel.sendMessage(message, new ResultCallback<Void>() {
        @Override
        public void onSuccess(Void aVoid) {
            ...
        }

        @Override
        public void onFailure(ErrorInfo errorInfo) {
            ...
        }
    });
}
Private Messaging
In the ChatFragment, users can find their friend by searching the friend’s name and send private text messages to them.
To search friends by name, you need to register the ChildEventListener and get data from Firebase Database.
childEventListener = new ChildEventListener() {
  @Override
  public void onChildAdded(@NonNull DataSnapshot dataSnapshot, @Nullable String s) {
    DBUser result = dataSnapshot.getValue(DBUser.class);
    showFriendText.setText(result.getName());
    mRef.orderByChild("name").startAt(friendName).endAt(friendName + "\uf8ff").removeEventListener(childEventListener);
  }
  ...
};

mRef.orderByChild("name").startAt(friendName).endAt(friendName + "\uf8ff").addChildEventListener(childEventListener);
Sending the private chat message is very similar to sending the group message. There are a few differences you need to pay attention to:
- You don’t need to create a RTM channel to send message.
- You need to register a RtmClientListener and receive messages from the onMessageReceived callback.
class MyRtmClientListener implements RtmClientListener {

    @Override
    public void onMessageReceived(final RtmMessage message, final String peerId) {
        runOnUiThread(new Runnable() {
            @Override
            public void run() {
                String content = message.getText();
                if (peerId.equals(mPeerId)) {
                    MessageBean messageBean = new MessageBean(peerId, content,false);
                    messageBean.setBackground(getMessageColor(peerId));
                    mMessageBeanList.add(messageBean);
                    mMessageAdapter.notifyItemRangeChanged(mMessageBeanList.size(), 1);
                    mRecyclerView.scrollToPosition(mMessageBeanList.size() - 1);
                } else {
                    MessageUtil.addMessageBean(peerId, content);
                }
            }
        });
    }

    ...
}- When you send the message out, call sendMessageToPeer() instead of sendMessage() which we used to send channel messages.
mRtmClient.sendMessageToPeer(mPeerId, message, mChatManager.getSendMessageOptions(), new ResultCallback() {
    @Override
    public void onSuccess(Void aVoid) {
       ...
    }

    @Override
    public void onFailure(ErrorInfo errorInfo) {
       ...
    }
});
Build And Test on Device
Now let’s run our application!
In Android Studio, make sure your Android device is plugged in, and click Run.
Done!
Congratulations! You just built yourself a live streaming app for android with face filter features and chat messaging!
Thank you for following along. If you want to see more features such as virtual gifting and in app gaming, please leave a comment below! Here is the email address for any of the questions you might have: devrel@agora.io.
Over the last decade, live streaming has gradually become one of the most popular forms of entertainment. More and more people enjoy sharing their lives publicly through live streaming.


