Audio Party-Chat Streaming in Unity using Agora
Hello, intrepid developers! In this tutorial you’ll set up an audio broadcast in a 3D Unity environment in Unity 2019.4.1 (LTS). This is essentially a video game environment where broadcasters can communicate with anyone in the same channel, and any audience member can listen in a game without video. On joining the scene, each player can choose via the UI to be either a broadcaster or an audience member, as well as the channel they want to join. Each broadcaster will have a gold material, and audience members will have the standard Viking aesthetic. You will use Agora callbacks to provide visual feedback for when each broadcaster is speaking.
Getting Started with Agora
To get started, you need an Agora account. If you don’t have one, here is a guide to setting up an account.
This project builds on the agora-unity-audio-broadcasting demo.
Use agora-unity-audio-broadcasting as a starting template. Or create a project from scratch and import the Agora Video SDK and the Photon Viking Demo.
Development
Create Agora Engine
In Assets > DemoVikings > Scenes > VikingScene, create an empty GameObject and name it AgoraEngine. If you don’t have a location, create a Scripts folder, and create a script called AgoraEngine.cs.
You now have a working Agora engine that you can access from your viking player objects.
But before moving on, in your viking scene add an EventSystem object to the scene via right-click in the Hierarchy > UI > Event System.
Broadcaster UI
Canvas Panel
Next, you’ll create the UI necessary for setting the channel name and the broadcaster/audience status. In Assets > DemoVikings > Resources > Charprefab, double-click the Charprefab to open the prefab view. In the Hierarchy, right-click the Charprefab parent object > UI > Panel and name it BroadcasterSelectionPanel. In your Canvas object > Canvas Scalar component > UI Scale Mode > select Scale With Screen Size. This keeps a uniform canvas across devices and resolutions. In the broadcast selection panel, set the attributes of the Rect Transform to Left: 250, Top: 200, Right: 250, Bottom: 50.
Buttons
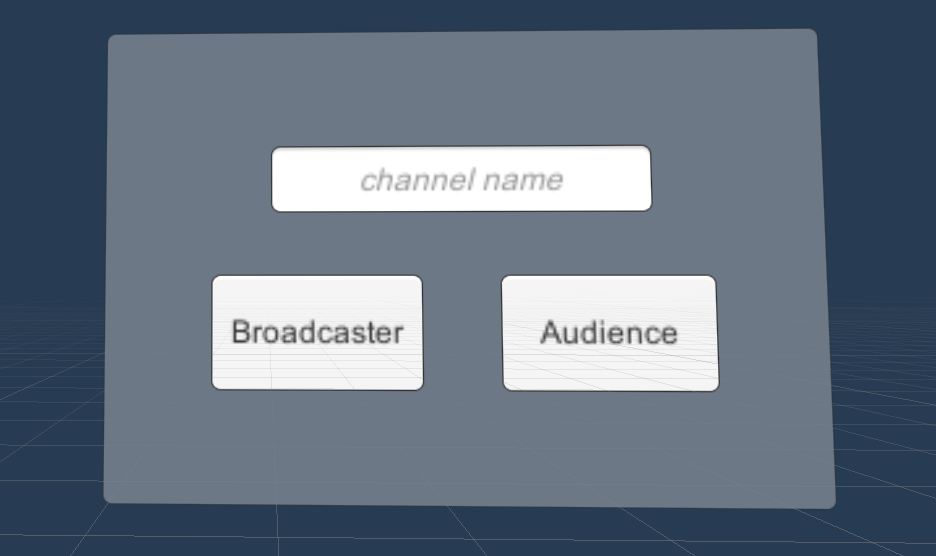
Next, you’ll create the buttons and the text input field. Right-click BroadcasterSelectionPanel > UI > Button > UI > InputField. Do this twice to make two buttons. My buttons look like this:

Toggle the BroadcasterSelectionPanel to the off state by removing the check mark next to its name in the Inspector.
Note: With multiple networked players in one scene, all of their UI panels will display unless toggled off. We want to display only the local user UI, and we will toggle it on through code.
Profile Selection Script
Now, you will create the script that will receive input from the UI you just created and handle the cases accordingly. Create a script called ProfileSelection.cs.
In ProfileSelection, make sure to include agora_gaming_rtc; and to replace
Public class ProfileSelection : MonoBehaviour with
Public class ProfileSelection : Photon.PunBehaviour. This gives you access to PUN services, and PunBehaviour gives you access to PUN callbacks you wouldn’t otherwise see.
First, you’ll create your attributes for the script:
Next, you’ll initialize the Agora engine. The engine itself is static, and a single instance is located in the scene. From each player, we look for the engine and access it. Because you are in a networked demo, there might be a slight delay in the synchronization from the player to the engine, so we build a timeout function to either retrieve the engine within 3 seconds or fail with an error:.
With a successful engine setup, the BroadcasterSelectionPanel will display, with buttons and an input field that have no functionality when clicked. Create a function called ButtonSetBroadcastState(bool isNewStateBroadcaster).
Note: When I create functions that are specifically intended to be assigned to buttons, I like to prefix them with “Button” so you can easily find them in the Inspector.
This project is meant for reference purposes and development environments, it is not intended for production environments. Token authentication is recommended for all RTE apps running in production environments. For more information about token based authentication within the Agora platform please refer to this guide: https://bit.ly/3sNiFRs
Next, create a function called TurnVikingGold. This function will send a “Remote Procedure Call” (RPC) across the network to change the necessary viking gold if the user is a broadcaster:
Note the [PunRPC] attribute, without it the function will be called only locally. That is, it will change your viking on your machine gold, but when you look at another client who is in the game with you, you won’t be gold on their screen!
Last, we will add one more function that synchronizes broadcaster/audience states as people start to join the channel. If someone is a broadcaster, but another person joins after they activate that status, the newly joined person won’t see the broadcaster’s gold material.
This is where inheriting from Photon.PunBehaviour is crucial, because without it this Photon event isn’t accessible.
With the Profile selection script completed, it’s time to assign the proper elements in the Inspector. Make sure ProfileSelection is attached to your Charprefab. Drag the BroadcasterSelectionPanel into the self-titled variable slot. Create a gold material called Gold by right-clicking in the Assets pane > Create > Material, and drag it into the Broadcaster Material slot. For the Viking Mesh, select Charprefab > Viking > BaseHuman.
In your BroadcasterSelectionPanel buttons, one assigns broadcaster status, and the other assigns audience status. For each button, if the OnClick() list is empty, click the plus sign (+) to create a function slot. Drag the Charprefab object into the slot. Click the dropdown titled “No Function > ProfileSelection > ButtonSetBroadcastState. For the Broadcaster button, make sure the check box is selected and the Audience check box is not selected.
Note: This toggle check box appears because our button function has a Boolean parameter, allowing you to assign the Boolean state from the Hierarchy UI.
Agora Profile Script
As the last part of the demo, you will create the AgoraProfile script that displays useful attributes about the player, houses the callbacks, and shows a UI indicator when a broadcaster is talking.
Create a script called AgoraProfile.cs and attach it to the Charprefab, just as you did for ProfileSelection.cs.
First, set up the variables necessary to drive the script, and inherit from Photon.PunBehaviour:
In the start method, you initialize the callbacks and necessary variables:
Next, create the join channel method:
Next, you will create the standard Agora callbacks. In this example, they are used for debugging. But it’s important to see how they work.
Note: I’ve tucked them in a #region so you can collapse the callbacks out of the way. I find regions very helpful. Feel free to use them or not!
Networked Speech Bubble
As a neat finishing touch, you’ll add a speech bubble that appears over the head of whatever broadcaster is talking and that disappears when they are done talking. The callback is very precise as to when speaking is started and stopped, and can look a little choppy without some extra loving. I’ll show you how to smooth the speech bubble so it looks a little more natural when someone is talking. Grab the speech bubble asset from the repo if you are following along, or use your own.
First, create two functions for toggling the speech bubble on and off:
Next, create the callback that fires during volume changes:
This checks if the local player is talking: If they are, place a networked speech bubble above their head. You want the speech bubble to appear as soon as the player starts talking, so no smoothing there.
This next function is designed to provide a slight delay before hiding the speech bubble, in case the broadcaster pauses, takes a breath, and so on.
The logic of the code looks like this:
- When the player stops talking, activate the talkBubbleDisableTimer.
- If the player starts talking again, reset the talkBubbleDisableTimer to its maximum value.
- If the player stops talking until the timer hits 0, disable the speech bubble and exit the coroutine.
Note: The coroutine is “shielded” by multiple calls by checking if isSmoothingTalkBubble is true. If a coroutine is already running, all attempts to disable the talk bubble will be negated until the original coroutine is stopped.
Note: I’ve set the talkBubbleBuffer (starting timer amount) to .75f, which is the average human reaction time (.75 seconds). It’s a good default value to keep in mind for quality of life design tips like this, as anything significantly less might make the speech bubbles too jittery, and anything significantly more could make the speech bubble hang around too long. Play around with what you think is best!
One Last Thing. Before you conclude, you need to properly clean up the engine.
Include the callback:
In the Photon demo is a button that allows you to leave the lobby. This is really helpful for debugging to check different channels or player states, but it can cause errors if the Agora engine is running.
Conclusion
It’s now time to test! If you learned something, post it in the #unity-help-me slack channel and direct message me, and be sure to teach someone else!
If you would like to contribute to this project and the broader Agora community as a whole, feel free to submit a pull request on GitHub and add your changes to the project!

