
In this tutorial we are going to use Agora’s Video SDK to build a cross-platform video chatting app. The SDK supports the four major platforms — MacOS and Windows for desktop machines, and iOS and Android for mobile devices. Unlike the demo application from the SDK, this tutorial focuses on the very basic and quickly verified solution to a 1-to-1 video chat scenario. The following image illustrate the simple UI design.

Prerequisites
- Unity Editor (version 2017 LTS or up, 2019 recommended)
- An understanding of the Unity editor, Game Objects, Unity scripting, and publishing Unity apps to mobile devices
- Basic understanding of C#
- Agora Developer Account (see: How To Get Started with Agora)
Overview
Before we dive in, let’s take a moment to review all the steps that we will go through.
- Setup New Project and Import Agora Video SDK for Unity
- Create User Interfaces (UIs)
- Create Controller Script (Top-down approach)
- Setup UIs
- Agora Engine Event Set up and Handling
- Clean up
- Test
Setup New Project
To start, let’s open Unity and create a blank new project and name it AgoraDemo. Once Unity finishes setting up the project, we’ll navigate to the Unity Asset Store and search for “Agora Video SDK”. Next we’ll Import the SDK into our project, when the prompt appears, make sure all the assets in the list are selected.
https://assetstore.unity.com/packages/tools/video/agora-video-sdk-for-unity-134502
Create the User Interfaces
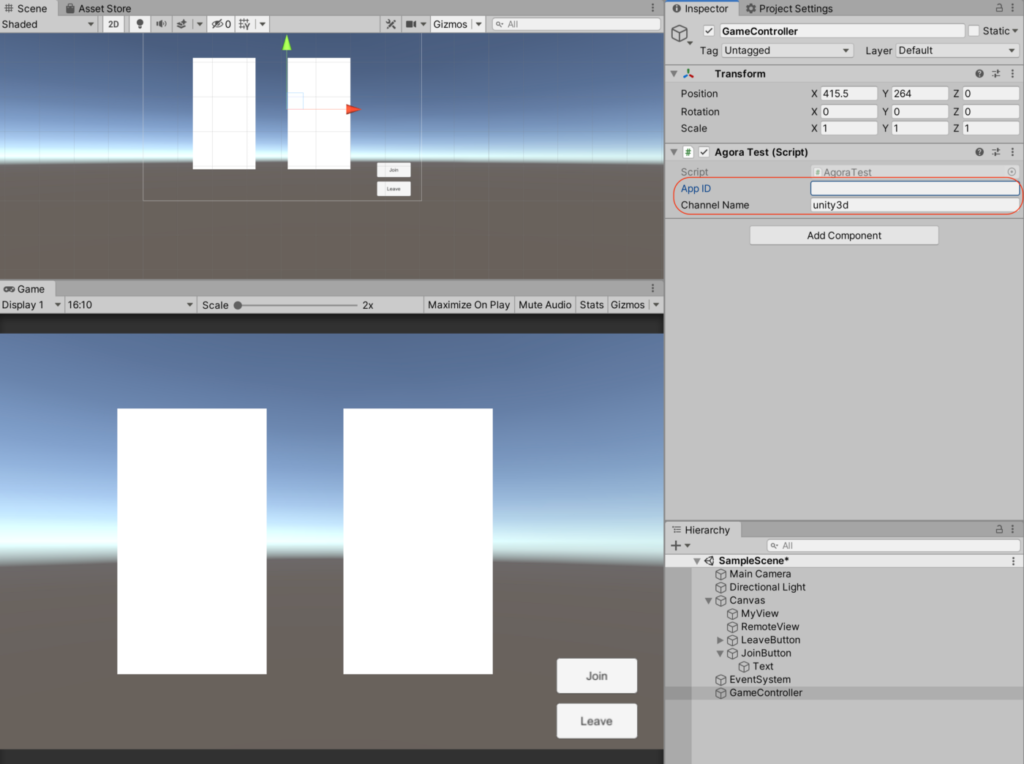
When Unity creates the new project, a default Scene “Sample” is created for you. We will use this scene for our project. As shown in Figure 1, we will create the following four objects on the scene:
- RawImage #1: name it “MyView”, size is 180w X 320h.
- RawImage #2: duplicate from MyView, named “RemoteView”, move to right position next to MyView.
- Button #1: name it “JoinButton”, size is 100w X 45h, the button text should be “Join”.
- Button #2: duplicate from JoinButton, and button text should be “Leave”.
Make sure to change the Canvas Scaler option to “Scale With Screen Size”.
Create the Controller Script
Add a new Game Object to the scene, called it “GameController”. Create a new C# script called AgoraChat.cs. Copy and paste the following skeleton code into it. Then attach the script to GameController.
As you can see, we will handle the UI set up as the first step of the controller during Awake, then we set up the Agora Engine to prepare for our chat session during Start. And we will add logic to the OnApplicationQuit() method for clean up during the game object life cycle ending. We will implement the Join and Leave functions to respond to the Join and Leave buttons we have on the UI. And then we will implement the callback functions for the events:
- Join Channel Successful
- Leave Channel
- Remote User Joined in
- Remote User went offline
UI Setup
If you recall, the items MyView and RemoteView are RawImages. But since we don’t use this class directly in the code, we declare them as VideoSurface in our AgoraChat script. We will attach the script as a component dynamically to the game object when it wakes up.
Some may ask why we don’t want to attach them directly to game object when we create them in the scene. This is actually a good practice to separate the SDK code from the Application code. If the SDK changed, the GUID for the script may not be the same as before, and you can have “missing unknown script” error later on.
The VideoSurface code will handle most of the heavy lifting of receiving video frames from the engine and sending them for rendering.
Create the SetupUI() method as following and uncomment the caller line to SetupUI() in Awake():
And the Join and Leave Function is simply calling the relevant Agora APIs:
Implement Agora Engine Setup
Uncomment the SetupAgora() call in the Start() method. Create the Agora engine instance using the AppID you obtained from your Agora developer’s account. Register the callback functions of the four events we want to handle:
Provide the Handlers on the Event Callbacks
We will explain the four event handlers with some more details here.
- OnJoinChannelSuccessHandler: When the local user joins the channel successfully, the agora engine will invoke this callback function. You should add more business logic here with respect to the local user. For this application, there isn’t much. So, we will just print a debug statement.
- OnLeaveChannelHandler: When the local user leaves the channel, you should clean up the user views. Calling the VideoSurface’s SetEnable(false) method will turn off the rendering. Otherwise, the last frame of the camera video will stay on the RawImage.
- OnUserJoined: When the remote user joins the channel, this callback tells you who joined. The uid is the key to render the remote user’s video stream with VideoSurface script. Note that, similar to local user, we add the VideoSurface component dynamically at this step.
- OnUserOffline: As the opposite to OnUserJoined, this callback signals the business logic to clean up for the remote user. Since we are reusing the RawImage, we will just turn off the VideoSurface. In some other use cases, you may choose to destroy the whole game object instead.
Application Clean-Up
The Agora video SDK engines runs on a C++ native library for various memory and hardware controls. The C# garbage collection may not clean up the resource automatically. This can lead to memory leaks and camera or audio resources not being released on some systems. So we must call the engine’s Destroy() code to properly exit the program.
Test the Code
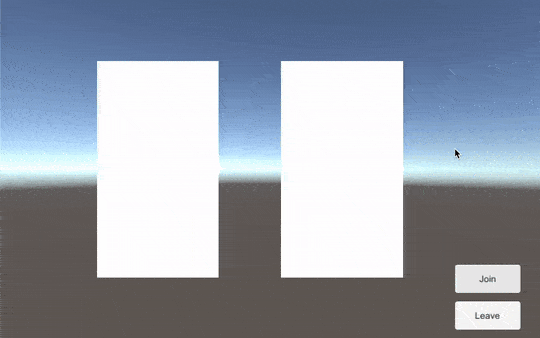
That’s all the code you need for a live chat app build on Unity! Remember to assign the AppID and Channel in the Inspector on the GameController object.
You may run this from the Unity Editor now and try out the Join and Leave functions. You should see yourself appearing in the MyView window. You will also need to have a second device to run as the remote user. Follow the README_QuickStart file from the SDK to learn about settings for the platform of your choice and make a build to run on the device. You may also use the Agora sample Web app as the remote client for testing.
Done!
Wow, that was quick! Thanks for following along. This sample app skipped some details on how to handle multiple remote users. You may find the logic in the other sample app, that comes with the SDK. It is differently structured but simple enough to follow.
The completed project can be found in this Github repo. If you have any questions or hit a snag in the course, please feel free to reach out directly or via the Agora Slack Channel!


