
How To: Create a Unity Stream Video Chat App
All apps become more fun when users have the ability to see and interact with each other. Options are limited especially when using Unity. The best application development for video streaming I’ve found is the Agora Video SDK for webRTC chat Unity through the Unity Asset Store.
In this guide we’ll walk through all the steps you need to build a cross-platform Unity stream video chat mobile app.
Prerequisites
- Unity Editor
- An understanding of the Unity Editor, Game Objects, Unity scripting, and publishing Unity apps to mobile devices
- Basic understanding of C# language
- Agora Developer Account
Note: While no Unity knowledge is needed to follow along, certain basic concepts (see prerequisites) won’t be explained along the way.
Overview
Before we dive in to building our Unity stream video app, let’s take a moment to review all the steps that we will go through:
- Set Up New Project and Import Agora Video SDK for Unity
- Create Scenes
- Handle Button Taps
- Implementing the Agora SDK
- Build and Test on device (iOS and Android)
Set Up New Project
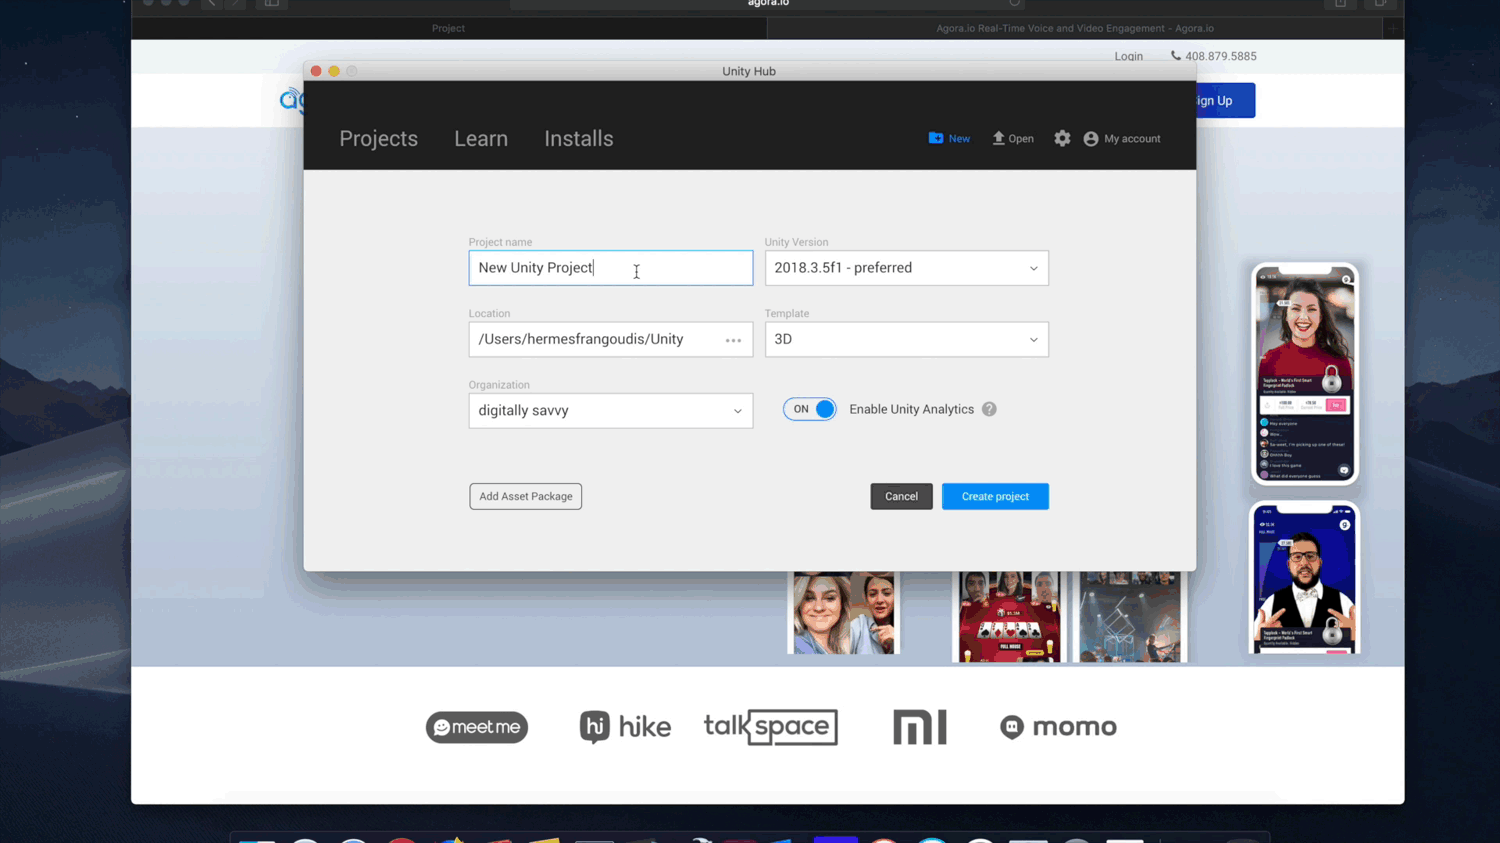
To start, let’s open Unity and create a blank new project and name it Agora Video Demo. Once Unity finishes setting up the project, we’ll navigate to the Unity Asset Store and search for “Agora Video SDK”. Next we’ll Import the Agora Video SDK for Unity into our program. When the prompt appears, make sure all the assets in the list are selected.
Create Scenes
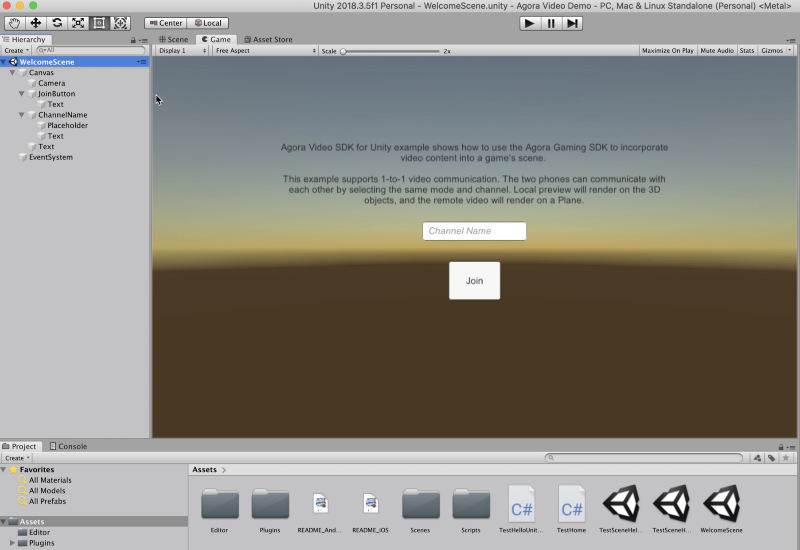
Now let’s create a new scene, name it WelcomeScene and double-click the scene to open it in the Editor view. The WelcomeScene will be the first screen the user sees once the Unity video player live stream loads. To start we’re going to remove the existing camera and lights from the scene. First we will add a Canvas Game Object. Next let’s add a Camera as a child of the Canvas. Since the screen is meant to be displayed in 2D, let’s switch our editor to 2D mode in order to make Unity stream video from the camera in the same mode. Let’s also switch our Editor view into Game mode, so we can visualize placement relative to the camera view.
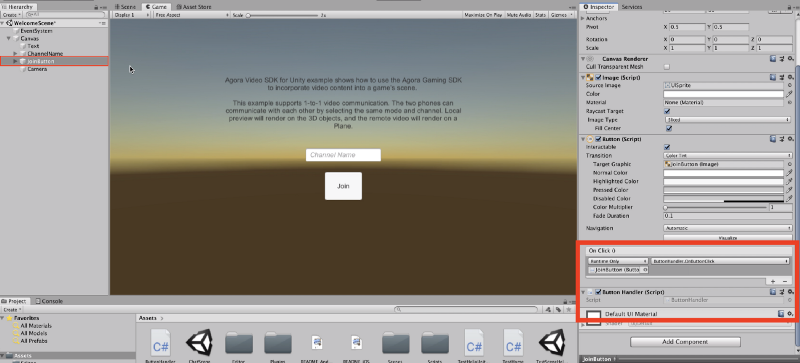
We are going to need a button that will trigger the app to join the chat, so we’ll add a button and name it JoinChannel and give it a label. Let’s adjust the scale and position of the button. We also need a way for the user to input their channel name, so let’s create a text input and name it ChannelName and give it meaningful placeholder text. We should add a text box to explain a little bit about our app. Create a Text Game Object as a child of the Canvas. Below is the text I wrote up, but feel free to add in whatever message you’d like.
Agora Video SDK for Unity example shows how to use the Agora Gaming SDK to incorporate video content into a game’s scene.
This example supports 1-to-1 Unity stream video communication. The two phones can communicate with each other by selecting the same mode and channel. Local preview will render on the 3D objects, and the remote video will render on a Plane.
Let’s take a moment to adjust the positions of each so we have ample space between Game Objects.
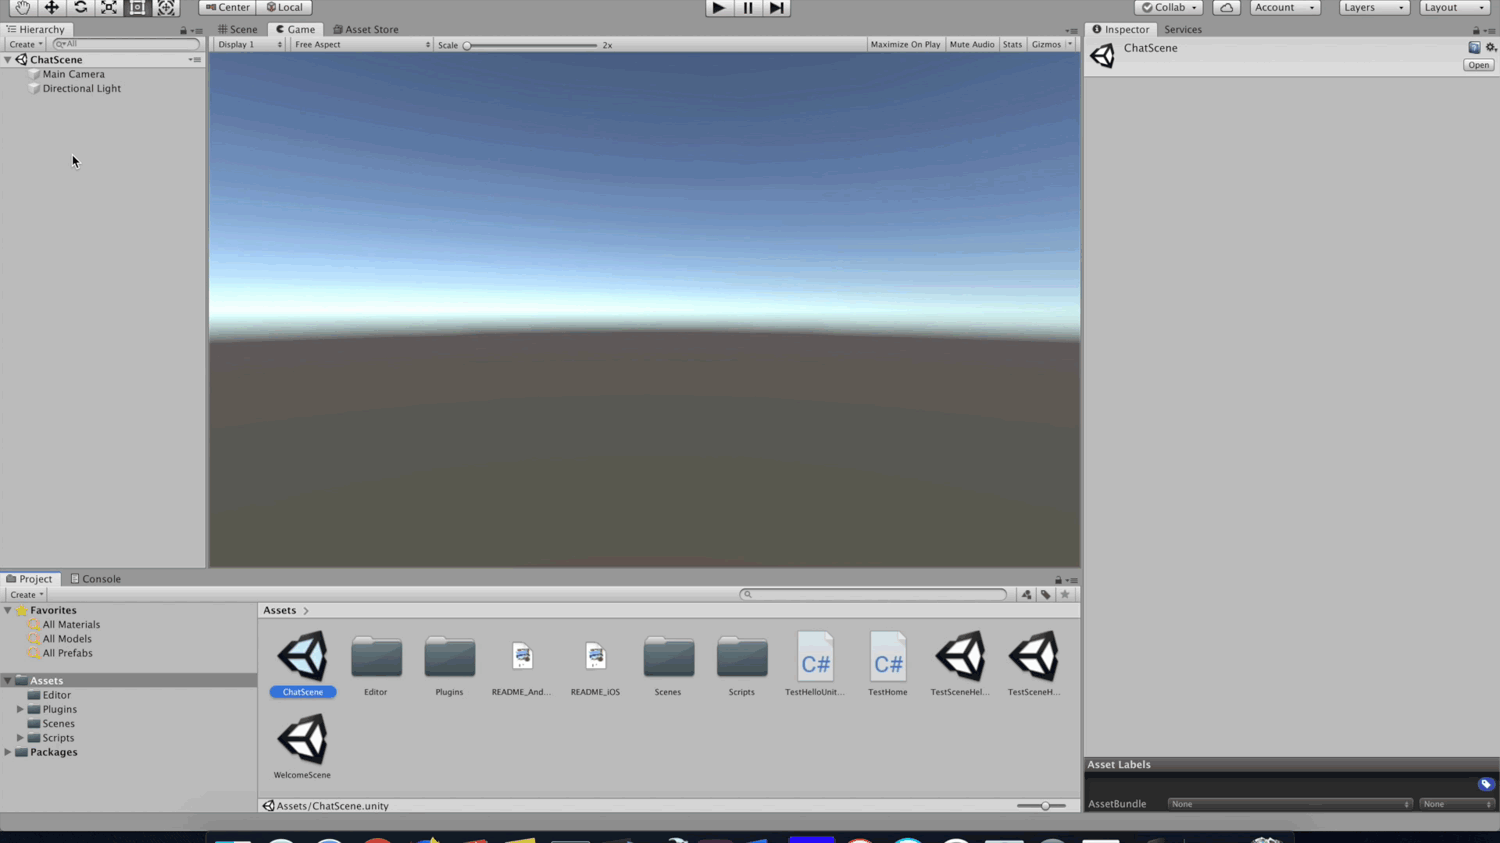
Next, we are going to create a new scene and name it ChatScene. This will be the screen with the local and remote video streams playing. To test out some of the capabilities of the Agora Video SDK, let’s add a few shapes to our scene. Let’s start by adding a cube to our scene. Since our scene contains 3D, let’s exit 2D mode in our editor. Now, we have a better view of our cube and it’s looking a bit small, so let’s change its scale to 2 on all axes.
We want our Cube to render the local camera stream as a texture, so we need to add VideoSurface.cs as a component of our Cube. Let’s add a Cylinder Game Object. First, we need to move it up so it’s not hidden by the Cube. Next we’ll give the Cylinder a unique scale, making sure to add the VideoSurface.cs as a component.
Lastly we are going to add a Canvas to the scene. This will allow us to also add in our 2D button to leave the chat. We’ll call it LeaveButton (very original) and give it a proper label. While we’re at it, let’s add a text box and name it VersionText; we can use it later to give us a visual confirmation that things are working. Let’s place the VersionText in the upper right hand corner to keep it out of the way and set the color to white to make it easier to see.
Handle Button Taps
During the process of setting up our scenes we created two buttons (JoinButton and LeaveButton), so now we need to create a script that will connect some actions to those buttons.
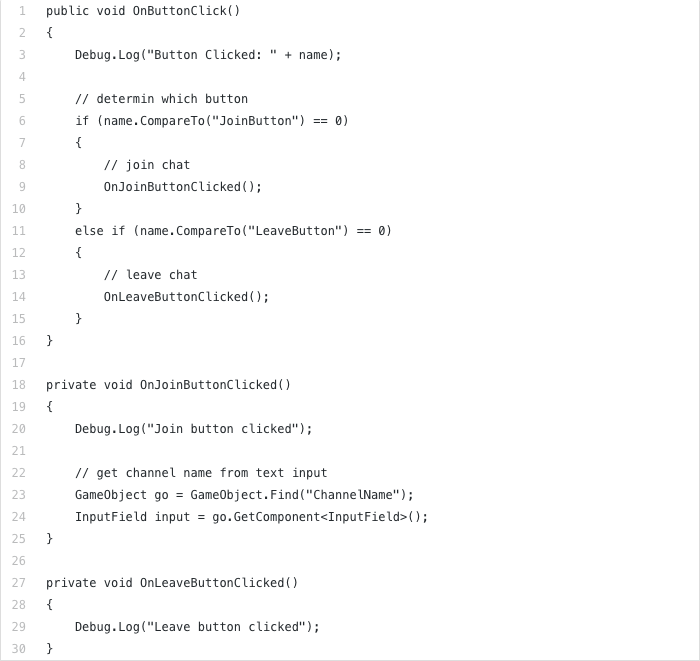
Start by creating a new C# Script in our assets. Name it ButtonHandler.cs and double-click it to open the file in Visual Studio. Let’s add a single function OnButtonClick(), and to keep things simple let’s add a Debug Log to the body of our function.
Debug.Log(“Button Clicked: “ + name);Let’s go back to our WelcomeScene within Unity and connect our script and function to our button. First select the JoinButton and add the ButtonHandlerscript as a component. Next add an event and map the button click to OnButtonClick(). We’ll repeat this process for the LeaveButton within the ChatScene.
Now that we have two buttons invoking the same function, let’s add some logic to differentiate the between two. To prepare for our Agora implementation, let’s add a couple lines to get the user input from the ChannelName field. We’ll need to include the UI library and then we can get the InputField component from the ChannelName Game Object.
Implement the Agora SDK
To start we’ll create a new C# Script in our assets, name it AgoraInterface.cs, and open the file in Visual Studio. The first variable we will create is appId, and this will hold our Agora App ID. Take a moment to log in to your Agora Developer Account, and copy your personal App ID and paste it into the value of appId. We also need to create a variable to hold a reference to the Agora RTC engine and a placeholder variable for the id of the remote stream.
private static string appId = "Agora App ID";
public IRtcEngine mRtcEngine;
public uint mRemotePeer;
Note: If you don’t have an Agora Developer Account, I’ve written a quick tutorial walking you through the setup process.
Let’s create a function to initialize the Agora RTC Engine: we’ll call it LoadEngine(). We need to make sure the engine is only initialized once. If the engine doesn’t already exist, we’ll use IRtcEngine.getEngine(appId)¹ passing in our Agora App ID.
Here we can also set the log level to Debug, so we can see our Debug logs and that everything is working as expected. As you can tell by now, I like to add lots of Debug logs to give us a clear understanding of what’s going on during execution.
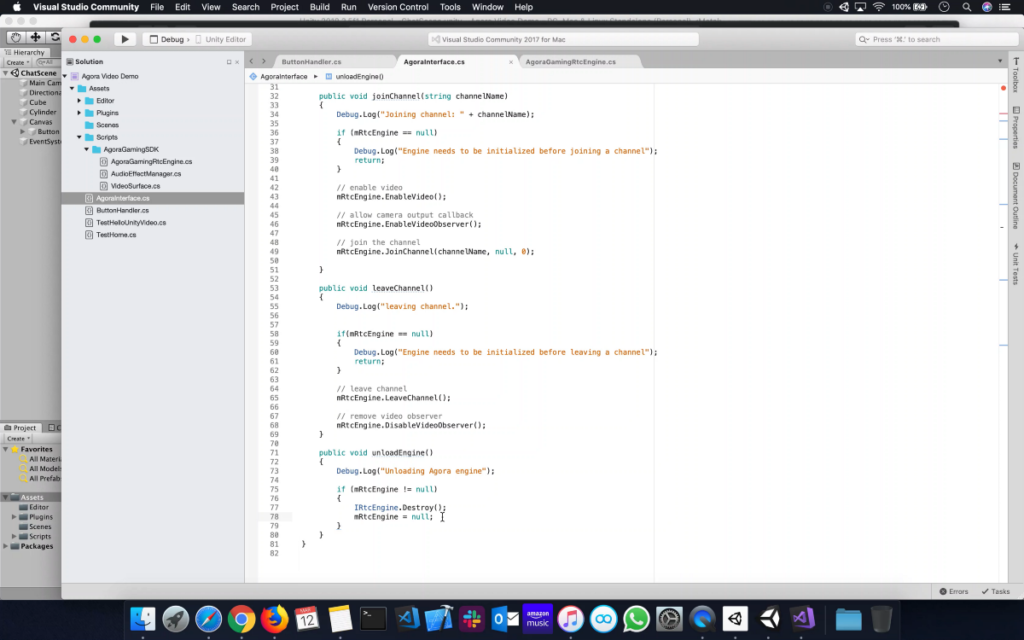
Next we’ll declare the JoinChannel() function. First check that the RTC engine exists, and then we’ll EnableVideo and enable the VideoObserver. Finally using the ChannelName we’ll call JoinChannel.
So far we’ve initialized the Agora RTC Engine and used it to join a channel, but now we need to add a way for users to leave the channel and “unload” the engine. We’ll start with LeaveChannel(). Again we check that the engine exists, and then using the engine call leaveChannel() and DisabelVideoObserver(). Lastly, we’ll unload the engine by calling IRtcEngine.Destroy() and setting the local reference to null.
The fundamental engine lifecycle events are accounted for, so we are ready to add some callback functions that the engine can call based on various predefined events ². In this implementation we will focus on three callbacks: OnChannelJoinSuccess, OnUserJoined, and OnUserOffline.
OnChannelJoinSuccess will get called whenever the local device successfully joins the channel; OnUserJoined will get called whenever a remote stream joins the channel; OnUserOffline will get called whenever a remote stream leaves the channel. After we define each function, we’ll notice the editor has stopped complaining about the errors on lines 43–45.
For now let’s leave the OnChannelJoinSuccess function with just a log. We’ll revisit this later.
Within the OnUserJoined function, we’ll add some logic to create an Empty Game Object and initialize it as a Plane. Let’s set the name of the Game Object to the remote steam’s uid so we can easily reference it later. Since we want to use this plane to render the remote stream, we need to add a VideoSurface component to the Game Object, and we’ll set the VideoSurface to use the remote stream’s uid and use setEnable(true) to enable rendering on the plane. Let’s set the scale and randomly position the plane somewhere randomly on the y-axis. As an example that the video plane does not need to remain stationary, we’ll add a TransformDelegate to the VideoSurface and this gets on update() so we can see the Plane rotation around the x-axis.
To finish up the callbacks within OnUserOffline let’s add some logic to destroy the Game Object created within OnUserJoined.
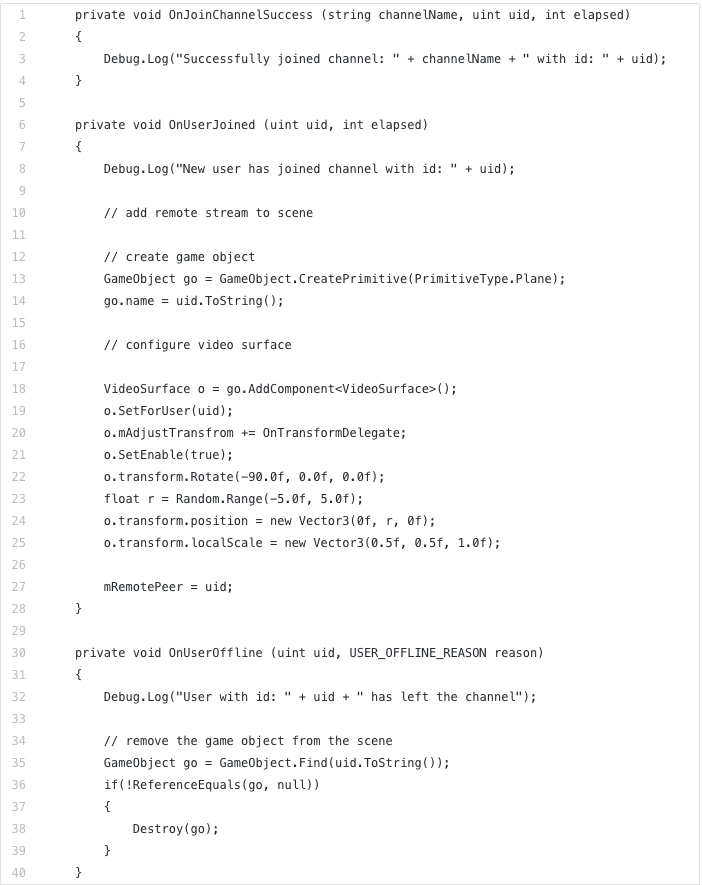
Let’s add the TransformDelegate function to skew the shape of and rotate any Game Object that calls this function. You may have noticed that within the TransformDelegate we added some logic for when uid == 0 , which is only true if we call the TransformDelegate on a VideoSurface with a local stream. Let’s declare a function called OnChatSceneLoaded and within it add some logic to set the TransformDelegate on the Cylinder’s VideoSurface. Let’s jump back to our ButtonHandler.cs script and add the logic to call the OnChatLoaded function whenever the ChatScene has finished loading.
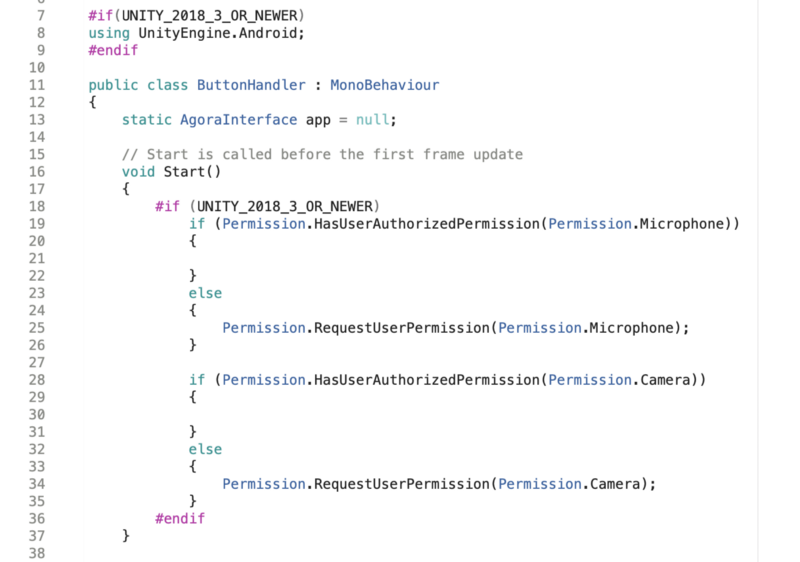
One thing we need to do before we can test our work on a device is to add some Permissions requests for Android. Starting in Unity 2018_3 the Permissions are no longer added automatically for security purposes, so we need to add a few if-else statements to check and request permission for microphone and camera.
Lastly, let’s add some logic to fill in the VersionText whenever we successfully join the channel. To do this, let’s go back to the AgoraInterface.cs script and declare the function getSDKVersion which returns the SDK version from the Agora RTC Engine. Now it’s time to connect this function with the OnChannelJoinSuccess that we created earlier. We’ll find the VersionText Game Object and set the text equal to "Version: " + getSdkVersion().
Build and Test on a Device (iOS and Android)
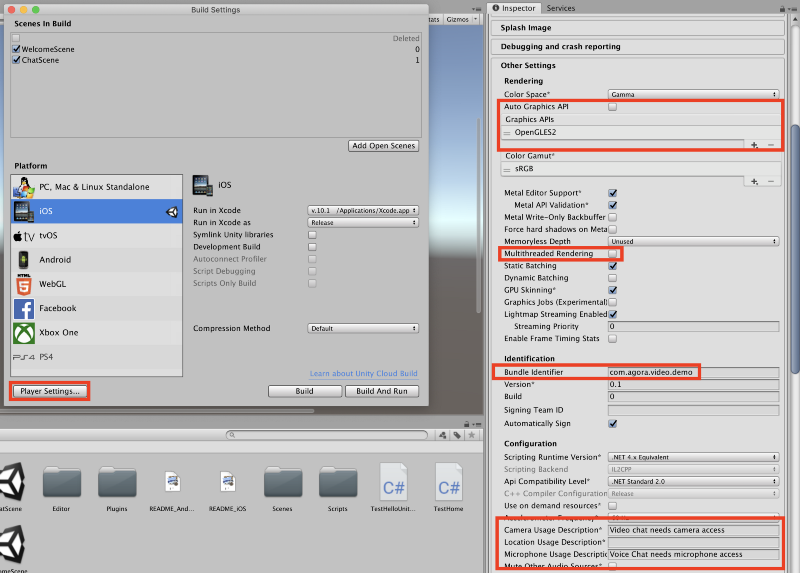
It’s finally time to test out our app! Let’s go back into Unity and open the Build Settings. First we’ll drag the WelcomeScene and ChatScene into the Scene list within the Build Settings dialog box.
Before we can build and deploy our app we need to make some adjustments to the Player Settings for each platform. Select iOS from the Platform list and open the Player Settings. First we need to deselect the Auto Graphics API option. Next, within the Graphics API options, make sure only OpenGLES2 is on the list (you may need to add it using the + icon) and remove any other APIs that may appear on the list. We also have to deselect the Multithreaded Rendering option. Let’s update the Bundle ID and provide some text for the camera and microphone usage descriptions (enables the permissions prompts).
We are now ready to build our app! Within the Build Settings dialog click the Build button, and Unity will prompt you for a location to save the build. I like to create a Builds folder to keep things organized. Save your build within the newly created Builds folder, and save our build as iOS. After Unity finishes building the iOS app the Finder window will appear containing the Unity-iPhone.xcodeproj, double click the file to open Xcode. Once Xcode is open, select the project (from the file navigator on the left) and enable Automatic Signing and select your team profile. Lastly, make sure your test device is plugged in and click the Play button.
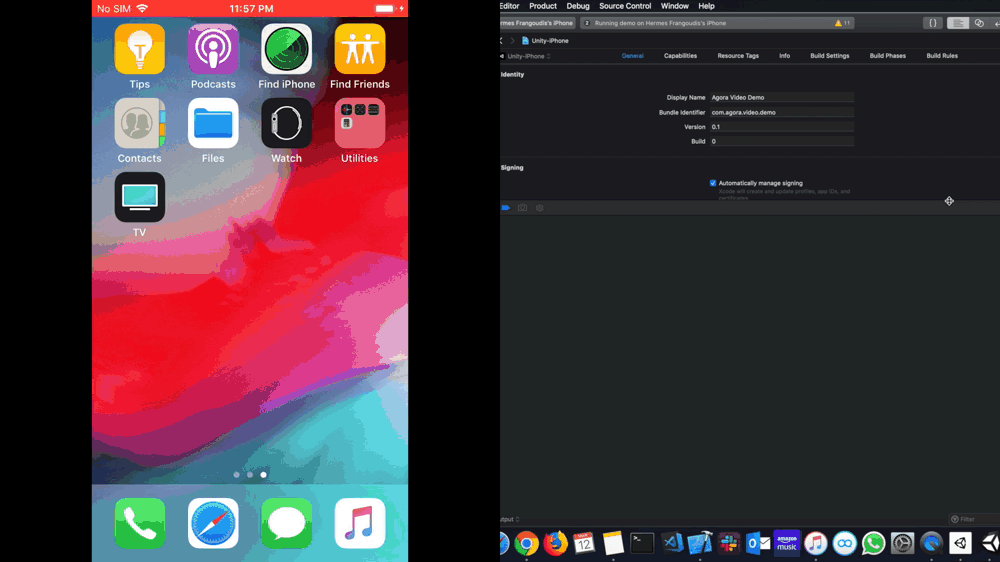
You can see the WelcomeScene loads first, and then when we join the channel we are taken to the ChatScene and back to the WelcomeScene when we click the Leave button. The only thing missing is the remote stream, but for that we need a second device.
At this point we could plug in another iOS device and run the Unity stream video demo app again but that’s not fun. So let’s go back into Unity and build the project for Android.
Let’s select Android from the Platform list and follow the same steps as iOS. Open the Player Settings, make sure we are using OpenGLES2, have disabled Multithreaded Rendering option and provided a Package ID.
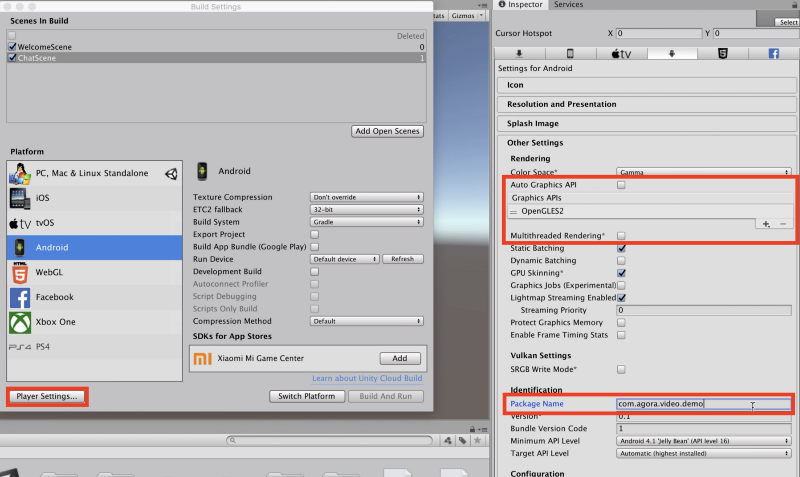
Make sure your Android device is plugged in and click Build And Run. Unity will prompt you to save your project, I named my build Android.
All Done!
You have created your Unity video streaming app. Pat yourself on the back because that was a big one! Well done!! Thanks for following along, and feel free to leave a comment below if you have any questions or contact us to learn more about Agora’s services!
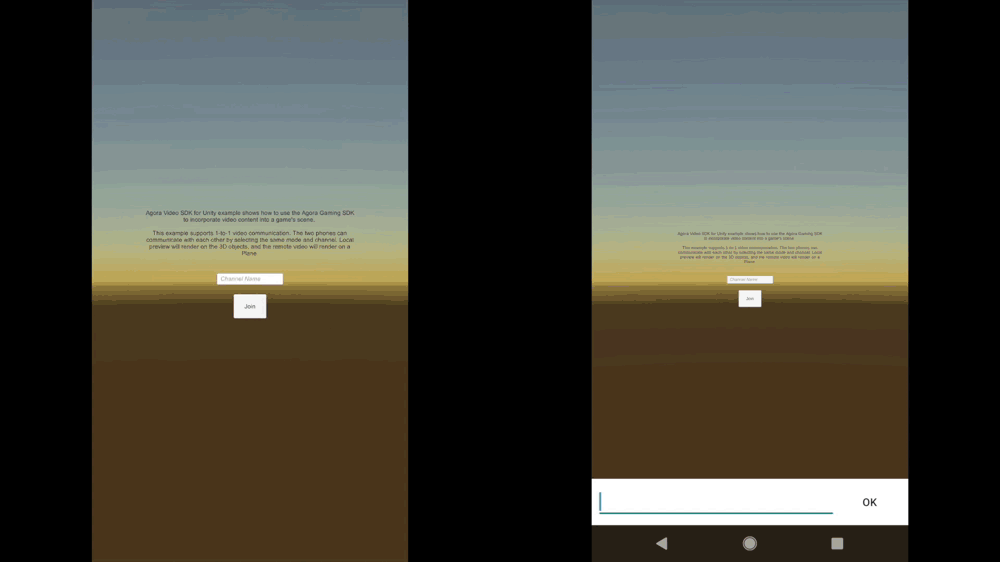
Note: At this point you can run the iOS app and the Android app to see both local and remote streams in the channel.
Other Resources
- The Agora Video SDK for Unity is available on the Unity Asset Store.
- The complete API documentation is available in the Document Center.
- For technical support, submit a ticket using the Agora Dashboard.
Footnotes
- You may ask, why
getEngine()and notnew IRtcEngine(). This has to do with Agora’s RTC Engine operating as a singleton.getEngine()will check if an instance exists and create a new one if it doesn’t. ThegetEngine()function can also be called later to get a reference to the engine from other parts of the code. - All callbacks are visible within the
AgoraGameRtcEngine.cs
(Assets → /Scripts → /AgoraGamingSDK ).
Note: Each callback function passes a specific set of parameters so it’s important to look at the AgoraGameRtcEngine.cs file if you plan to add any of the other callbacks.