
Agora’s main product is audio and video streaming services, which enable you to connect with friends, colleagues and teachers with super-low latency. But another Agora product enables you share messages between devices on the network: Agora RTM (real-time messaging) SDK. In this tutorial, you’ll learn some of the many things you can do with RTM.
This tutorial covers sending messages (such as text and photos) to others, rendering them with an open-source iOS framework called MessageKit, detecting who is in the RTM channel (with a feature to raise hands for users who need attention), and sharing files with the channel, which can be viewed and exported.
Prerequisites
- An Agora developer account (see How to Get Started with Agora)
- Xcode 12.0 or later
- An iOS device with minimum iOS 14.0
- A basic understanding of iOS development
- CocoaPods
iOS 14 is not a requirement of Agora RTM SDK but of various Swift classes, such as UIDocumentPickerViewController.
Setup
Download this repository on the branch guide_start, open the project directory in terminal and run pod init to install AgoraRtm_iOS. Open the .xcworkspace file to get started.
This branch has essentially all the UI already set up and needs only the connections and callbacks to Agora RTM SDK.
Below are the main four pages of the project before the linking to RTM are set up:
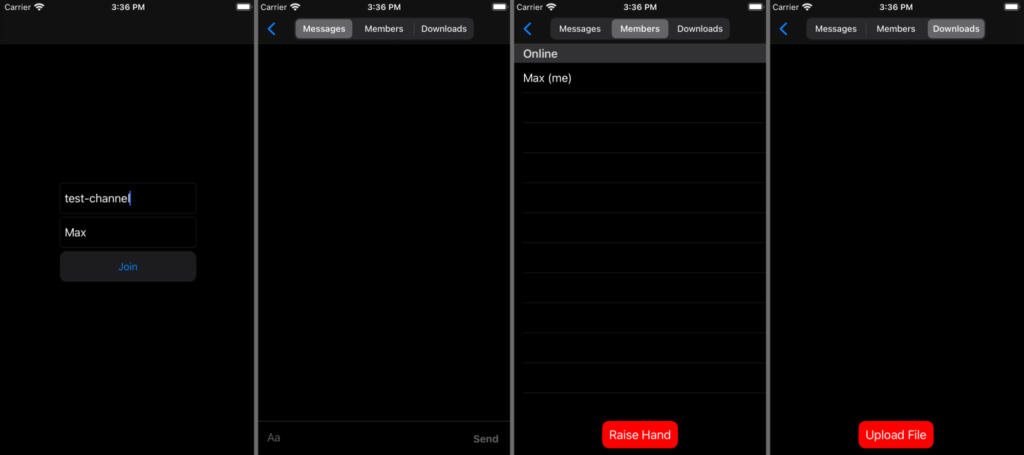
Step 1: Logging in
In the first view (ViewController), we have two text fields and a join button. On pressing the join button, we take the values out of the two text fields, create an instance of MultiChatVC and then create the base UI, along with a few other pieces that I will explain later in this tutorial.
In MultiChatVC’s viewDidLoad method is a call to rtmLogin(). The method is currently empty on the guide_start branch, but this is where the logic for connecting to the RTM back end and also the channel will go.
First, we need to create an AgoraRtmKit instance with our App ID. See How to Get Started with Agora if you do not already have an App ID.
MultiChatVC already has an optional value for the RTM instance called rtmKit, so let’s use that and assign the delegate to this instance of MultiChatVC:
self.rtmKit = AgoraRtmKit(appId: <#Agora App ID#>, delegate: self)After this, we need to connect to the RTM back end, create a channel, and then join the channel:
self.rtmKit?.login(
  byToken: nil, user: self.localUser.userDetails.senderId,
  completion: { loginCode in
    if loginCode == .ok {
      self.rtmChannel = self.rtmKit?.createChannel(
        withId: self.channel, delegate: self
      )
      self.rtmChannel?.join(
        completion: self.channelJoined(joinCode:)
      )
    }
  }
)
In this example we are going to pass nil as the token as this is a development project, however in a production app it is highly encouraged to use tokens for security. There are many articles that talk in depth about how to generate tokens, including this one, which uses Golang.
As you can see in the above example, we have access to members self.localUser, self.channel, and a method self.channelJoined. Once those code snippets are added to MultiChatVC.rtmLogin()we can look at what to do once the channel has been joined.
In our case, localUser is defined on the initialiser of MultiChatVC. localUser is an instance of RTMUser, which contains:
- User details, including a unique ID and the username entered in the box in the initial screen
- The status, which is initially
.offline - handRaised, which will be used later to show if the user’s hand is raised or not
The method channelJoined currently contains an empty if statement to see whether the channel was successfully joined. We need to do several things here: we need to set the local user’s status to .online, append them to a list we are keeping of all connected users called connectedUsers, and add them to a dictionary of type [senderId: userDetails]. The dictionary is there only as a to look up users that is faster than searching through the entire list of connectedUsers each time.
The channelJoined method should look like this once the above steps have been added:
func channelJoined(joinCode: AgoraRtmJoinChannelErrorCode) {
  if joinCode == .channelErrorOk {
    print("connected to channel")
    self.localUser.status = .online
    self.connectedUsers.append(self.localUser)
    self.usersLookup[
      self.localUser.userDetails.senderId
    ] = self.localUser
  }
}
I’ve left the print statement in just because it’s helpful for debugging.
We’re now connected to our channel and ready to go to the next step: being able to send messages to other members using MessageKit.
Step 2: Integrating MessageKit
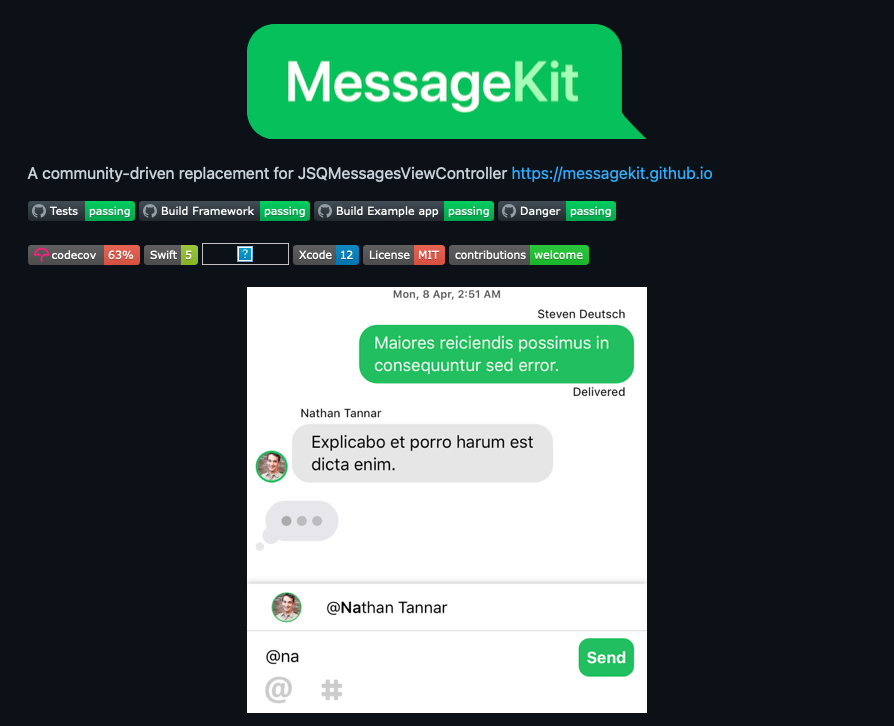
What is MessageKit?
MessageKit is an open-source, community-driven UI library for creating a messaging user interface. Just one example of a UI library of this kind, it was chosen for this tutorial due to its popularity in the iOS ecosystem.
This is the most complex section of the project, so take your time with it. If you get lost, refer to the default branch on the repository, which has all the pieces filled in.
Setting up MessageKit
Check out the repository for MessageKit on GitHub for details about how to best set it up for your environment. In the provided code repository for this post, I have already set it up to be displayed in MultiChatVC.pages.messages using RTMChatViewController.
Some of the classes created to aid MessageKit in this repository are:
Sender, which uses MessageKit's protocolSenderTypefor information about who sent the messageMessageKitMessage, using MessageKit's protocolMessageTypefor all messages inserted into the UIImageMediaItem, used to display image messages in MessageKit
Some of the above classes also contain methods for converting to JSON, which is how the information will be sent from the device to the RTM network and then to other devices in the channel.
Most of the code associated with MessageKit can be found in MultiChatVC+Message.swift, which is in our starter project.
In this file we extend the base class of MultiChatVC to use the protocols MessagesDataSource, MessagesLayoutDelegate, and MessagesDisplayDelegate, which are used to show MessageKit what messages to display. I based the implementation of MessageKit in this application on some of the code samples I found in the MessageKit GitHub repository. If anything is unclear about this, I encourage you to check out the documentation in the MessageKit repository.
Scrolling down to the methods inputBar and ;insertMessages, we see that here is where the text added to the bottom text field is captured and processed to form a MessageKitMessage object. In this implementation only text- and image-based messages are accepted, but MessageKit supports many more types, including video, audio and contacts. This example could be altered to accept those too.
After the MessageKitMessage is created, addNewMessage is called, which inserts the message into the view. But now we need to distribute this message to all other peers across RTM.
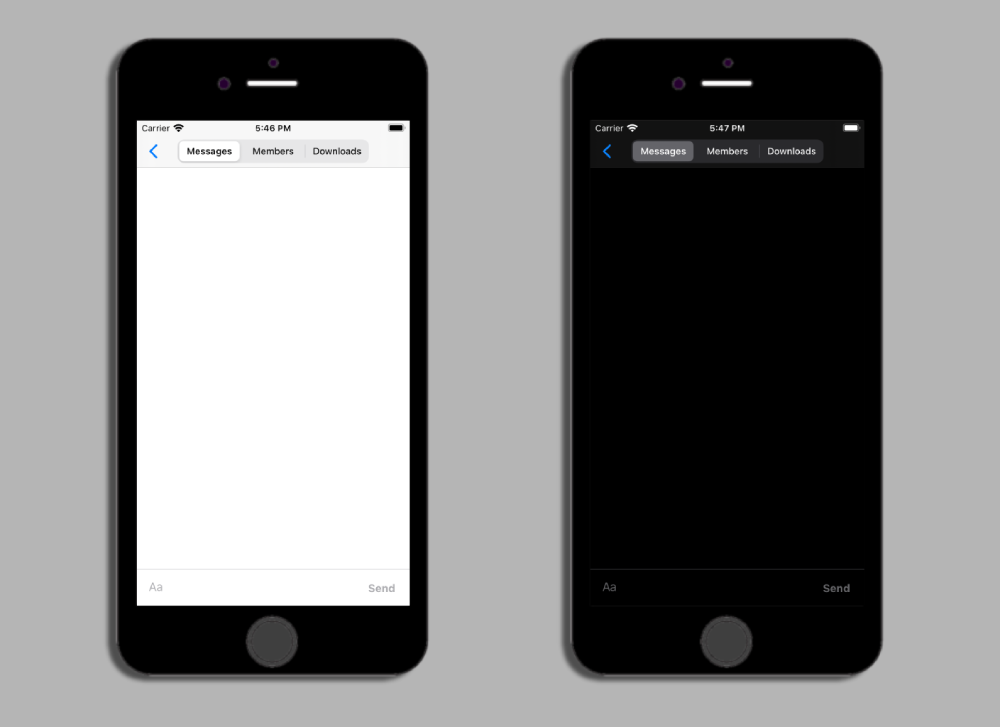
Our the bare UI currently looks like this:
Encoding Messages
The MessageKitMessage has a method called generateMessageText. Let's see what that does:
func generateMessageText() -> String {
  var rtmMessage: [String: Any] = [
    "sender": self.sender.toJSON(),
    "message_id": self.messageId,
    "timestamp": ISO8601DateFormatter().string(from: self.sentDate)
  ]
  switch self.kind {
  case .attributedText(let str):
    rtmMessage["type"] = "text"
    rtmMessage["body"] = str.string
  case .text(let str):
    rtmMessage["type"] = "text"
    rtmMessage["body"] = str
  case .photo(_):
    rtmMessage["type"] = "photo"
  default:
    print("no conversion for type: \(kind)")
  }
  let jsonData = try! JSONSerialization.data(
    withJSONObject: rtmMessage, options: []
  )
  let decoded = String(data: jsonData, encoding: .utf8)!
  return decoded
}
be seen in this snippet, we are turning the MessageKitMessage properties into a Swift dictionary and then to JSON data serialised as a string.
For example, if we created an object like this:
let msg = MessageKitMessage(
  sender: Sender(senderId: "my-sender-id", displayName: "Max"),
  messageId: "random-message-id",
  sentDate: .init(),
  kind: .text("Hello World")
)
The output of msg.generateMessageText() would look like this:
{
  "sender": {
    "display_name": "Max",
    "sender_id": "my-sender-id"
  },
  "message_id": "random-message-id",
  "timestamp": "2021-03-12T09:05:16Z",
  "type": "text",
  "body": "Hello World"
}
The output would be the above wrapped in a string
As you can see, the above can be converted back into a MessageKit message once it’s received on the remote device via this initialiser:
public init?(basicMessage: AgoraRtmMessage) {
  let data = Data(basicMessage.text.utf8)
  do {
    guard let json = try JSONSerialization.jsonObject(
        with: data, options: []) as? [String: Any],
      let sender = json["sender"] as? [String: String],
      let displayName = sender["display_name"],
      let senderId = sender["sender_id"],
      let messageId = json["message_id"] as? String,
      let type = json["type"] as? String,
      let timestamp = json["timestamp"] as? String,
      let body = json["body"] as? String,
      let sentDate = ISO8601DateFormatter().date(from: timestamp)
    else {
      return nil
    }var messageKind: MessageKind!
    if type == "text" {
      messageKind = .text(body)
    } else {
      return nil
    }
    self = MessageKitMessage(
      sender: Sender(senderId: senderId, displayName: displayName),
      messageId: messageId, sentDate: sentDate, kind: messageKind
    )
  } catch let error as NSError {
    print("Failed to load: \(error.localizedDescription)")
    return nil
  }
}
Usually, you might want to just use Swift’s Codable to encode and decode a class of this type. However, the property MessageKind would need to be explicitly encoded because it can be many types, including a UIImage. Encoding and decoding this way also means that we know exactly how the message will look, so it can be interpreted the same on any platform, including Android.
Sending Messages Over RTM
Now that we have a string that represents the message body, we need to send this over RTM.
To do so, let’s head to the insertMessages method in MultiChatVC+Messages.swift, grab the JSON text and call the method AgoraRtmChannel.send() using our instance of the current channel, found at MultiChatVC.rtmChannel like this:
if let msgText = message?.generateMessageText() {
  self.rtmChannel?.send(
    AgoraRtmMessage(text: msgText),
    completion: { sentCode in
      if sentCode == .errorOk {
        print("Message was sent!")
      }
    }
  )
}
You may want to produce some feedback in case the message is not successfully sent to the channel due to network issues. But for the sake of simplicity we will skip that part and trust in the Agora RTM infrastructure.
But what about images? We cannot send images in such a simple way, partly because there is a limit on the size of any RTM message to 32KB, but also because there are specific methods for sending images over RTM.
To send an image over RTM, it must exist as a file on the device first. To do so in this example, we generate a random UUID as the filename in FileManager.default.temporaryDirectory:
let fileURL = FileManager.default.temporaryDirectory
  .appendingPathComponent(UUID().uuidString)
if let _ = try? img.pngData()?.write(to: fileURL) {
  // Image saved to `fileURL`, now send it over RTM
}
The first step is creating an image message with our AgoraRtmKit instance using createImageMessage(byUploading:,withRequest:):
var requestID = Int64.random(in: Int64.min...Int64.max)
self.rtmKit?.createImageMessage(
  byUploading: fileURL.path,
  withRequest: &requestID,
  completion: { (requestId, imageMsg, errorCode) in
    if errorCode == .ok, let imageMsg = imageMsg {
      // now send our imageMsg over RTM
    }
  }
)
It might be necessary to keep track of the requestID if we are sending many images and want to define a separate completion method and different uploaded images to be sent to different locations. But in this instance a random requestID without tracking it is fine.
Now our imageMsg object is of type AgoraRtmImageMessage, which can be sent over the network in exactly the same way as a regular AgoraRtmMessage. It just has additional properties, including mediaId and fileName. However, we still need to add information for the MessageKitMessage, such as the sender and timestamp. This information can be generated from the same generateMessageText() used earlier and assigned to the AgoraRtmImageMessage text property, which is currently unused. Then the message can be safely sent over the network in the exact same way as before:
imageMsg.text = message.generateMessageText()
self.rtmChannel?.send(imageMsg, completion: { (messageSent) in
  if messageSent == .errorOk {
      print("Message has been sent!")
  }
})
Receiving Messages from RTM
Receiving messages with Agora RTM is handled from various delegate methods. In our case, the delegate methods for our group chat will be found in the AgoraRtmChannelDelegate protocol, and in this project all AgoraRtmChannelDelegate and AgoraRtmDelegate methods are defined in MultiChatVC+AgoraRtmDelegate.swift, and the channel delegate is assigned upon creating the channel.
The delegate method we are interested for watching messages coming in from any user in the channel is channel(_:,messageReceived:from:). As you can see in MultiChatVC+AgoraRtmDelegate.swift this method has already been defined. It directly calls another method, handleMessageReceived(), passing only the AgoraRtmMessage.
All we need to do here is create an MessageKitMessage instance from the optional initialiser we defined earlier. If this message is of the expected structure, then we can go ahead and insert that message directly into our MessageKit view using the same addNewMessage() that was used when creating the image. The code at the top of handleMessageReceived should look like this:
if let msgKitMessage = MessageKitMessage(basicMessage: message) {
  self.addNewMessage(message: msgKitMessage)
  return
}
// otherwise handle other types of incoming message
This only works for text based messages, now let’s take a look at those incoming AgoraRtmImageMessage objects.
In the same file you should see an already defined delegate method of channel(_:,imageMessageReceived:,from:), with an empty body.
Similar to createImageMessage is a method on the AgoraRtmKit class called downloadMedia(toMemory:,withRequest:,completion:), which we can use to download the image and then pass to a MessageKitMessage to display with MessageKit.
To download the image, add the following code to the method body:
var requestId = Int64.random(in: Int64.min...Int64.max)
channel.kit.downloadMedia(
  toMemory: message.mediaId, withRequest: &requestId
) { (request, imageData, errcode) in
  if let imgData = imageData, let img = UIImage(data: imgData) {
    // send image to MessageKit
  }
}
We now have the image in UIImage form. This could be written to the device instead of stored in memory.
Now to create a MessageKitMessage, we need to get the properties from our message.text, which is encoded JSON. There is another method I have already added to this project to do just that. This method has a very similar body to MessageKitMessage(basicMessage:), and it is called getProperties:
static func getProperties(
  from text: String
) -> (sender: Sender, sentData: Date, messageId: String)? {
  let data = Data(text.utf8)
  do {
    guard let json = try JSONSerialization.jsonObject(
        with: data, options: []) as? [String: Any],
      let sender = json["sender"] as? [String: String],
      let displayName = sender["display_name"],
      let senderId = sender["sender_id"],
      let messageId = json["message_id"] as? String,
      let timestamp = json["timestamp"] as? String,
      let sentDate = ISO8601DateFormatter().date(from: timestamp)
    else { return nil }
    return (
      Sender(senderId: senderId, displayName: displayName),
      sentDate,
      messageId
    )
  } catch let err as NSError {
    print("ERROR COULD NOT DECODE \(err)")
    print(text)
  }
  return nil
}
We can now almost create a MessageKitMessage with the above method. The last thing to do is turn the UIImage into a MediaItem type using the ImageMediaItem mentioned at the beginning of step 2 using the initialiser, which accepts a UIImage, and then pass all those values into the MessageKitMessage initialiser:
guard let (sender, sentDate, messageId) = MessageKitMessage.getProperties(
  from: message.text
) else {
  return
}
let mediaItem = ImageMediaItem(image: img)
let message = MessageKitMessage(
  sender: sender,
  messageId: messageId,
  sentDate: sentDate,
  kind: .photo(mediaItem)
)
Now we just have to once again pass this object to addNewMessage() and our received image will appear in MessageKit!
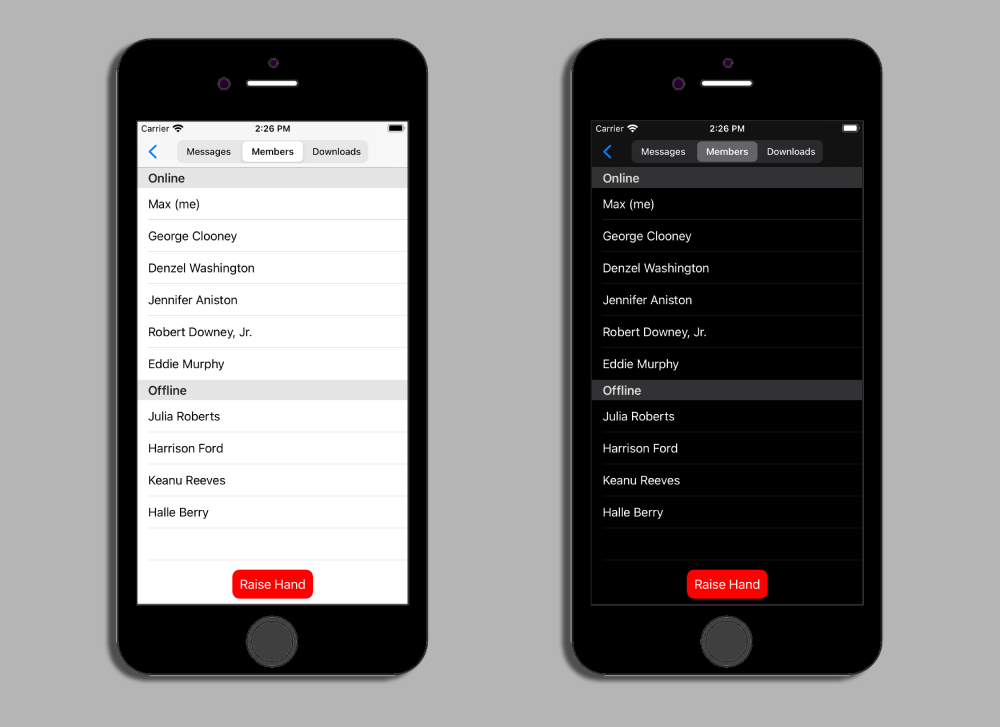
Step 3: Displaying Peers
In this section we will explore one solution to display everyone else who is in our channel. It will be a simple list view of up to 2 sections, the first section being those who are online, and the second section for users who were in the channel, but have now logged out.
We will also add a simple button to change the state of our user to everyone else to display a raised hand next to our name.
Sending Status Updates
We will send a message channel-wide to give the rest of the channel our details with the join channel callback used earlier. Whenever a member joins our channel we will send them a message with our details to populate their lists. We are notified whenever a member joins the channel with channel(_:,memberJoined:). We will also need to use the AgoraRtmDelegate because some messages will be sent directly to users, as opposed to channel-wide.
To start, we will send our status to the newest members in the channel as they join.
The message we wish to send should have a similar body to those sent for MessageKit, but the amount of required information is much less here. All we need to tell the user is our sender details, including display name and ID; the type of message, which in this case is "status"; and an encoding of the enum representing our status (online or offline).
Since we store our local user data in the property localUser, which is of custom type RTMUser, I have added methods for turning the struct into a JSON string and then to a text-based AgoraRtmMessage. To access the message, simply call self.localUser.statusRTMMessage to get the message. See RTMUser.swift to review the implementation of this. The result creates an AgoraRtmMessage containing the following text:
{
  "sender":{
    "sender_id":"B22663DD-3A30-4102-B4A1-5645AD144625",
    "display_name":"ipad"
  },
  "body":"online",
  "type":"status"
}
Once we have the message, we use AgoraRtmKit to send the message to the newly joined user. The full method should look like this:
func channel(_ channel: AgoraRtmChannel, memberJoined member: AgoraRtmMember) {
  channel.kit.send(
    self.localUser.statusRTMMessage,
    toPeer: member.userId,
    completion: { sentErr in
      if sentErr == .ok {
          print("Status message has sent")
      }
  })
}
In channelJoined, we need to send a similar message to our peers. But instead of to a specific user this message is sent out channel-wide:
func channelJoined(joinCode: AgoraRtmJoinChannelErrorCode) {
  if joinCode == .channelErrorOk {
    print("connected to channel")
    self.localUser.status = .online
    self.connectedUsers.append(self.localUser)
    self.usersLookup[self.localUser.userDetails.senderId] = self.localUser
    // Status related code:
    self.rtmChannel?.send(self.localUser.statusRTMMessage) { sentErr in
      if sentErr != .errorOk {
        print("status to channel send failed \(sentErr.rawValue)")
      }
    }
    self.membersTable?.reloadData()
  }
}
Receiving Status Updates
In step 1, we added our local user to connectedUsers and the map, usersLookup. Now we want to do the same for everyone else who joins and leaves the channel, once again using channel delegate methods. The delegate methods we are adding to know the status of other members are rtmKit(_:,messageReceived:,fromPeer:) and channel(_:,messageReceived:,from:). We are also going to use channel(_:,memberLeft:) to update a remote user's status to offline.
The first two methods are already defined and are calling the previously covered function, handleMessageReceived()which first checks if the incoming message is one that should be used by MessageKit. If that does not find a message for MessageKit, then the next functionality we should check for is if this AgoraRtmMessage contains a JSON string body and if that body is of the structure we expect.
let data = Data(message.text.utf8)if message.type == .text, let json = try? JSONSerialization.jsonObject(
  with: data, options: []
) as? [String: Any] {
  guard let senderJson = json["sender"] as? [String: String],
        let displayName = senderJson["display_name"],
        let senderId = senderJson["sender_id"],
        let type = json["type"] as? String,
        let body = json["body"] as? String
  else { return }
  let sender = Sender(senderId: senderId, displayName: displayName)
  if type == "status"
    guard let userStatus = RTMUser.Status(rawValue: status) else {
      print("could not set status to \(status)")
      return
    }
    self.statusUpdate(from: sender, newStatus: userStatus)
  }
}
Similarly, the memberLeft method should call the same statusUpdate method:
func channel(_ channel: AgoraRtmChannel, memberLeft member: AgoraRtmMember) {
  if let offlineUser = self.usersLookup[member.userId] {
    self.statusUpdate(
      from: offlineUser.userDetails,
      newStatus: .offline
    )
  }
}
The statusUpdate(from:newStatus:) is definied in the project, and its flow is as follows:
- If a user of this senderId does not exist, one is created with the specified status.
- If a user does exist, their status is updated, and they are moved to either the connectedUsers list or offlineUsers list.
- Finally membersTable is reloaded with the updated data.
func statusUpdate(from sender: Sender, newStatus status: RTMUser.Status) {
  if let senderObj = self.usersLookup[sender.senderId] {
    if senderObj.status == status {
      return
    }
    let oldStatus = senderObj.status    senderObj.status = status
    if status == .offline {
      self.connectedUsers.removeAll(
        where: { $0.userDetails.senderId == sender.senderId }
      )
      self.offlineUsers.append(senderObj)
    } else if oldStatus == .offline {
      self.offlineUsers.removeAll(
        where: { $0.userDetails.senderId == sender.senderId }
      )
      self.connectedUsers.append(senderObj)
    }
  } else if status != .offline {
    let newUser = RTMUser(
      userDetails: sender,
      handRaised: false,
      status: status
    )
    self.usersLookup[sender.senderId] = newUser
    self.connectedUsers.append(newUser)
  } else {
    return
  }
  self.membersTable?.reloadData()
}
Now our table will be updating as users join and leave the channel!
Raise Your Hand
The final part in this section is the “Raise Hand” button.
Similar to sending status updates, I have added a property to quickly get the AgoraRtmMessage with a JSON of the raise hand update. This property is raiseHandRTMMessage, and the text of the message looks like this:
1{
2 "type": "raise_hand",
3 "sender": {
4   "display_name": "Max",
5   "sender_id": "1D83826A-7586-40C8-A002-767766E4FB76"
6},
7 "body": "true"
8}
The “Raise Hand” button already calls a method raiseHandPressed(), so in this method we need to change the handRaised property of localUser, fetch the message with raiseHandRTMMessage, send it to the rest of the channel, update the button text, and reload the membersTable once again:
@objc func raiseHandPressed(sender: UIButton) {
 self.localUser.handRaised.toggle()
 self.rtmChannel?.send(self.localUser.raiseHandRTMMessage)
 sender.setTitle(
   (self.localUser.handRaised ? "Lower" : "Raise") + " Hand" ,
   for: .normal
 )
 self.membersTable?.reloadData()
}
In the UITableViewDelegate method tableView(_:,cellForRowAt:), we can see what happens to the users where the value of handRaised is true:
if user.handRaised {
cell.accessoryView = UIImageView(
image: UIImage(systemName: "hand.raised.fill")
)
} else {
cell.accessoryView = nil
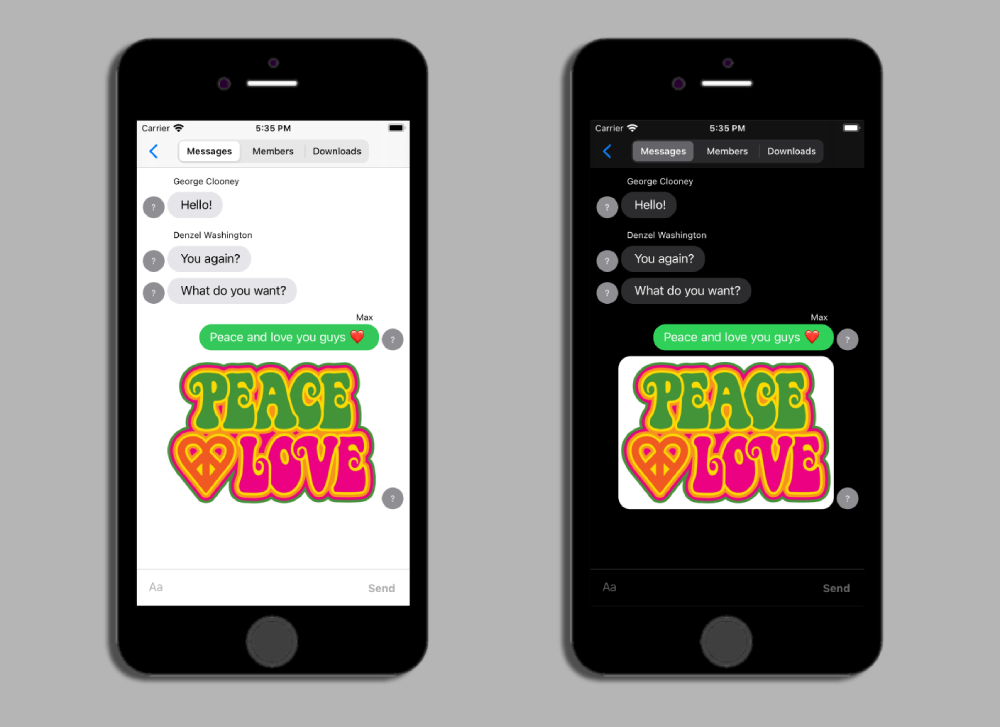
}So if we have a few users with their hands in the air, including ourselves, we see this:

Step 4: Sharing Files
As well as sharing small amounts of data to other users on the network, we can also send larger files.
We’ve already seen an example of sending images with the MessageKit integration, so in this part we’ll see how you can send other types of files, including PDFs and even a 3D file such as a USDZ.
The project already has the following layout:
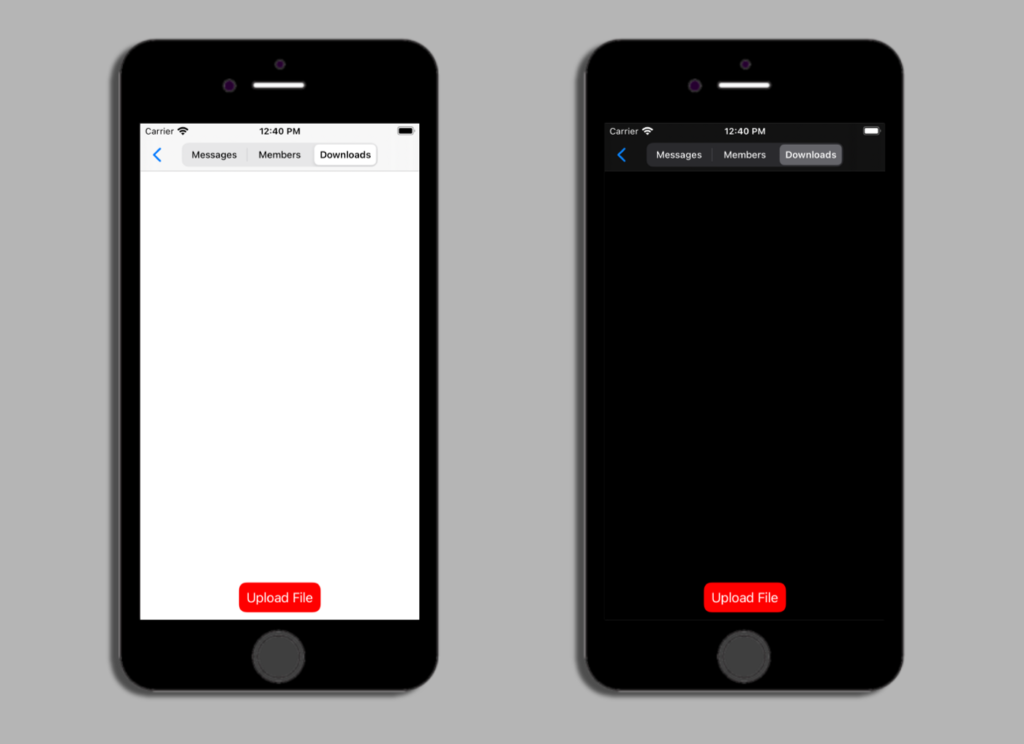
If you select the “Upload File” button you’ll see that it opens a UIDocumentPickerViewController, where you can select a file to then upload. This is what that looks like:

After you select an item, the picker view closes and a UIDocumentPickerDelegate method, didPickDocumentsAt, is called that tells us the URL for our picked document.
func documentPicker(
  _ controller: UIDocumentPickerViewController,
  didPickDocumentsAt urls: [URL]
) {
  guard let url = urls.first,
        url.startAccessingSecurityScopedResource()
  else { return }
  // send the file to RTM
}
From this method we need to create an AgoraRtmFileMessage and then send it to all other users in the channel.
We have seen createImageMessage for creating an AgoraRtmImageMessage previously in this tutorial. Similar to that is a method called createFileMessage, which we will use to make the AgoraRtmFileMessage.
This method takes the URL path and a requestID pointer to create our file message. After that, it has a completion callback to see if it was successful.
var requestID: Int64 = Int64.random(in: Int64.min...Int64.max)
self.rtmKit?.createFileMessage(
  byUploading: url.path, withRequest: &requestID,
  completion: { (requestId, fileMsg, errorCode) in
    if errorCode == .ok, let fileMsg = fileMsg {
        // send the file to our channel
    } else {
        print(errorCode)
    }
    DispatchQueue.main.async {
        url.stopAccessingSecurityScopedResource()
    }
})
Sending our file to the channel is very similar to before. In this case, we are not keeping track of users, so we do not need to add information such as the sender, as was done in previous sections. However, we are explicitly setting the fileName because that is useful for displaying information about the item in our collection view:
fileMsg.fileName = url.lastPathComponent
self.rtmChannel?.send(fileMsg, completion: { sentStatus in
  if sentStatus == .errorOk {
    print("File message sent")
  }
})
We need to display this file in our table. The table is found via a property called downloadsTable. The data source for the table is an array called downloadFiles. downloadFiles is an array of a custom type, DownloadableFileData. DownloadableFileData is a basic struct, containing only a filename and download ID used by Agora RTM.
self.downloadFiles.append(
  DownloadableFileData(
    filename: url.lastPathComponent,
    downloadID: fileMsg.mediaId
  )
)
self.downloadsTable?.reloadData()
The document picker delegate method should now look like this:
func documentPicker(
  _ controller: UIDocumentPickerViewController,
  didPickDocumentsAt urls: [URL]
) {
  guard let url = urls.first,
     url.startAccessingSecurityScopedResource()
  else { return }
  var requestID: Int64 = Int64.random(in: Int64.min...Int64.max)
  self.rtmKit?.createFileMessage(
    byUploading: url.path, withRequest: &requestID,
    completion: { (requestId, fileMsg, errorCode) in
      if errorCode == .ok, let fileMsg = fileMsg {
        fileMsg.fileName = url.lastPathComponent
        self.rtmChannel?.send(fileMsg, completion: { sentStatus in
          if sentStatus == .errorOk { print("File message sent") }
        })
        self.downloadFiles.append(
          DownloadableFileData(
            filename: url.lastPathComponent,
            downloadID: fileMsg.mediaId
          )
        )
        self.downloadsTable?.reloadData()
      } else {
        print(errorCode)
      }
      DispatchQueue.main.async {
        url.stopAccessingSecurityScopedResource()
      }
    }
  )
}
To display any received messages on other devices is very simple at this point. All we need to do is catch the messages coming in and append another entry to the downloadFiles array:
func channel(
_ channel: AgoraRtmChannel,
fileMessageReceived message: AgoraRtmFileMessage,
from member: AgoraRtmMember
) {
self.downloadFiles.append(
DownloadableFileData(filename: message.fileName, downloadID: message.mediaId)
)
self.downloadsTable?.reloadData()
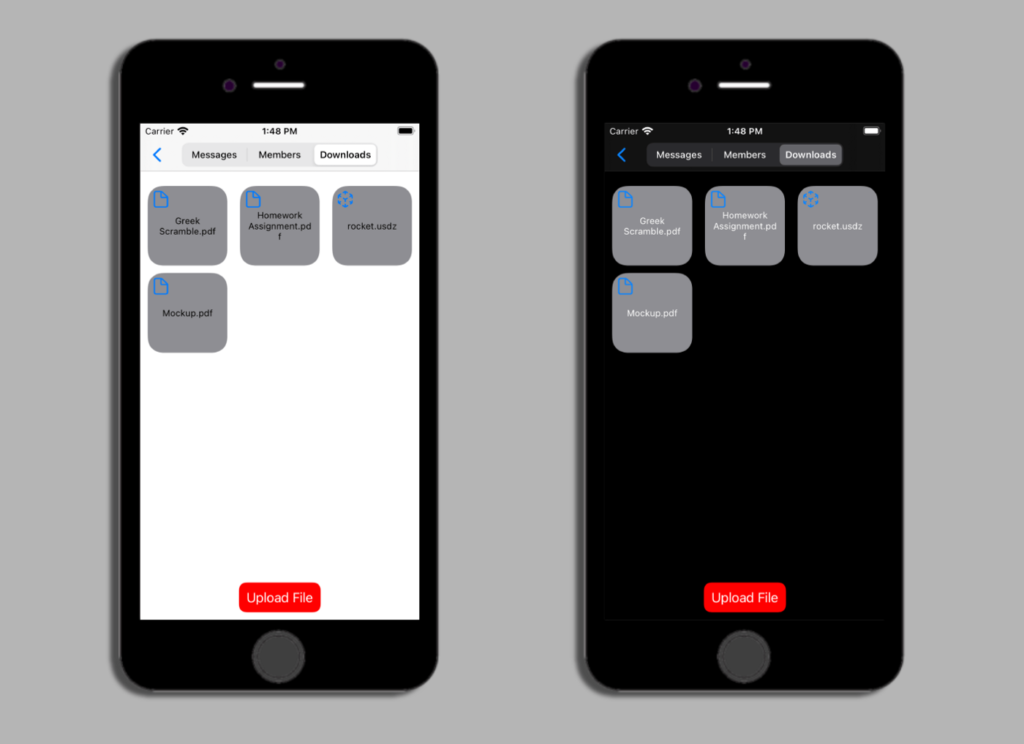
}Now all devices in the channel can see the files sent from their own device and all the other files being sent around the channel. The downloads page will look like this:
Now we need the files to download and open when clicked. The functionality for this will go in the UITableViewDelegate method didSelectItemAt.
To download the file, we use almost the same method used to download the images earlier. But instead of downloading to memory, we download to file: downloadMedia(_:toFile:,withRequest:,completion:). After the images are downloaded, we will call a method, showFile().
func collectionView(
  _ collectionView: UICollectionView,
  didSelectItemAt indexPath: IndexPath
) {
  let docsData = self.downloadFiles[indexPath.row]
  let downloadFileURL = FileManager.default.temporaryDirectory
    .appendingPathComponent(docsData.filename)var requestId = Int64.random(in: Int64.min...Int64.max)
  self.rtmKit?.downloadMedia(
    docsData.downloadID,
    toFile: downloadFileURL.path,
    withRequest: &requestId,
    completion: { _, errcode in
      if errcode == .ok {
        self.showFile(at: downloadFileURL)
      } else {
        print(errcode)
      }
    }
  )
}
showFile simply presents a QLPreviewController, which is used to display almost every type of file in the same way that the Files app does.
Here’s the flow of uploading some files, then displaying one of them:
It’s that simple, now we can view all kinds of files that are shared over the local network with ease.
Testing
To see the completed project download the repository and checkout the main branch.

Conclusion
Now you can add messaging to your application, including an app that uses voice or video messaging, see all online users, and even send files across the network.
There’s many more things that can be done with Agora RTM, and hopefully this post can help you achieve some of those things. These messages work between all supported platforms too, so a message can go from iOS to Android, to macOS, and even a Unity project.
Other Resources
For more information about building applications using Agora SDKs, take a look at the Agora Video Call Quickstart Guide and Agora API Reference.
I also invite you to join the Agora Developer Slack community.


