
Agora Cloud Recording makes it easy for a developer to record and store the videos from their real-time engagement application. We’ll look at how to add cloud recording to a React Native video chat app. By the end of this tutorial, you’ll be able to record and save video calls from your application to an Amazon S3 bucket for later access.
Prerequisites
- An Agora developer account (see How to Get Started)
- An AWS account
- A Heroku account or another service to deploy the back end
Architecture
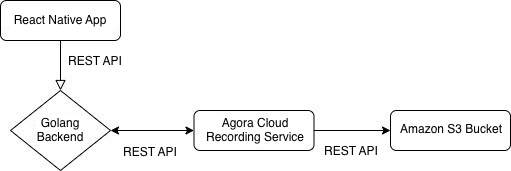
We’ll be deploying a Golang server to handle requests from our React Native app using the REST API. The Golang server will internally manage calling the Agora Cloud Recording service, which stores the result in an Amazon S3 bucket.
If you haven’t deployed a back-end service or used Golang before, don’t worry. We’ll walk through the entire process together.
Agora Setup
- Create a project: Once you have an Agora account, click the Project Management tab in the console. Click the Create button. Enter a name for your project. Select Secured Mode while creating the project.
- Enable cloud recording: Click the View usage button and select the option to enable cloud recording.
- Get app credentials: Copy the App ID and the App Certificate from the same page to a text file. We’ll use these later.
- Get customer credentials: Visit the RESTful API page and click the Add Secret button. Copy the Customer ID and the Customer Secret to a text file.
AWS Setup
Once you’ve created an AWS account, we need to create an Amazon S3 bucket to store our video recordings and an IAM user to access our bucket. If you already have this set up, feel free to skip this section.
- Go to your AWS IAM Console and create a user. Add the
AmazonS3FullAccesspolicy with Programmatic Access. - Copy your AWS Access Key and Secret Key to the text file.
- Create an Amazon S3 bucket and copy the bucket name to your text file. To find your region number (for your AWS region), go to the table and click the Amazon S3 tab. For example, if you’re using the
US_EAST_1region, your bucket number is 0.
Deploying Our Back End
Before deploying our back end, we need the following variables. (It’s time to use our text file.) We’ll be using the Heroku one-click deploy to make it super simple to get our back end up and running. You can use any other service as well:
APP_ID=
APP_CERTIFICATE=
RECORDING_VENDOR=
RECORDING_REGION=
BUCKET_NAME=
BUCKET_ACCESS_KEY=
BUCKET_ACCESS_SECRET=
CUSTOMER_ID=
CUSTOMER_CERTIFICATE=
Note: RECORDING_VENDOR=1 for AWS. Visit this link for more information.
- Create an account on Heroku if you haven’t done so already.
- Click this link to use the Heroku one-click deploy.
- Enter your variables and click the Deploy App button at the bottom of the page.
- Wait a few minutes. Once the deployment is complete, save your back-end URL in a text file, which we’ll use in the app.
Building Our App
We’ll be using the example app from this blog. If you’re new to the Agora platform, I recommend reading through the blog to understand how to build a video chat app. We’ll take that as a basis and discuss how to add cloud recording to it.
If you just want the final app, you can go to this repo.
Getting the Boilerplate
Make sure you have satisfied the prerequisites for creating and building a React Native app. Git clone or download the ZIP file from the master branch. In the project directory, execute npm install. If you’re building for iOS, also execute cd ios && pod install.
Adding Credentials
Open App.tsx and enter your back-end URL, Agora App ID, and a channel name to the state of our app (you can ignore the typescript errors for now). The channel name can be any alphanumeric string (example: 'test'):
We’ll also add three new state variables that are used for recording rid, sid, and recUid.
Joining Our Channel
Let’s edit the join channel method to use tokens from our back end:
We use the Fetch API to get our token from our server and then use it to join the channel.
Start Recording
We’ll create a function to start recording:
We’ll again use the Fetch API to send a POST request to the /api/start/call route of our back end. We’ll send the channel name in the body of our request. Once we get a response, we’ll update our state with the rid, sid, and recUid from the response.
Stopping Recording
To stop recording, we send a POST request to the /api/stop/call route of our back end with the channel, rid, sid, and recUid in the body:
Getting the Status
Let’s create a function to check the status of our recording and log it to the console:
Adding Buttons
Let’s add some buttons to execute our recording functions:
Now you can execute npm run android or npm run ios to launch the app on your device and once you click the start recording button, after a few seconds you should be able to see fragments of your videos in your S3 bucket.
Conclusion
That’s it, now you have an app that uses Agora Cloud Recording to store your videos. You can find out how to merge the resulting video fragments here. You can find more information about cloud recording here.


