
There are some pretty good solutions for collaborative live streams with other creators. But if you are like me, you probably think they are a little too expensive, and you probably wish they were more customizable. Thankfully, Agora exists and you can build your own services like this one!
Prerequisites
- An Agora developer account (see How to Get Started with Agora)
- Flutter SDK
- Agora RTC package
- Agora RTM package
Since this is such a big project, the plan is to break it down and cover only the most important concepts. If you want the full code, you can find it here: https://github.com/tadaspetra/flutter-projects/tree/main/streamer
App Overview
Before we address the main points, let’s look at what we are trying to accomplish and how we are going to go about it. The goal of this application is simple: Allow multiple users to join and stream their video to a streaming platform, using a host application that can manage the users and what gets pushed to the streaming platform.
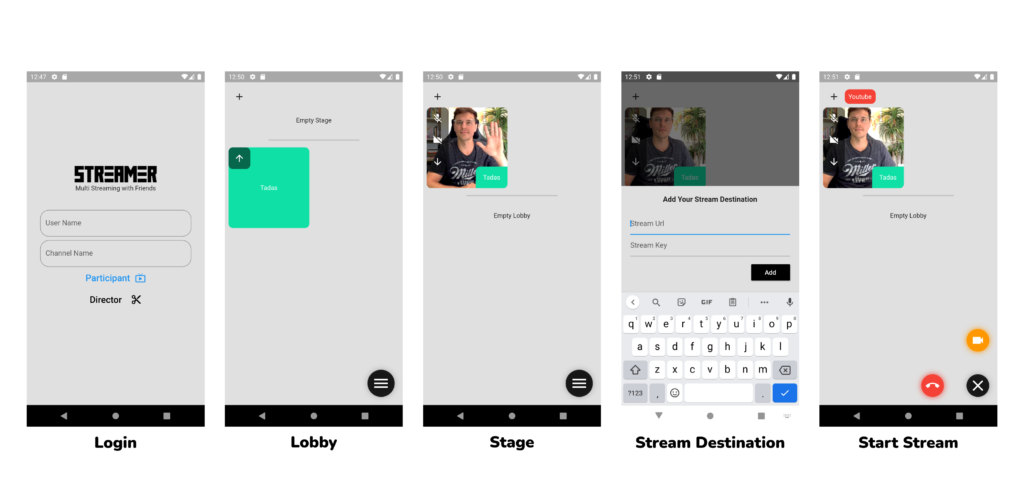
The flow of the application is as simple as possible. You start on the main screen, where you enter which channel you are trying to join and your name. Then you have two options: You can join as a director of the call or as a participant within the call:
- Director: Manages all the users and where and how the stream gets sent out
- Participant: Joins the call and has a simple call interface for collaboration
In this article, we won’t cover the basics of Agora and how it works. If you aren’t familiar with Agora, here are a few good places to start before you continue with this tutorial:
- Video call: https://www.youtube.com/watch?v=zVqs1EIpVxs
- Live streaming: https://www.youtube.com/watch?v=kE0ehPMGgVc
- RTM: https://www.youtube.com/watch?v=TBgHmFcDd1U
Participant View
This tutorial doesn’t spend much time on the participant view. The logic here should be very similar to any other type of video call, except for four big differences:
- When the user first joins they are in a lobby, so their camera and audio are off.
- When the host brings them onto the stage, their video and audio should turn on.
- Video and audio can be controlled by the host.
- Instead of seeing everybody in the call, they will see only the people on the stage.
The person using the device shouldn’t see much of a difference from any regular video call. The only extra thing is the lobby screen that they see before joining the call. If there are people on the stage, the current participant can see them, even if the current participant is not on the stage yet. They will be able to view the output call that gets sent to the streaming platform but without the custom transcoding. Now, all these complex operations are done using Agora’s RTM messages.
RTM Messaging
Since this is not a simple video call application, it will require some way for the director to control the participants. For this, we will use the agora_rtm package. This package allows you to send real-time data between everybody in the channel. The agora_rtc_engine package is built on top of agora_rtm. The difference is that RTM allows you to send any data, while RTC makes it easy to send video and audio data. For this application, only the director can send RTM messages, and the participants can only receive them. There are three types of functions we need to allow the director to have:
- Mute or unmute audio.
- Enable or disable video.
- Send out a list of active users.
To mute a user, the director sends out a channel-wide RTM message in the format “mute uid”, where “uid” is replaced with the specific uid of the user to be muted. On receiving this message, the participant checks if this uid is their uid. If it is, then the user mutes themselves. Unmuting, disabling and enabling video works the same way, except for using the keywords "unmute uid", "enable uid", and "disable uid".
The slightly trickier part is the active users. Normally, if you’re using Agora, you would display all the broadcasters in that call. But in this case, some of them are in the lobby, and they should not be displayed to the viewers. To handle this, we use RTM messages again to send all the users that should be displayed. The format is “activeUsers uid,uid,uid”, where “uid” is replaced with the specific uid of the active users.
So far we have covered almost everything from the participant point of view. Now let’s transition to the director, which is where most of the magic happens.
Director Controller
The director in this app has a lot of functions and things to keep track of. To keep things organized, we will use riverpod, a popular state management solution for Flutter.
If you have never used Riverpod, here is a good place to start: https://www.youtube.com/watch?v=8qzip8tVmqU
The DirectorController that we have defined here will be a StateNotifierProvider. This helps separate our business logic from the UI section of our application.
This controller will have functions that the rest of our code can access, including joinCall(), leaveCall(), toggleUserAudio(), addUserToLobby(), promoteToActiveUser(), startStream(), and lots of others. This controller will also store all the data that we need to keep track of in our app.
Since the participants only receive the RTM messages, the director only sends RTM messages.
In order for the director to be able to send out RTM messages, you need to set up a client and a channel using RTM. This is very similar to what happens with RTC engine behind the scenes. You need to create a client, log in to the client, and then create a channel and join the channel. Once this is done, you are ready to send out the RTM messages. The participants need to do the same thing in order to receive messages on the onMessageReceived callback.
To send out the message, you need to use the sendMessage function that is provided on that channel. To format the message correctly use this:
Use the same approach for all the other messages, such as “mute uid”, “enable uid”, “disable uid”, and “activeUsers uid,uid,uid”.
So those are the infrastructure details of what enables us to manage users and streams. Let’s get into the details of how the director part of this app works. The main three features that we are going to cover are:
- Muting and disabling the video of other users
- Moving users between the stage and the lobby
- Transcoding each video and pushing it to streaming platforms
Muting and Disabling Video
Now that we have the infrastructure with RTM messaging all set up, this section might sound trivial, but there are actually a lot of pieces that need to be accounted for and synced up.
Director App
- Muting/unmuting a user’s audio.
- Disabling/enabling a user’s video.
- Current states of audio and video for each user.
- Updating if a user changes their own state.
Participant App
- Mute/unmute themselves.
- Disable/enable their own video.
- Mute/unmute from the director.
- Disable/enable video from the director.
- Current state of audio and video.
To do all this and have it synced up, there are lots of parts that control the audio. The best way to go about this is to look at the various scenarios:
- Participant mutes/unmutes themselves. When the participant decides to mute themselves, they need to call
muteLocalAudioStream()and then update their own button state to show that they are muted. On the director side, theremoteAudioStateChangedevent should get triggered, which should update the current state for that specific user. - Participant disables/enables video. Same process as above, except call the function
muteLocalVideoStream(). The event on the director side should beremoteVideoStateChanged. - Director mutes/unmutes user. The director needs to send an RTM message with either “mute uid” or “unmute uid”. Then the user with the matching
uidwill follow the same execution as if they were muting themselves.The director should again see theremoteAudioStateChangedevent trigger, and they can update the local state. - Director disables/enables video. Same process as muting, but instead the stream message will be “enable uid” or “disable uid”.
Let’s add another layer of complexity to this.
Stage and Lobby
The idea here isn’t too complex, but it comes with a couple of caveats that need to be taken care of. The only person that will be able to see both the lobby and the stage is the director. The DirectorController will hold a separate list of active users and lobby users. A normal flow for a participant user would be to join the channel and be directly added to the lobby. Then the director is in complete control and can move them to and from the stage at will.
The flow for moving a person to and from the stage is very similar. First, remove them from the previous list (lobby or active) and add them to the other list. Then update and use an RTM message to send out the new list of activeUsers to everybody.
Not too bad, but here is where the complexity comes in. You don’t want the lobby users to be able to talk over the users on the stage, so they should be muted while in the lobby. And since they are in the lobby, there is no need to take up extra bandwidth for their video either. Because of this, we need to add a couple more scenarios for audio and video control:
- Participant first joins the channel.Since they are added directly to the lobby, they need to be muted and their video disabled immediately. Whenever a participant joins a channel, they automatically mute themselves.
- Participant moved to the stage.When they are moved to the main stage, their video and audio need to be enabled so that the audience can see them. This should follow the same logic as the director unmuting or enabling video.
- Participant moved to the lobby.When they are moved to the lobby their video and audio need to be enabled so that the audience can see and hear them. This should follow the same logic as the director muting or disabling video.
Transcoding
Once you have the activeUser list synced up with both the director section of the app, and the participant section of the app, the last step is to broadcast it to the streaming platforms. For this, we will first transcode all the incoming videos to the desired layout and then publish and unpublish our streams to the desired platforms using the Real-Time Messaging Protocol (RTMP).
First, we need to define what layout we want to have for our output video. In this case, we will support only up to eight people in a call. But you can extend the same concept to as many callers as you want. We also take into account that our stream will be a 1080p stream, so we have 1920x1080 pixels to work with. Given that information the layout will look like this:
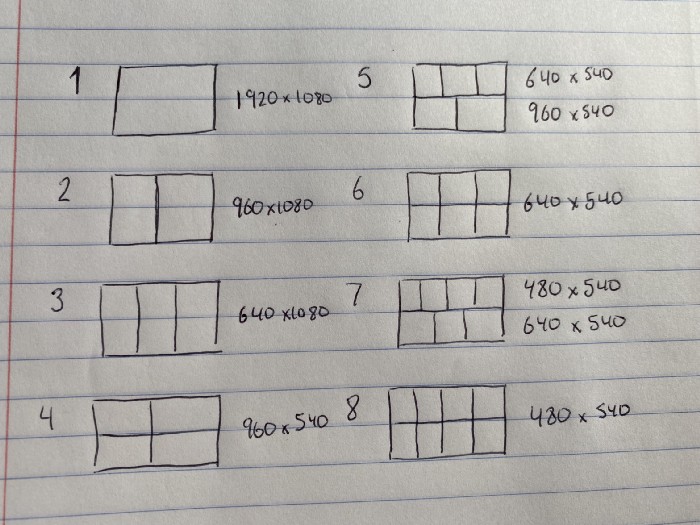
To send out this information, we need to create a list of TranscodingUser and set up each of the user layouts accordingly. Once they are in the list, we create a LiveTranscoding object with the list and tell the RTCEngine that this is what we want the layout to look like.
Now that we have the layout for our stream configured, we need to send it. With this app, we have the ability to send it out to multiple locations. For this, you will need a URL that your stream should be pushed to. For YouTube, it is pretty straightforward. You will need the Stream Url + backslash ("/") + Stream Key, which are all given in your livestreaming dashboard. Twitch has a similar concept, and you can read about it here: https://help.twitch.tv/s/article/guide-to-broadcast-health-and-using-twitch-inspector?language=en_US
Now that you have all your links, you can loop through all of them and call the addPublishUrl() on the RTCEngine with the transcodingEnabled parameter set to true. And it's all done! Your stream should have appeared on the platforms.
Finally, you will want to update the transcoding when someone is added or removed from the main stage, and end the stream. To update, you need to update the transcoding layout accordingly and then setLiveTranscoding() again. To remove a stream call the removePublishUrl().
Conclusion
If this app seems a bit complex, that’s because it is. But there are full-blown companies that take months to build an MVP (Minimum Viable Product) for something like this. And even if they can build it, they don’t have anywhere close to the infrastructure and reliability that the SD-RTN brings. This is a very complex application, but with Agora it becomes achievable.
You can find the code for this app here.
Other Resources
To learn more about the Agora Flutter SDK and other use cases, see the developer guide here.
You can also have a look at the complete documentation for the functions discussed above and many more here.
And I invite you to join the Agora Developer Slack Community.


