
Hello devs! Today we will be creating a video party chat feature inside of a networked demo using Unreal Engine Blueprinting on PC.
Unreal Engine is the most powerful real-time 3D creation platform, made even more powerful with the most powerful real-time engagement platform, Agora! The Unreal Engine is primarily known as the powerhouse behind games like Fortnite, Gears of War, and PUBG. However, Unreal is also used to create stunning architectural visualizations, 3D content enhancing live broadcasts, and much more!
Using Agora, you could integrate video party chat into the digital playgrounds of the future, connect realtors face to face with clients during a VR walk through of their new dream home, or use Agora’s broadcasting features to engage with live fans on a next generation talk show.
By combining Unreal and Agora, you can now enable interaction from people all over the world inside of digital worlds handcrafted by the Unreal Engine!
To implement Agora’s Real Time Engagement, we will connect two players into an Agora channel after they walk onto a special platform. We will then connect our players over a local network into the same level simulating a networked multiplayer game.
This demo displays the necessary pieces that show what a networked game can look like, by connecting two players into the same level. However if you only have one PC (or Mac), we will have to simulate the 2-person Agora call using the Agora Web Example Showcase.
Currently, Agora is supported in Unreal Engine versions 4.23–4.25.
I recommend using 4.25 for this demo.
If you are totally new to Agora or Unreal, you can follow the links below that lead to the instructions for proper download/sign up.
I also recommend using this template project that includes a working Agora example with an installed Agora SDK. Here is a link to the plugin
Installation
Follow these steps to integrate the Agora Plugin into your project.
- Copy the plugin to [your_project]/Plugins.
- Add plugin dependency into [your_project]/Source/[project_name]/[project_name].Build.cs file, Private Dependencies section
PrivateDependencyModuleNames.AddRange(new string[] { "AgoraPlugin" });. - Restart Unreal Engine (if it is running).
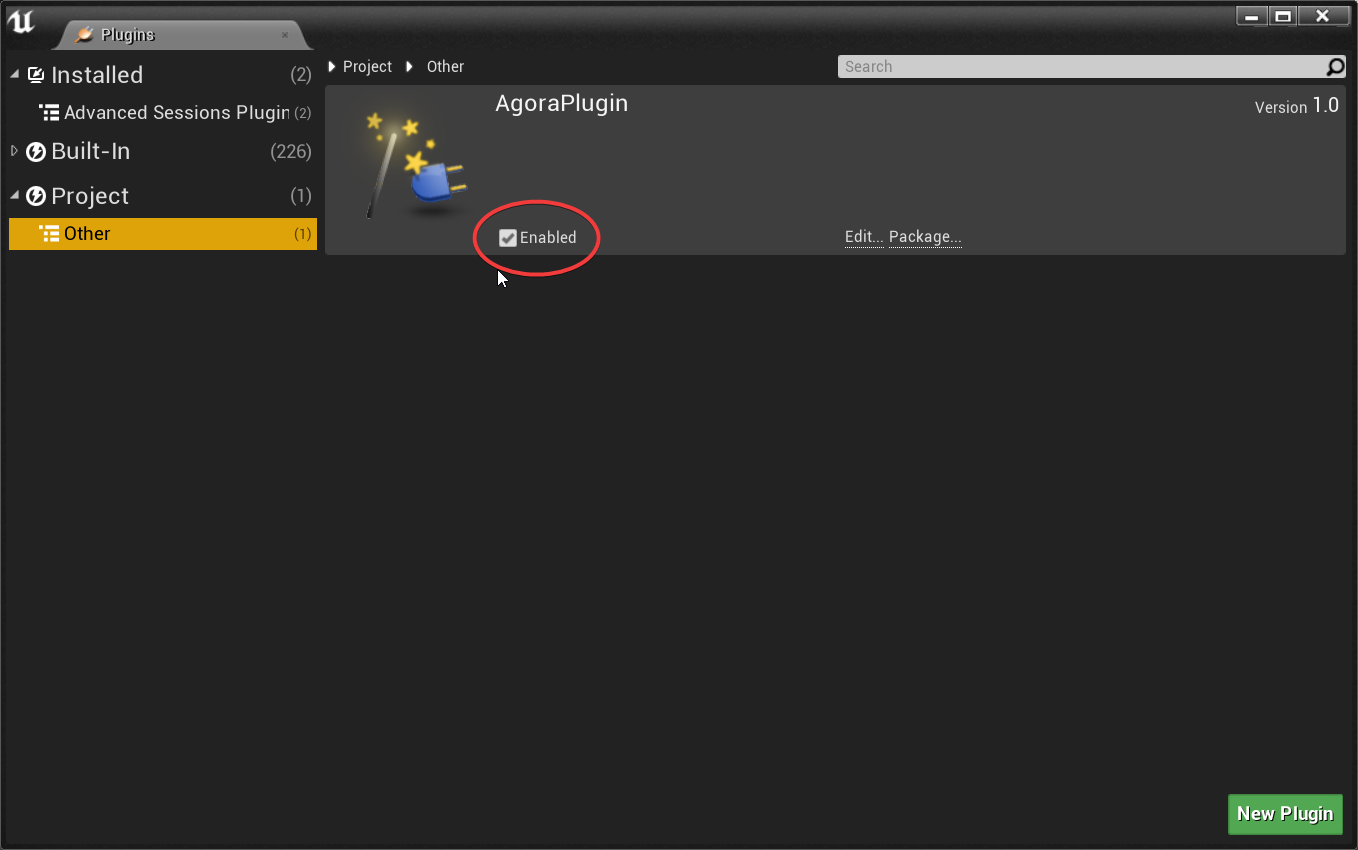
- Go to Edit->Plugins. Find category Project->Other and make sure plugin is enabled.
If you decide to use this project, you will need to install the ThirdPerson content pack to your project. To do this, open the Unreal engine, inside the Content Browser click the “Add New” button. Click the first item “Add Feature or Content Pack…” and then select Third Person.
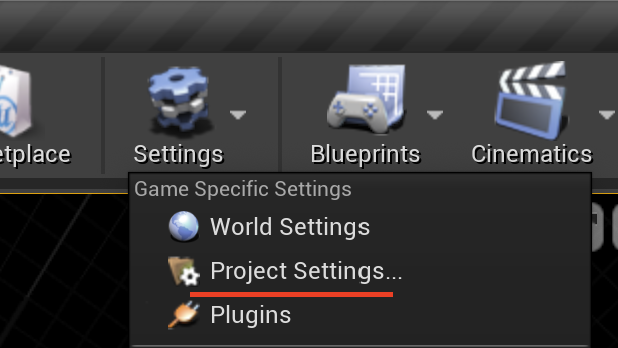
After doing this, go to Settings > Project Settings > Maps and Modes, set the Editor Startup and Game Default Map to ThirdPersonExampleMap, and set the default pawn to ThirdPersonCharacter.
With our Unreal project containing the Agora plugin installed, we now have access to Agora’s network, essentially a private VIP network built from the ground up for voice and video!
Agora Setup
BP_Party Widget
Now it’s time to set up the logic to render the Agora video feed from 2 players in our channel.
Right click inside your blueprints folder, and go to “User Interface > Widget Blueprint” and name it BP_PartyWidget.

Drag two images into your canvas and name them Player1Video and Player2Video like so:
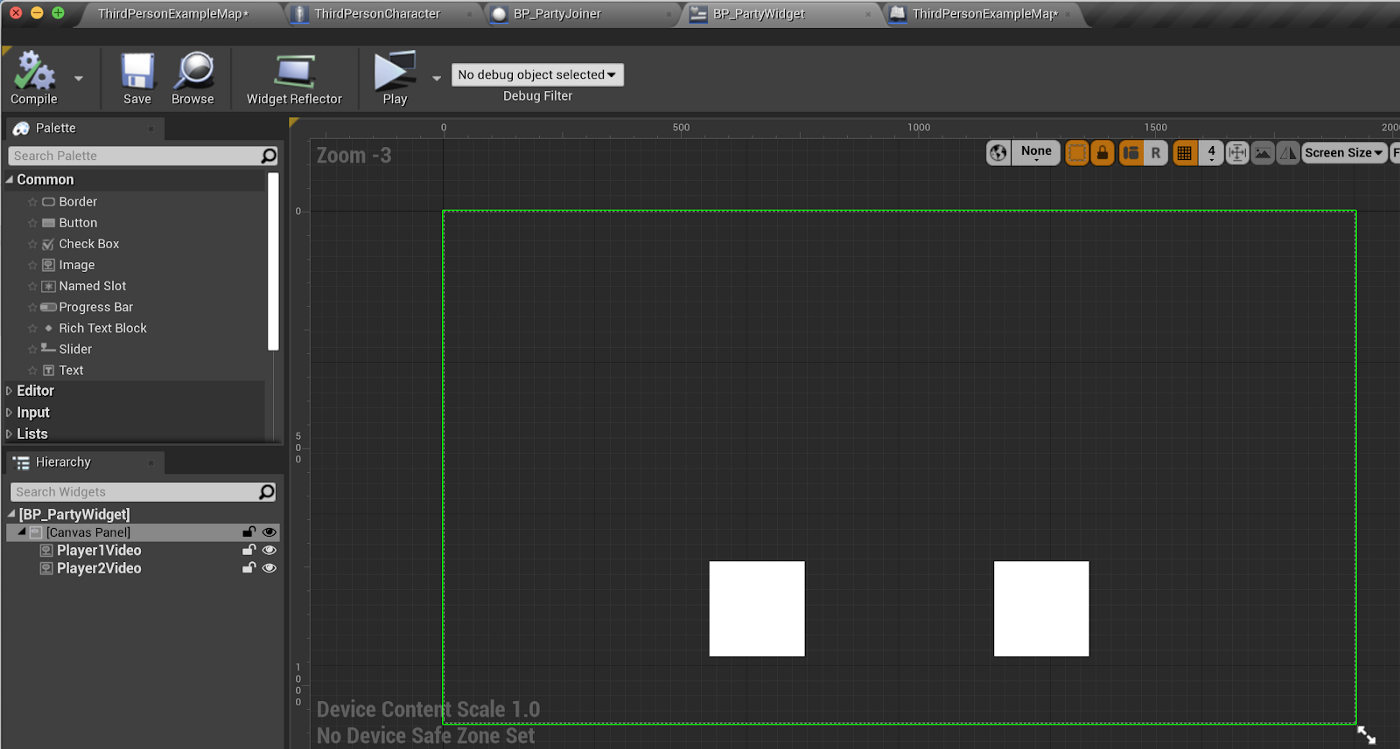
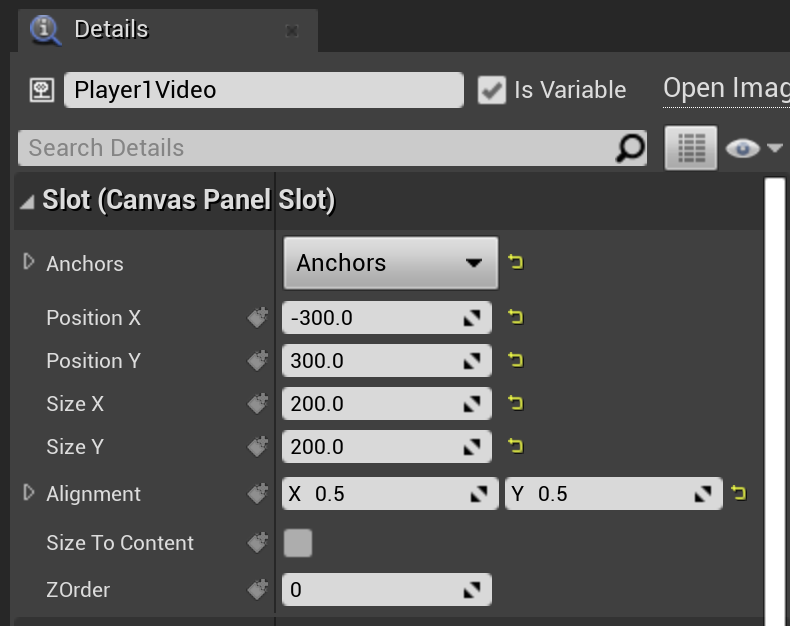
You can make them whatever size/position you’d like. Here are the attributes I used — Player2Video has PositionX of “300” to make them even.
Finally, go into the event graph of our new widget blueprint, make a new variable named “AgoraEngine” of type “Agora” and add in this custom event:
Be sure to search for “assign on local frame received” — it will create both nodes you need.

These events will render every single time a new Agora frame is received and render it to our image, effectively turning our widget images to videos.
To render our video, we will be setting up the Agora Engine, creating callbacks for new players joining, and simulate what a player joining your party looks like.
Open up the ThirdPersonCharacter EventGraph, and let’s get blueprinting. Here is a high level view of our ThirdPersonCharacter initialization. Create a variable of BP_PartyWidget named “PartyWidget”, a variable of type Agora named “AgoraEngine” and two string variables named “DefaultChannel” and “CurrentChannel”.
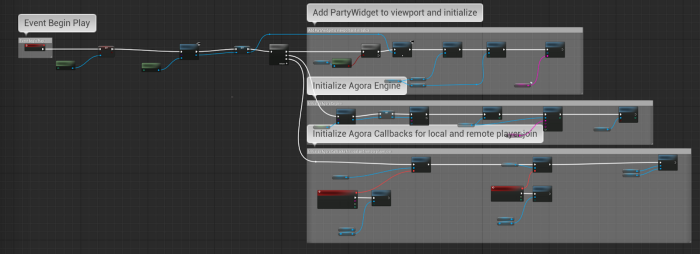

First we will Add the BP_PartyWidget that allows you to see your local video feed, and the feed of another remote player. “UpdateChannel” is a custom event we will create in a bit. For now, create the event and leave it empty so we can call it in our EventBeginPlay.

I’m setting the images to hidden until a callback is fired saying that remote or local video is incoming.
Next, initialize the Agora engine and join a default channel.

We will then be able to see our local video feed inside our default channel name, but no one else is able to join it.
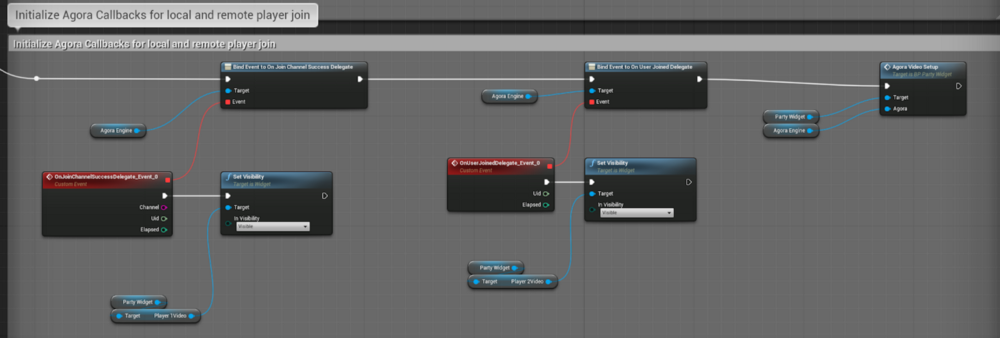
Lastly, we will create the call backs that register local and remote users joining, and initialize the BP_PartyWidget images to render the incoming Agora video feed.
BP_PartyJoiner
The BP_PartyJoiner is a custom actor that will connect players to the same Agora channel. It will be a platform that changes the current channel name of every player that steps on it and join that player to the Agora channel.
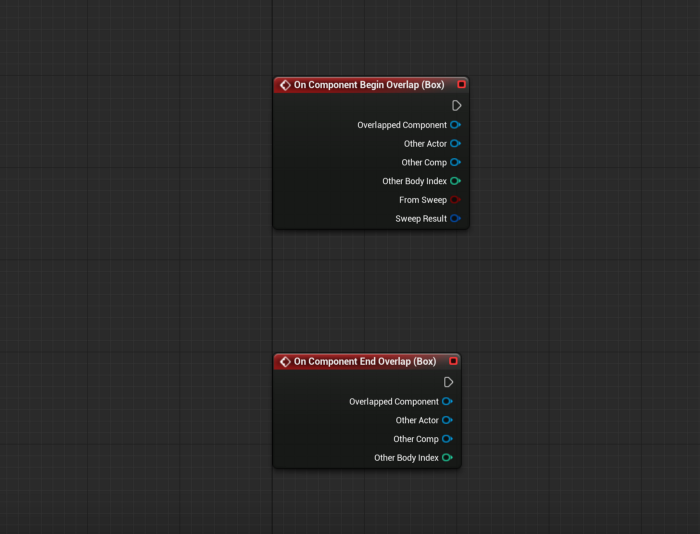
Create a new Blueprint class of type Actor, and name it BP_PartyJoiner. Add a Box Collision, and a Cube component for visibility (make sure it’s smaller than the Box Collision) to the DefaultSceneRoot. Create a new variable of type string named ChannelName.
Finally, we will create two events to leave empty for now to hook into in a second.
Select your BoxCollision component, and in the Details panel scroll all the way down and click the green plus box for OnBeginOverlap and OnEndOverlap.
Agora Player Party
Now we’ll create the logic to adjust our player channel names, so each player can connect to the same Agora Channel.
Open up the ThirdPersonCharacter, in the Details panel of Default and Current Channel variables, set the “Replication” field to Replicated — this exposes the variable to the network so all players can be on the same page about each other’s channel names.
Our CurrentChannel will change and shift based on the party we join, and our DefaultChannel serves as a unique channel for when we want to leave a party chat.
To change our channels, we will create custom events that are visible to the Unreal Engine Replication systems, and visible to the network. If we create standard custom events, our results will be localized and unique to the individual client, instead of shared by the whole network.
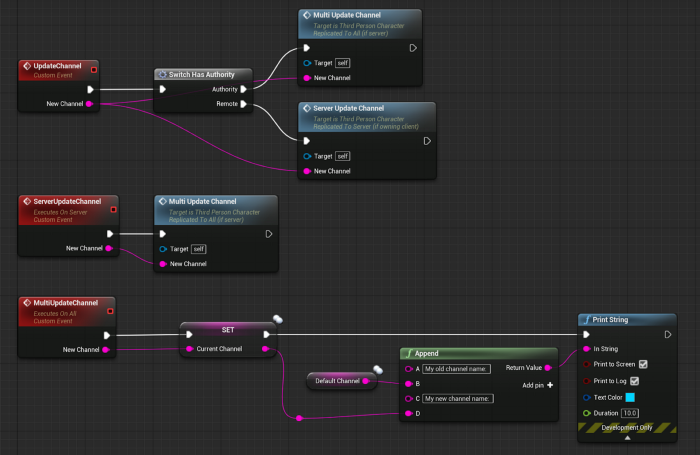
Let’s start first with an UpdateChannel event and go to the Event Graph inside of ThirdPerson Character.
Right click and type “custom event”, name the event “UpdateChannel” and press Enter.
Create two more events, one named “ServerUpdateChannel”, and the other “MultiUpdateChannel”.
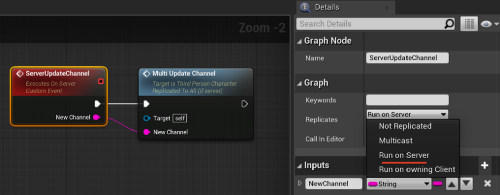
Click on ServerUpdateChannel node, and in the Details panel > Graph > Replicates, set the dropdown box to say “Run on Server”.
Do the same for MultiUpdateChannel, but select Multicast. Inside the Details > Inputs for each node, click the “+ Add Parameter” button and add a new string named NewChannel. I included a print statement for debug purposes, but you can leave it out if you’d like.
UNREAL TIPS:
To explain Unreal’s replication system in depth is out of scope for this tutorial — this UE4 Network Compendium is a great starting point — however here is a basic understanding:
Unreal’s network is a server-client model. One server controls several clients and makes all the networked universal changes, where the clients can only make changes to their local games.
To change a channel name for one client and enable other clients to be aware of that change, we have to make that change on the server.
When we call the event to update the channel, we first check:
Do I have Authority? (am I the server?),
If yes — tell all clients to execute this event (run the multicast event).
If no — tell the server to tell all the clients to execute this event (run the server event, that will in turn properly run the multicast event).
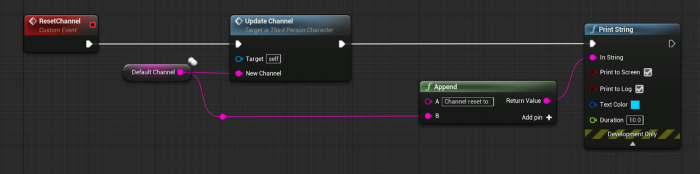
By using this pattern, we are able to make changes to a player on every client instead of just the locally controlled client. We will create the ResetChannel event to reset the channel back to its default string.
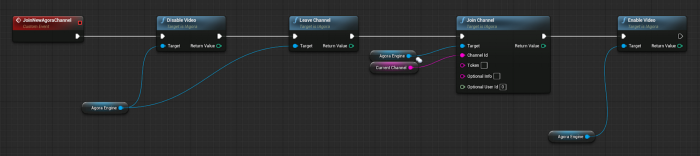
Lastly we will create an event that allows the player to join new channels.
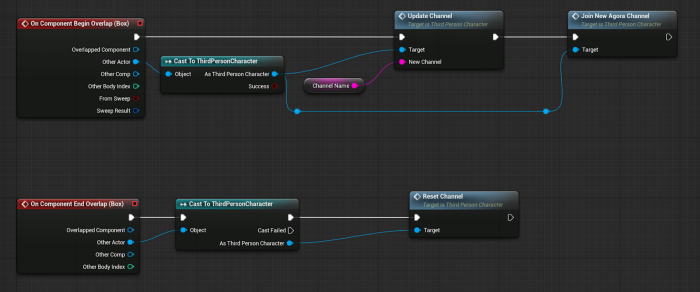
Let’s hop back into our BP_PartyJoiner, and fill in those empty overlap events.
Testing
Let’s test this out really quick with a single player and web example showcase! If you aren’t sure how to make a standalone build, scroll down to the bottom to the “Final Testing” section.
This test is to show our Agora functionality working as if we joined another player’s party.
In the web example showcase, plugin the appID you are using for your Unreal project, and the channel name you’d like to connect to.
The following section “Network Setup” will show you how to place two unique players in the same Unreal level, and enable you to build off of this demo as a platform to implement networking features working in conjunction with the Agora SDK!
Network Setup
Next, let’s get our basic Unreal networking setup. This is going to be absolutely bare-bones networking, and will exclude any special UI or lobby. The purpose of this network is to show two players inside the same level. It’s possible to test the demo without this feature, however if you’d like to test Agora real-time-engagement in a multiplayer context with other features I’d highly recommend it!
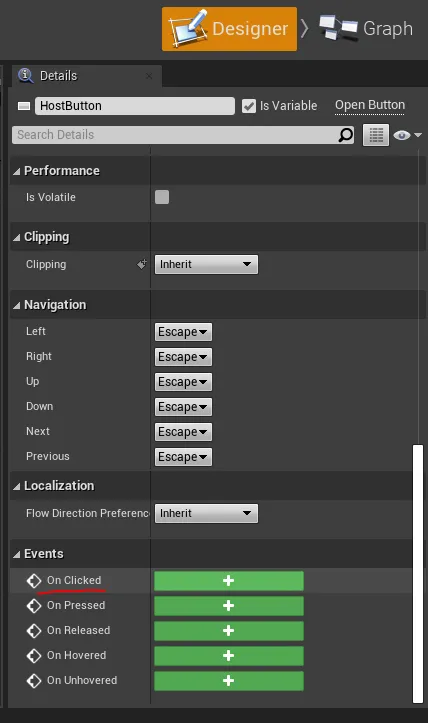
Double click to open it up, and create two buttons, one named “HostButton” and the other “JoinButton”.
To assign a click event to our host button, click the host button inside the “Designer” view, and in the details panel scroll all the way to the bottom, and click the green plus sign for “On Clicked”.
Do the same thing for the join button as well. Click on “Graph” to go to the Event Graph. Here, we will be setting up our basic networking nodes. From the OnClicked (HostButton) node, set it up like so:
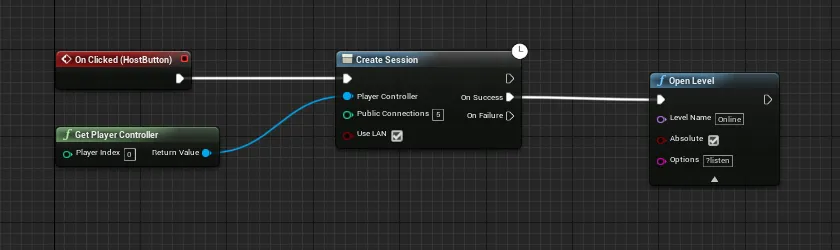
We have yet to create the “Online” level, and will do that in just a moment. Next setup the OnClicked (JoinButton) like so:

Fortunately, Unreal has a lot of built-in networking functionality, and this is all that we need to get two players on the same level!
Again, this is a highly simplified version of networking, but will do the trick for the scope of this tutorial.
Before we test this out, go back to our ThirdPersonExampleMap view. Inside your content folder, hold the “Ctrl” key and press the “N” key to create a new level, select “Default”, and name it “Online”.
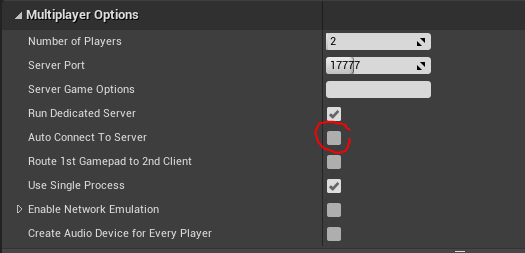
Go back to ThirdPersonExampleMap, and adjust your online settings for 2 Players on a dedicated server, or “Net Mode: Play As Client”, while playing in a new Editor window:

Click the dropdown menu again, click “Advanced Settings…”, scroll down to “Multiplayer Options”, and uncheck “Auto Connect to Server”.
We’ve created the logic for the network widget, but now we have to actually create and add it to the viewport.
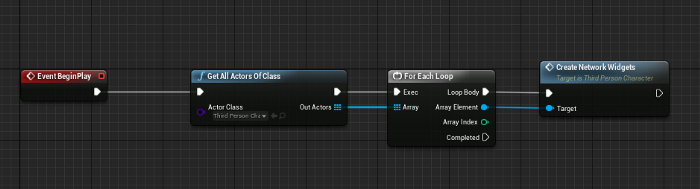
Inside the ThirdPersonCharacter, go inside the event graph. Create a new Custom Event called CreateNetworkWidgets (right click the empty graph and type “Custom Event”), and connect these nodes like so:

Last, go inside the Level Blueprint,

and call CreateNetworkWidgets, the event we just created, on all available players like so:
I set it up like this, so when we enter the opening level, ThirdPersonExampleMap, we see the UI to host/join a local network. When we join the Online level, that UI widget won’t show up.
Final Testing!
Make sure to delete the ThirdPersonCharacter who is already placed in the scene and then click Play in the New Editor Window.
When you run up to the PartyJoiner, the print statement should show that the newly updated channel is consistent across both clients.
To test the project we have to make a standalone build. To do so, go to File > Package Project > PC (or Mac if you want to exclude the networking feature)
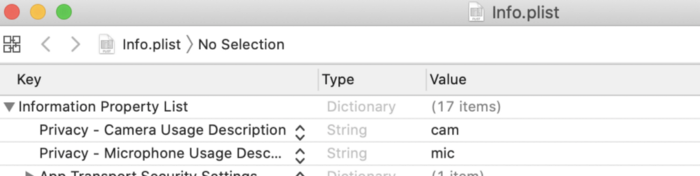
If you build to Mac, right click on the completed project, select “Show Package Contents” open the Info.plist file and add these entries.
Then open up the build and you’re good to go!
To reiterate,
- We will start by having two players join the same level using Unreal “Sessions”, simulating a multiplayer game.
- We will walk over the BP_PartyJoiner pad, and print display the consistent PartyJoin channel name of your choice across each client.
- When touching the PartyJoiner, we will leave our default Agora channel, and join a new channel that is named in the PartyJoiner blueprint.
- After joining that channel, we will connect another Agora instance via Agora Web Example Showcase using the PartyJoiner channel name, and see what it looks like to have two players video feeds rendering in our UI in the game.
AGORA NOTE:
If you try to connect two Agora clients using Unreal on the same machine, one of the video feeds will freeze as they both try to access your webcam. One way around this is to use two separate PCs, or use an Agora demo from your phone.
Nevertheless, you can see how simple and straightforward it is to connect your players via video engagement using Unreal. Simply plug people into a channel of the same name and you’re off to the races!
If you have any questions, comments, or ideas for another Unreal tutorial, please reach out to me at —
Agora’s Slack channel.
channel: #unreal-help-me
or find me on twitter @JoelThomas362
Thanks for following along devs!
Cheers!


