
Video call apps have become more popular, especially in the wake of the global stay-at-home mandate which transitioned into work from home for many people.
So, if you’ve ever thought of creating your own video calling app, you can easily do so with the Agora SDK and Agora UIKit. You can even take it up a notch by adding cool features to enhance the overall user experience, or adding monetisation options. That’s where the Agora Extensions Marketplace comes in.
Launched in September 2021, the Agora Extensions Marketplace is a one-stop shop for app enrichment features like voice changers, content moderation, and much more. The best part of it is that it can be done in a matter of minutes or up to an hour.
In this post, we’ll show you how to easily change your voice (with options such as echo, flanger, reverb, and pitch shift) in a video call app with the Synervoz Voice FX extension. With the Voice FX extension, you can change your voice in three easy steps:
- Enable the extension.
- Pass extension credentials.
- Set voice parameters.
Now, let’s get started.
Prerequisites
- An Agora developer account — Sign up here
- Xcode 12.3 or later
- A physical iOS device with iOS 13.0 or later
- A basic understanding of iOS development
Setup
Let’s start with a new, single-view iOS project. Create the project in Xcode, choosing SwiftUI for the interface, and then add the Agora UIKit package.
Add the package by selecting File > Swift Packages > Add Package Dependency, and then paste the link into this Swift package:
https://github.com/AgoraIO-Community/iOS-UIKit.git
When asked for the version, insert 4.0.0-preview, and select "Up to Next Major". This should install at least version 4.0.0-preview.8, which is released at the time of writing.
When in doubt, you can always select “Exact” and insert 4.0.0-preview.8.
Once that package is installed, the camera and microphone usage descriptions need to be added. To see how to do that, check out Apple’s documentation here:

Video Call UI
I won’t go into much detail about the UI here, because we’re mainly focusing on the Voice FX extension, but on a high level:
- The ContentView contains two views: a VideoCallView (defined in the project) and a button to join the channel.
- VideoCallView holds the active AgoraViewer, which is brought in from Agora UIKit.
- When the join button is pressed, the Agora UIKit method
join(channel:,with:,as:)is called, which joins the Agora video channel.
This is what the ContentView looks like:
Without any of the Voice FX additions, the VideoCallView looks like this:
struct VideoCallView: View {
  @Binding var joinedChannel: Bool
  var body: some View {
    ZStack {
      ContentView.agview
    }
  }
}
We now have a working video call app with SwiftUI and Agora UIKit. The next step is to integrate the Voice FX extension!
Integrating Voice FX
Credentials
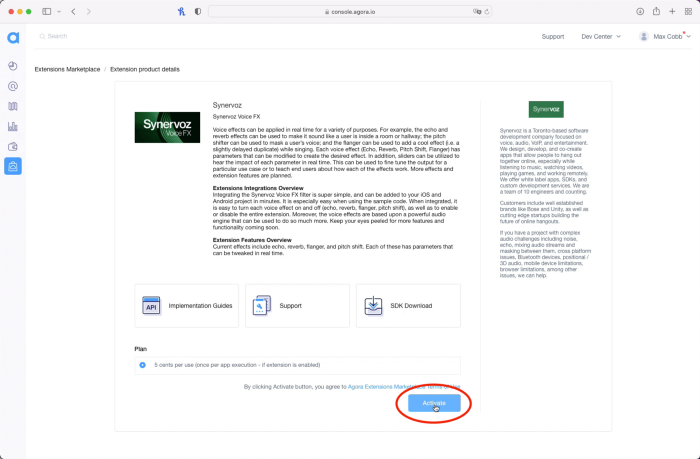
If you have an account with Agora and are currently signed in, follow this link to activate the extension for your account.
First, you will need to activate Voice FX for your account by clicking the “Activate” button here:
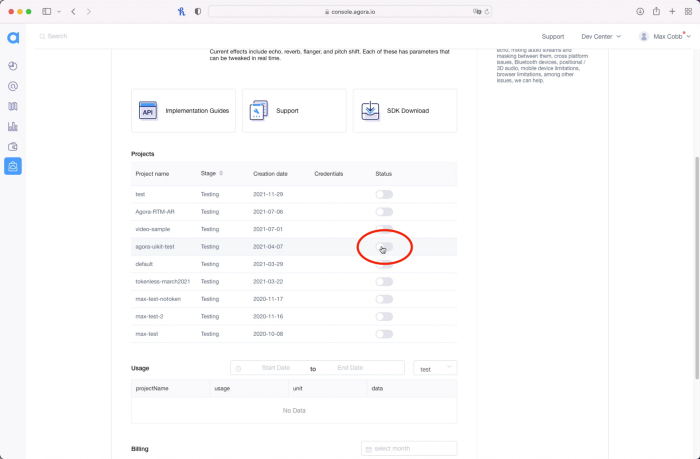
Next, enable Voice FX for the project, the same project as for the Agora App ID used in the app:
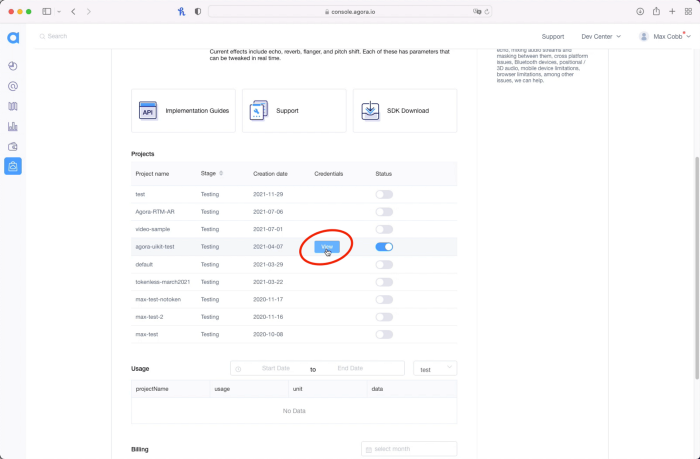
Once that’s done, you can grab your API Key and API Secret by clicking the “view” button below in the Credentials column:
Add to Xcode
We need to add the extension, which can also be installed via the Swift Package Manager with the following URL:
https://github.com/AgoraIO-Community/Extension-Synervoz-Voice-FX-iOS.git
The latest release at the time of writing is 0.0.1.
Enable the Extension
When using Agora extensions, you need to enable them before joining a channel.
To do this with Agora UIKit, call AgoraVideoViewer.enableExtension().
This method needs to be passed the vendor (“Synervoz”) and the vendor extension (“VoiceFilter”) in this case. They can also be accessed via the VoiceFiltersAgoraExtensionVendor and VoiceFiltersAgoraExtensionName properties to avoid typos or misspellings. If you use these properties, you must import VoiceFiltersAgoraExtension at the top of your Swift file:
AgoraViewerHelper.agview.viewer.enableExtension(
  withVendor: VoiceFiltersAgoraExtensionVendor,
  extension: VoiceFiltersAgoraExtensionName,
  enabled: true
)
The above code snippet is added to the beginning of the joinChannel method defined earlier.
Set Voice Properties
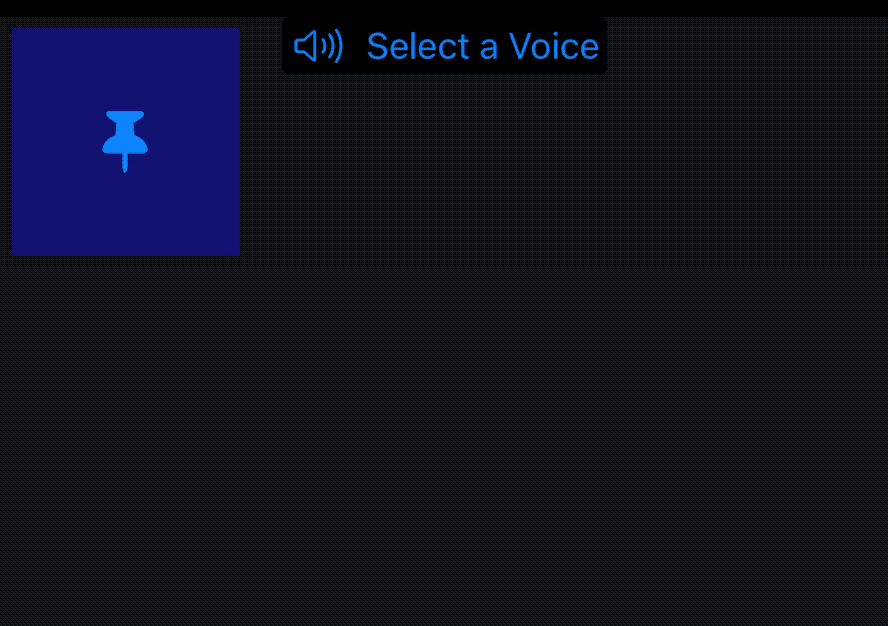
For the sake of simplicity, this project will let you choose only between a few preset voice changes from a drop-down menu.
The menu is created like this:
The names array is defined like this:
let names = [
   "echo",
   "reverb",
   "flanger",
   "pitch shift"
]
This is what the menu looks like:
When an option is selected from the above menu, a method “setVoiceFxParam” is called. Inside that method, the first thing to do is pass the API Key and API Secret (obtained above from console.agora.io):
The first call to setExtensionProperty passes the API Key, and the second call passes the API Secret. The properties VoiceFiltersAgoraExtensionApiKey and VoiceFiltersAgoraExtensionApiSecret are also used here to make sure the correct key is applied. After these are properties are added, you must call to enable the extension one more time.
Next, we convert the input string, which could be “echo”, “reverb”, etc. to a usable property for applying an effect to our voice:
The values passed to each configuration above are chosen at random. You can configure them to any value you like that is allowed by the ranges shown in the documentation. Now we can get a VoiceEffect enum with an associated value to apply. Now, let’s update setVoiceFxParam to fetch this enum and apply it:
At the top of the above code snippet, we have defined a SynervozVoiceFilter object, which will apply the voice effects we want to apply for the local user. We fetch the VoiceEffect enum and create a local variable with it called newVoice. Using a switch case, we can fetch the associated value and apply it with the correlated method to the voice filter object and the engine.
We now need to make sure that the effect type is enabled in our app. For this tutorial, our app uses only one effect at a time, however you can certainly use all four at the same time in your own app.
Conclusion
By now, you should have a video call app complete with the new extension from Synervoz! Congratulations on building an app fitted with voice tuning capabilities!
There are other extensions I’d encourage you to try out. They can all be found here:
https://console.agora.io/marketplace
If you want to create an app from scratch with this extension, the extension can be applied to an application made directly with the Agora SDK. For that, you will need to make sure you’re using the 4.x version of the SDK. Details can be found here:

The methods, such as setExtensionProperty, used in this post are adaptations of the SDK's built-in methods relating to extensions. They can be found in this file from the Agora Video UIKit:
Testing
You can try out this app by following the GitHub link:
Other Resources
For more information about building applications using Agora SDKs, take a look at the Agora Video Call Quickstart Guide and Agora API Reference.
I also invite you to join the Agora Developer Slack community to meet with our developer team as well as other like-minded developers and technical enthusiasts.


