
Who wants to build a video chat app in a hour? This is a guide to how to quickly and easily create a video chat app that can support multiple participants with the Agora SDK.
Requirements
- Xcode 10.0+
- A physical iOS device. The iOS simulator lacks camera functionality.
- CocoaPods (If you don’t have CocoaPods installed already, you can find instructions here).
- An Agora account (You can sign up for free here).
- An understanding of how to build iOS layouts with a Storyboard. If you need a refresher, there’s a great tutorial here.
Setting up the Agora Library with CocoaPods
- Create a new Xcode project (or use an existing one).
- In Terminal, navigate to the root directory of your project and run
pod initto initialize CocoaPods. - Open the Podfile that was created and add the following code to import the Agora library:
target 'Your App' do
  pod 'AgoraRtcEngine_iOS', '3.4.0'
end- Run
pod installin Terminal to install the library. - From now on, open YourApp.xcworkspace to edit and run your app.
Add Camera and Microphone Permissions
In order to use the microphone and camera, we’ll need to ask the user for permission to do so. In your Info.plist add the following keys:
Privacy - Microphone Usage Description
Privacy - Camera Usage Description
Make sure you add a value for each. These values are user-facing, and will be displayed when the app asks for these permissions from the user.
Setting up the Scene
In our Main.storyboard we'll need to add the views Agora will use to display the video feeds. For our demo, we'll be using a single large view to display our local feed, and a collection view to show an arbitrary number of remote users, but feel free to adjust as necessary for your own needs.
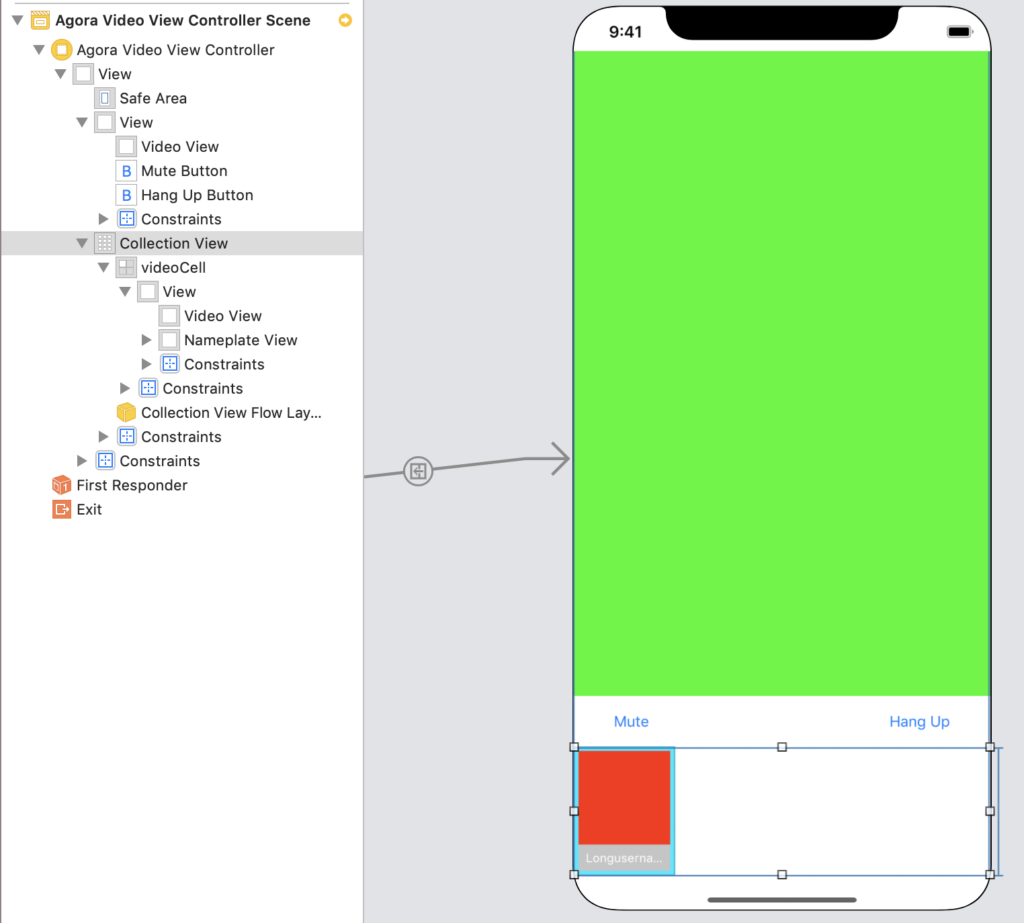
The local view is in green, and the remote view template is in red, for ease of identification. Add a View object for the local stream, a UIButton to mute and hang up the call, and a UICollectionView to hold the remote streams. Your UICollectionViewCells can be as simple as a single view to hold the stream — in the example above, I’ve added an overlay to show the remote user’s name if we know it.
Make sure you hook up the views in your main View Controller, and set the View Controller as the UICollectionView’s delegate and dataSource:
Make sure you hook up the views in your main View Controller, and set the View Controller as the UICollectionView’s delegate and dataSource:
View Controller Storyboard hookups
And connect up your custom collection view cell:
Collection View Cell Storyboard hookups
Tip: If you want to add overlays to your video streams, make sure you don’t add them as subviews of the view objects you’re going to use as video screens. The video canvas will be drawn on top of them. Add them as sibling views instead.
Initialize the Agora Engine
In order to use the Agora engine, we need to create an instance of AgoraRtcEngineKit with our app ID.
First, we will need to retrieve our app ID by going to the Agora Dashboard. If you haven’t created an Agora project yet, do so now by clicking “New Project.”
Once you have a project, click the “Edit” button (or open the Project Management pane) to view that project’s details. Copy the app ID and add it to your project. If you enabled the App Certificate, you’ll also need a Token to join channels — you can generate a temporary one by clicking “Generate Temp Token.” You can also read our tutorial on generating your own tokens here.
Note: Any Agora projects made for production should require a token from the client to connect. See Connecting to Agora with Tokens — Using Swift for more information on how to work with tokens in an iOS project.
The first call you make to Agora must be to initialize a shared Agora engine. We’ll make sure to do this by creating a helper function that initializes the engine if we haven’t done so yet, and just returns it if we have. That way we can just call it whenever we need a reference to the engine without having to worry about who does it first.
Agora Engine initialization
Tip: This is a quick way to ensure the engine is only initialized once when you need it, but for a larger app you may want to consider wrapping it in a Singleton instead, so you can easily access it from anywhere.
We’ll also need to implement the AgoraRtcEngineDelegate protocol so we can respond to relevant callbacks:
RtcEngine Delegate extension
Enable Video
The next step is to tell Agora we want video enabled, and to tell it where to put the local video stream. We can then call this function from our viewDidLoad().
Video setup
Tip: If you want to customize how the video is displayed, this is a good place to configure the video profile.
Join a Channel
Once the engine is initialized, joining a call is as easy as calling joinChannel() on the Agora engine.
Join a channel
Note: Any Agora projects made for production should require a token from the client to connect. See Connecting to Agora with Tokens — Using Swift for more information on how to work with tokens in an iOS project.
Setting up Remote Video
Now is the time to put our UICollectionView to good use. We’ll keep a list of remote user IDs, and for each one, set up a remote video canvas within our collection.
Collection view callbacks
Tip: Remember to set your custom cell’s reuse identifier in your Main.Storyboard!
To get this list of userIDs (and maintain it), we’ll utilize the rtcEngine(didJoinedOfUid:) and rtcEngine(didOfflineOfUid:) callbacks. Inside your AgoraRtcEngineDelegate extension, add the following functions:
Agora engine callbacks
And with that, you have a working video chat app. Beware of audio feedback if testing on multiple devices at once.
Polish
There are a few more pieces that we should add in to make our app a little nicer. For one, our buttons don’t do anything. Lets’s fix that first. Enabling the mute button is a simple call to muteLocalAudioStream():
Mute button
We can also hang up by calling leaveChannel():
Hang up button
Tip: If you don’t hide the local video view (or pop the view controller) you’ll end up with a static view of the last frame recorded.
As a final touch, let’s take advantage of Agora’s ability to join channels with a username to give our remote streams some nice nameplates. We can update joinChannel() to join with a username if we have one (how you acquire those usernames is left up to you):
Join a channel with a username
Tip: Agora recommends you call registerLocalUserAccount() before joining a channel with a username for better performance, but it’s not necessary.
And then we can extract that username when a remote user joins. Add the following block to collectionView(cellForItemAt:)
Extract remote usernames
And we’re done! You can find the completed app here. Thanks for following along, and happy coding!
Other Resources
For more information about building applications using Agora.io SDKs, take a look at Agora Video Call Quickstart Guide and Agora API Reference.
I also invite you to join the Agora Developer Slack community.


