
Do you ever imagine when you play against your friends on a multiplayer game on your lovely mobile device, you want to see each other’s facial expression or tease each other with jokes and funny faces? You’ve found a solution here without leaving the game itself to another chat App. In this tutorial we are going to take Unity’s popular Tanks game to the next level and make it into a game with live video chats!
Before we get started, there are a few prerequisites for anyone reading this article.
Prerequisites
- Unity and a Unity Developer account
- Knowledge of how to build your Unity project for iOS and Android
- A cross-platform mobile multiplayer Unity game (I chose to use Tanks!!!)
- An understanding of C# and scripting within Unity
- An Agora developer account
- At least two mobile devices (one iOS & one Android is ideal)
Project Setup
If you plan to use your own existing Unity project, go ahead and open it now and skip down to “Integrating Group Video Chat”.
For those readers that don’t have an existing project, keep reading; the next few sections are for you. (Note, this step is exactly the same to the Project Setup you may find in or have done most of the setup by following Hermes’ “Adding Voice Chat to a Multiplayer Cross-Platform Unity game” tutorial.
New Unity Project
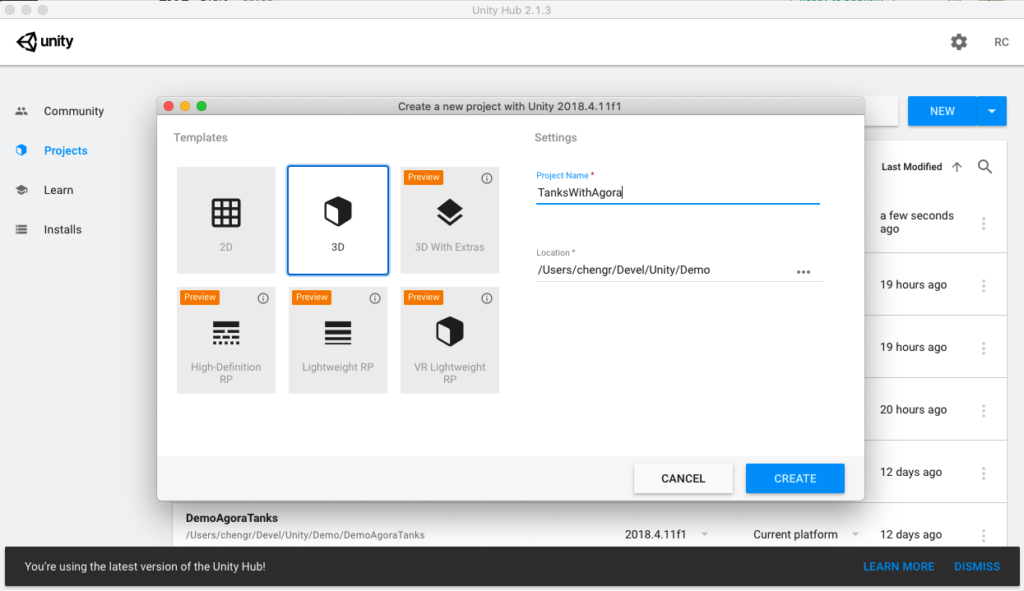
Please bear with me as the basic setup has a few steps and I’ll do my best to cover it swiftly with lots of images. Let’s start by opening Unity, creating a blank project. I recommend starting this project with the latest Unity 2018 LTS version.
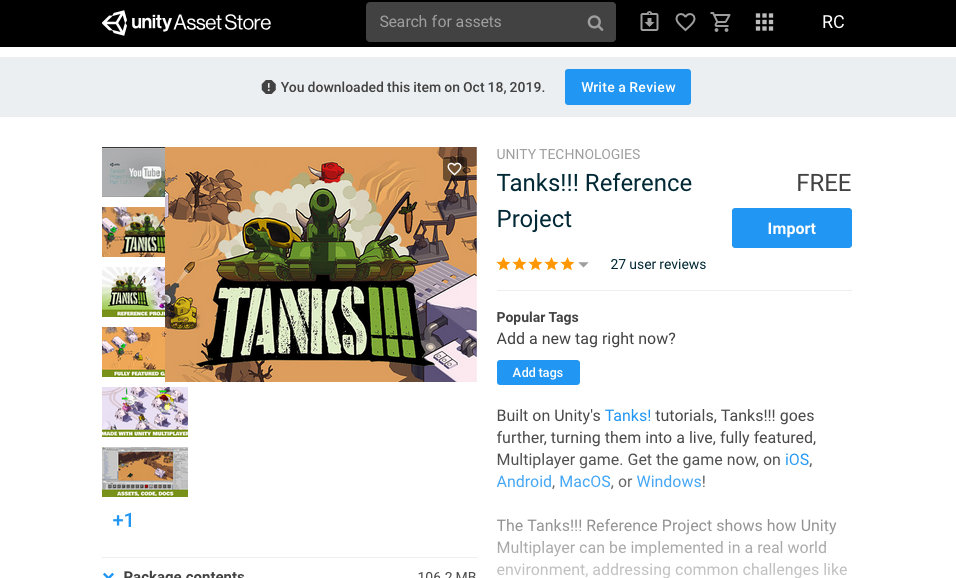
Download and import the “Tanks!!! Reference Project” from the Unity Store:
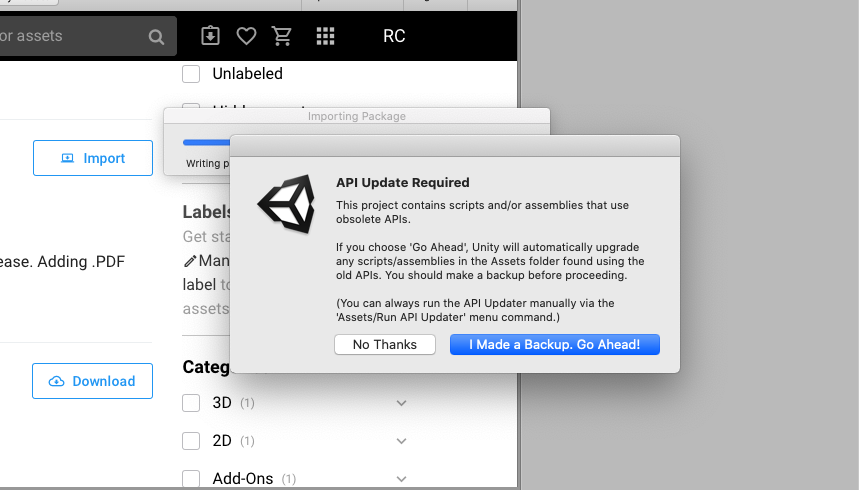
When Unity prompts for if you want to overwrite the existing project with the new asset, click Yes. Furthermore, accept the API update prompt that will come up next.
Theres a couple more steps to getting the Tanks!!! reference project ready for building on mobile. First we need to enable Unity Live Mode for the project through the Unity dashboard. (select project → Multiplayer → Unet Config).


Building for iOS
Now that we have Unity’s multiplayer enable, we are ready to build the iOS version. Let’s start by opening our Build Settings and switch our platform to iOS and build the project for testing.
Please note: you need to have Xcode installed and setup before attempting to build the project for iOS.

When building for the first time, create a new folder “Builds” and save the build as iOS
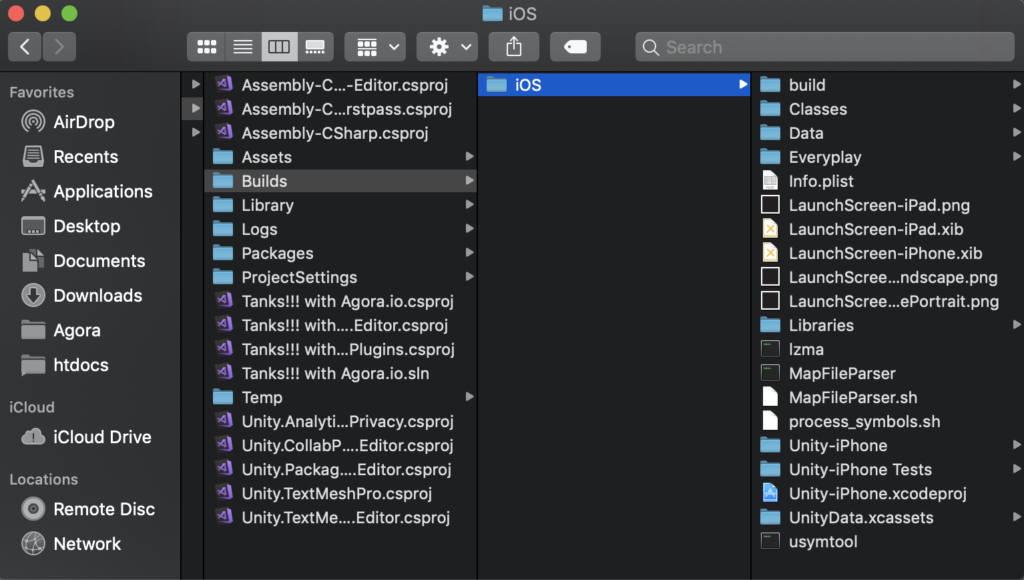
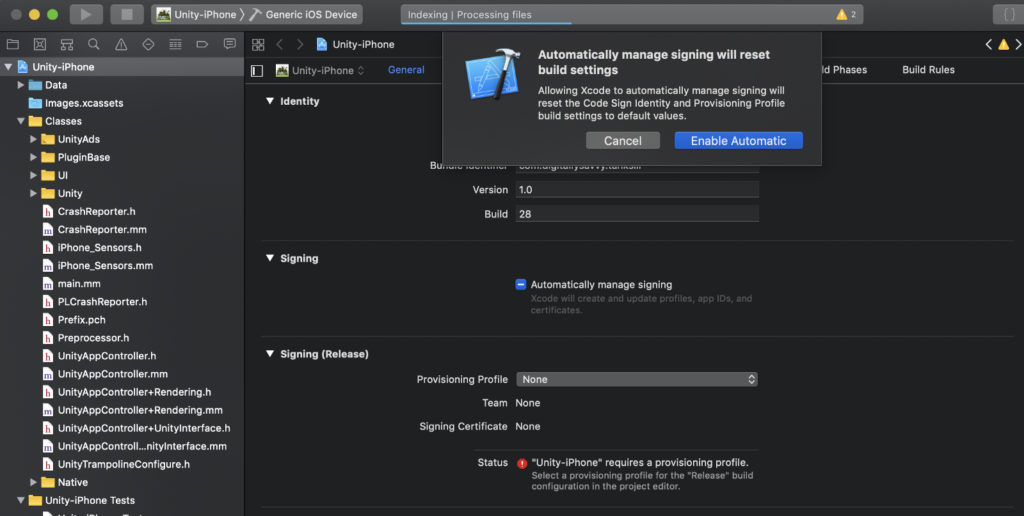
Let’s open Unity-iPhone.xcodeproj, sign, and build / run on our test device
Don’t start celebrating just yet. Now that we have a working iOS build we still need to get the Android build running.
Building for Android
Android is a bit simpler than iOS since Unity can build, sign, and deploy to Android without the need to open Android Studio. For this section I’m going to assume everyone reading this has already linked Unity with their Android SDK folder. Let’s start by opening our Build Settings and switching our platform to Android.
Before we try to “Build and Run” the project on Android we need to make a couple adjustments to the code. Don’t worry this part is really simple, we only need to comment out a few lines of code, add a simple returnstatement, and replace one file.
Some background: the Tanks!!! Android build contains the Everyplayplugin for screen recording and sharing your game session. Unfortunately, Everyplay shutdown in October 2018, and the plugin contains some issues that if not addressed will cause the project to fail to compile and to quit unexpectedly once it compiles.
The first change we need to make is to correct a mistake in the syntax within the Everplay plugin’s build.gradle file. Start by navigating to our project’s Plugins folder and click into the Android folder and then go into the everyplay folder and open the build.gradle file in your favorite code editor.
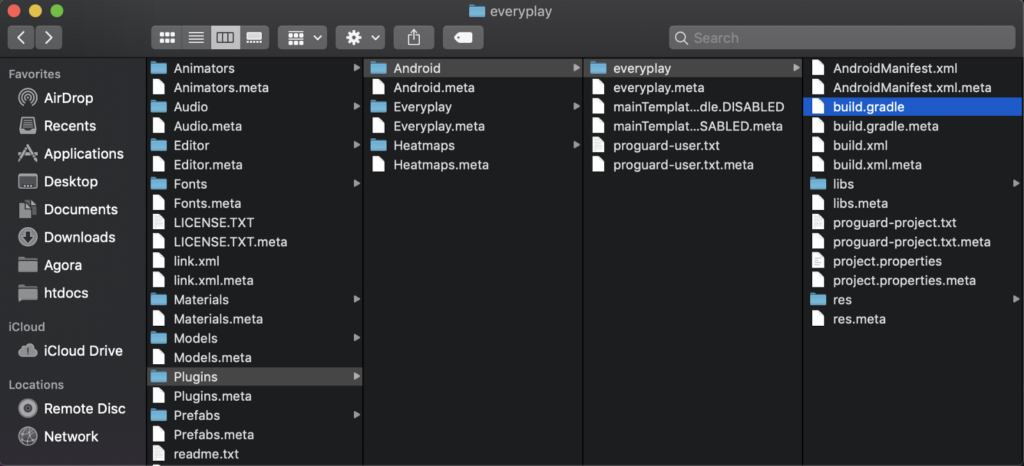
Now that we have the Gradle file open, select all and replace it with the code below. The team that built Tanks!!! updated the code on GitHub but for some reason it didn’t make its way into the Unity Store plugin.
The last change we need to make is to disable EveryPlay. Why would we want to disable EveryPlay, you may ask. That’s because when the plugin tries to initialize itself it causes the Android app to crash. The fastest way I found was to update a couple lines within the EveryPlaySettings.cs, (Assets → Plugins → EveryPlay → Scripts) so that whenever EveryPlay attempts to check if it’s supported or enabled, we return false.
(Assets → Plugins → EveryPlay → Scripts → EveryPlaySettings.cs)
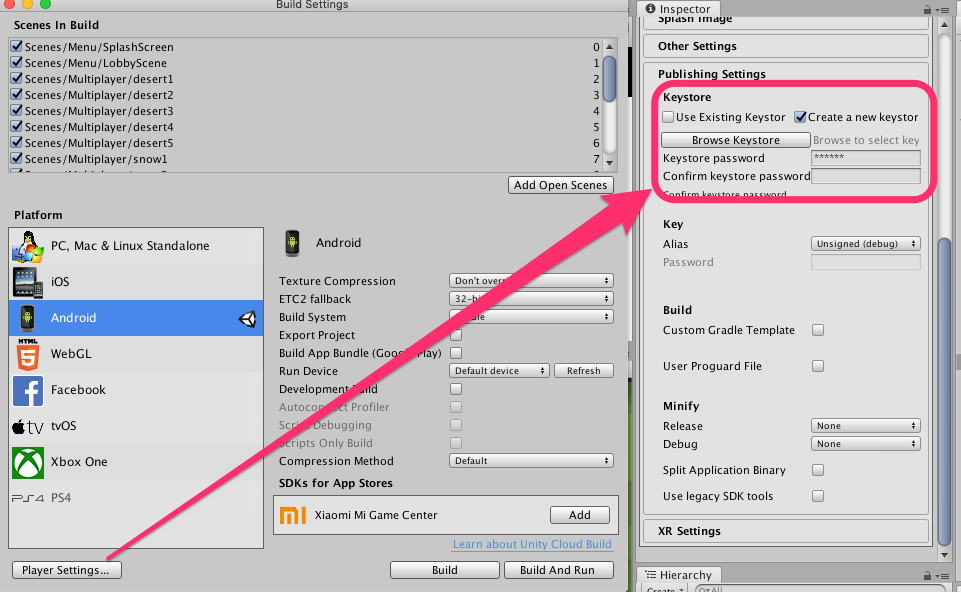
Now we are finally ready to build the project for Android! Within Unity open the Build Settings (File > Build Settings), select Android from the Platform list and click Switch Platform. Once Unity finishes its setup process, open the Player Settings. We need to make sure our Android app also has a unique Package Name, I chose com.agora.tanks.videodemo.
You may also need to create a key store for the Android app. See this section of the PlayerSettings in Unity Editor:
Integrating Video Chat
For this project Agora Video SDK for Unity was chosen, because it makes implementation into our cross-platform mobile project, really simple.
Let’s open up the Unity Store and search for “Agora Video SDK”.
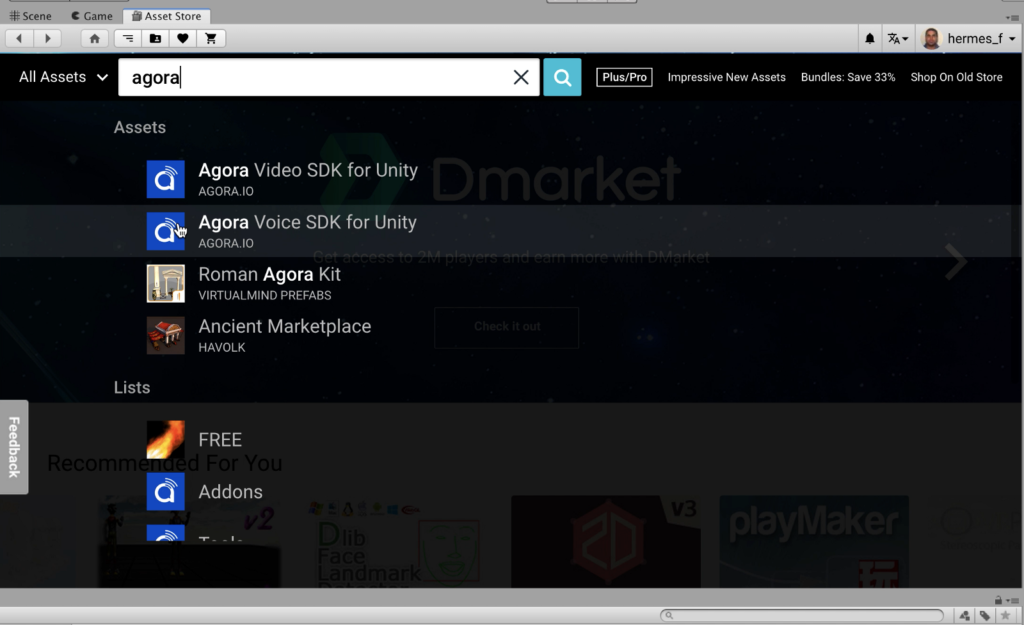
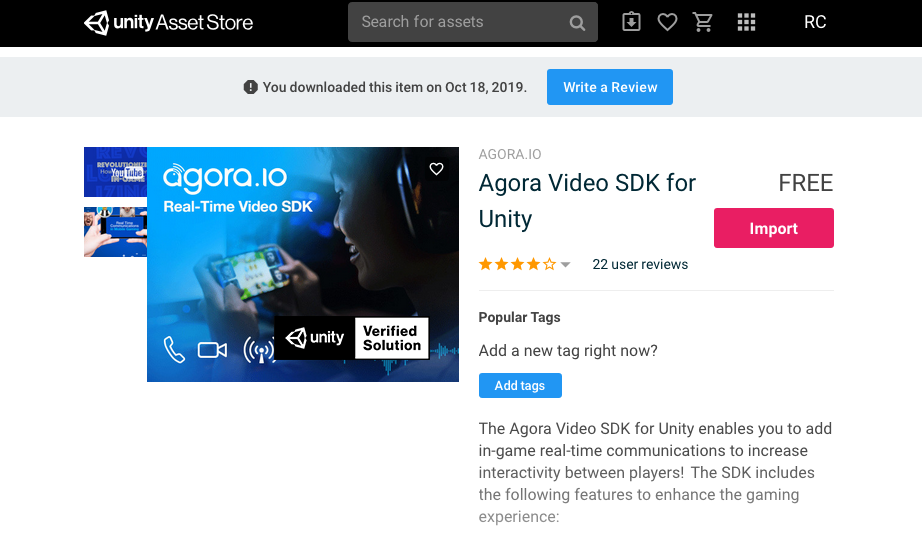
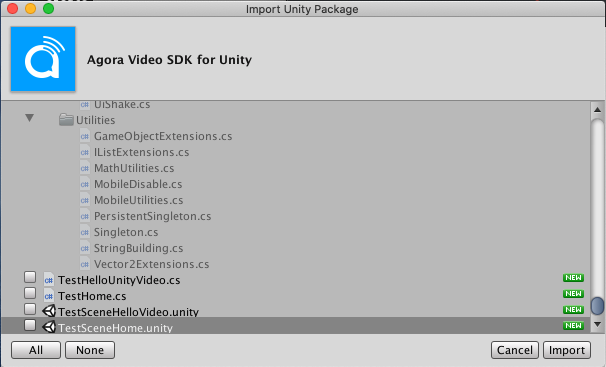
Once the plugin page has loaded, go ahead and click Download. Once the download is complete, click and Import the assets into your project.
You should then open the Lobby as your main scene. The following shows the also how the service page would look like for the multiplayer settings:

Discussion: in the following sections we will go through how the project to be updated with new code and prefabs changes. For those just want to quickly try out everything. Here is a plugin file to import all the changes. You will just need to enter the AppId to the GameSettings object as described after importing.
Modify the Tank Prefab
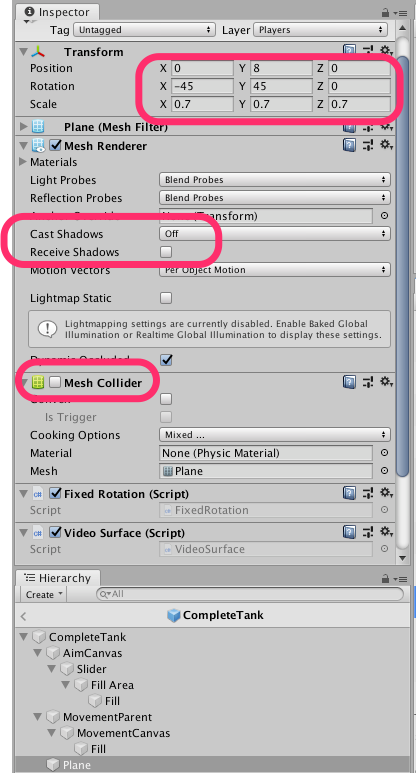
Let add a plane on to the top of the tank to render the video display. Find the CompleteTank prefab from the project. Add a 3D object Plane to the prefab. Make sure the following values are updated for the best result:
- Y =8 for position; Scale to 0.7. Rotate -45 degrees on X, 45 degrees on Y.
- Do not cast shadow
- Disable the Mesh Collider script
Attach VideoSurface.cs script from the Agora SDK to the Plane game object.
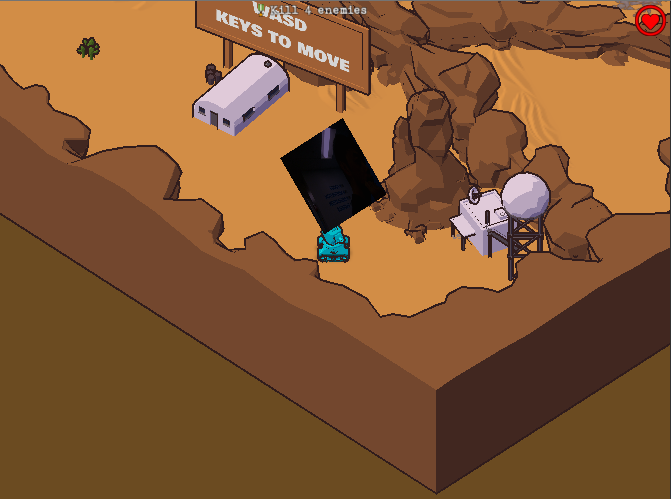
Save the change, and test the prefab in the game by going to Training to see the outcome. You should see a tank similar to the following screen:

Create UI for Mic/Camera Controls
Next, open the GameManager prefab and create a container game object and add three toggles under it:
- Mic On
- Cam On
- FrontCam
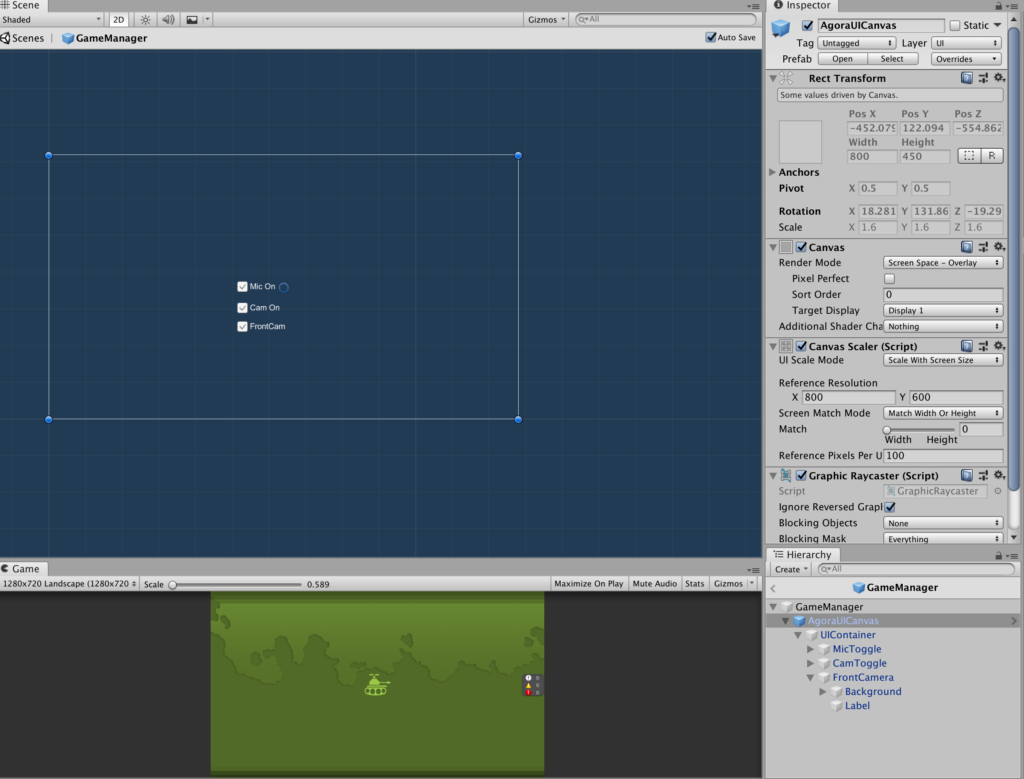
That’s basically all the UI changes we need for this project. The controller script will be added to the prefab later in the following sections.
Controller Scripts
Next we will go over some scripts to make the video chat to work for this game. Before adding new scripts, we will modify a script to allow the input for the Agora AppId.
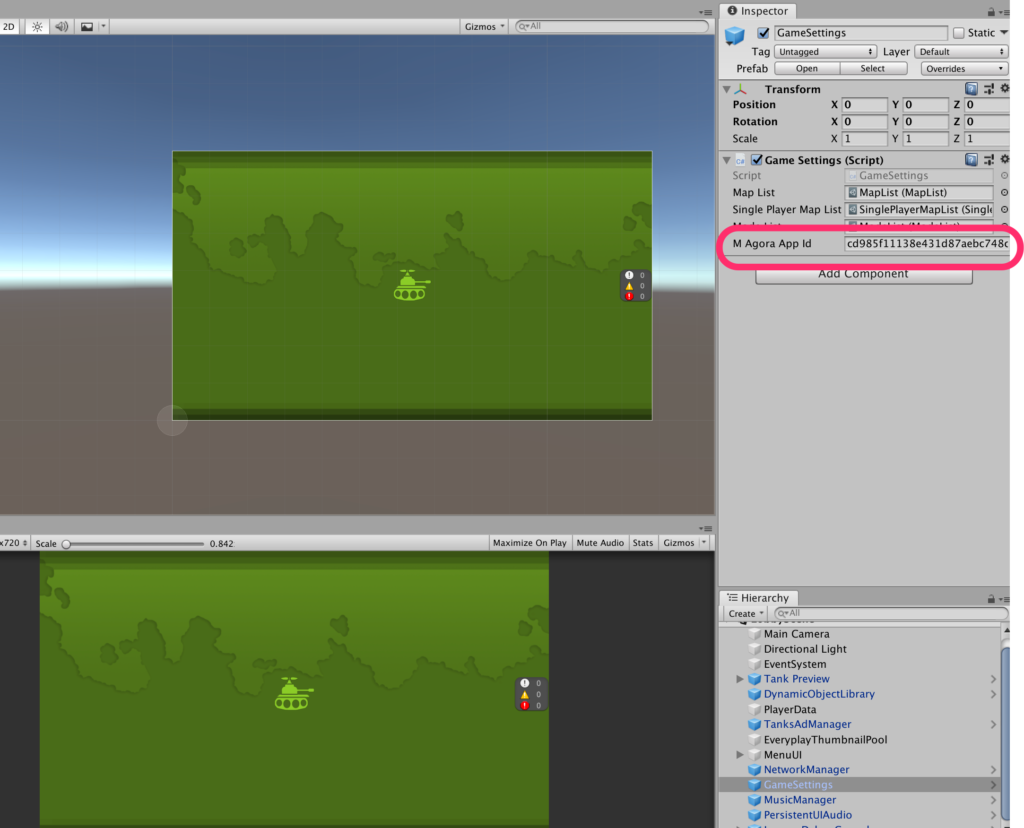
GameSettings
Two updates to the scripts to make the game to work with Agora SDK.
1.) Add a SerializedField here for the AppId.
Go to your Agora developer’s account and get the AppId (you may need to following the instruction to create the project first):

In the Lobby scene of the Unity Editor, paste the value of the App ID there and save:
2. Add support for Android devices by asking for Microphone and Camera permissions.
Agora Controller Scripts
Before jump right into the code, let’s understand what capabilities are needed. They are:
- Interface to the Agora Video SDK to do join channel, show video, mute microphone, flip camera, etc.
- Actual implementation for the Agora SDK event callbacks.
- Mapping from the Unity Multiplayer’s id to Agora user’s id.
- A manager to respond to the UI Toggle actions that we created earlier.
The following script capture shows the corresponding scripts hierarchy. A discussion about the four classes follows.
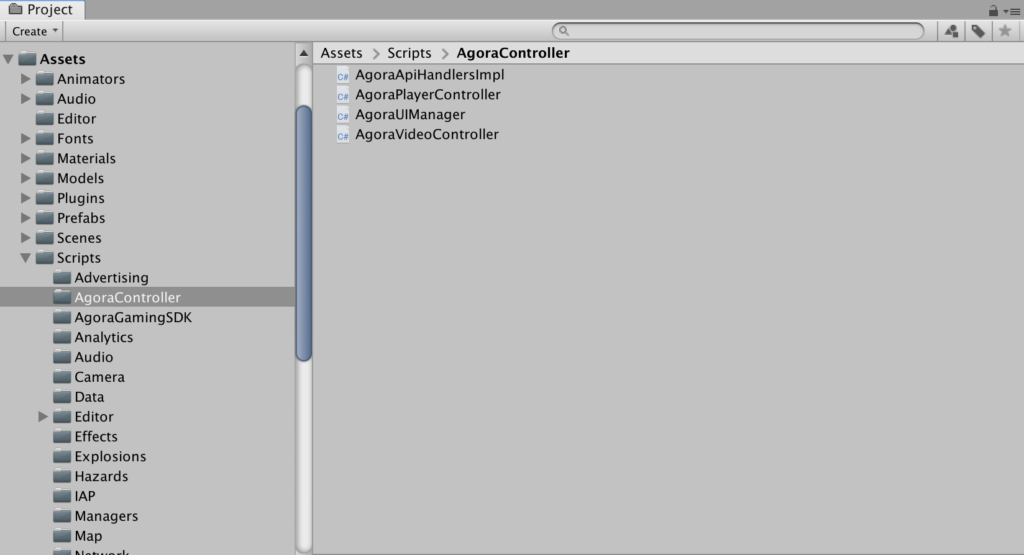
AgoraApiHandlerImpl: this class implements most of the Agora video SDK event callbacks. Many of them are placeholders. To support the minimum capability in this game, the following handlers are of the most interest:
- JoinChannelSuccessHandler — when local user joins a channel, this will corrospond to create a game and start a server. The server name is the same as the channel number for Agora SDK.
- UserJoinedHandler — when a remote user joins the game.
- UserOfflineHandler — when a remote user leaves the game.
SDKWarningHandler is commented out to reduce the noise in the debugging log. But it is recommended to enable it for an actual project.
AgoraApiHandlersImpl.cs
AgoraVideoController: this singleton class is the main entry point for the Tanks project to interact with the Agora SDK. It will create the AgoraApiHandlerImpl instance and handles interface call to join channel, mute functions, etc. The code also checks for Camera and Microphone access permission for Android devices.
AgoraPlayerController.cs
AgoraPlayerController: while Unity Unet library maintains the Network player’s profile, the Agora user’s id is created asynchronously. We will maintain a list of network player and a list of Agora user ids. When the game scene actually starts, we will bind the two list together into a dictionary so the Agora id can be looked up by using a Networkplayer’s profile. (We don’t need this binding mechanism if user id is known. In an actual production project, it is recommended to let the game server to provide the user ids to set for JoinChannel() call.)
AgoraVideoController.cs
AgoraUIManager: position the container game object to top right location of the game screen. It provides three toggling functions:
- Mic On : mute the audio input.
- Cam On: mute the local camera streaming and turn off the display of the local player.
- CamSwitch: switch between the front camera or the back camera on the mobile device.
AgoraUIManager.cs
Tanks Code Modifications
We will interact the above controllers code into the existing project by updating the Tanks code in the following classes:
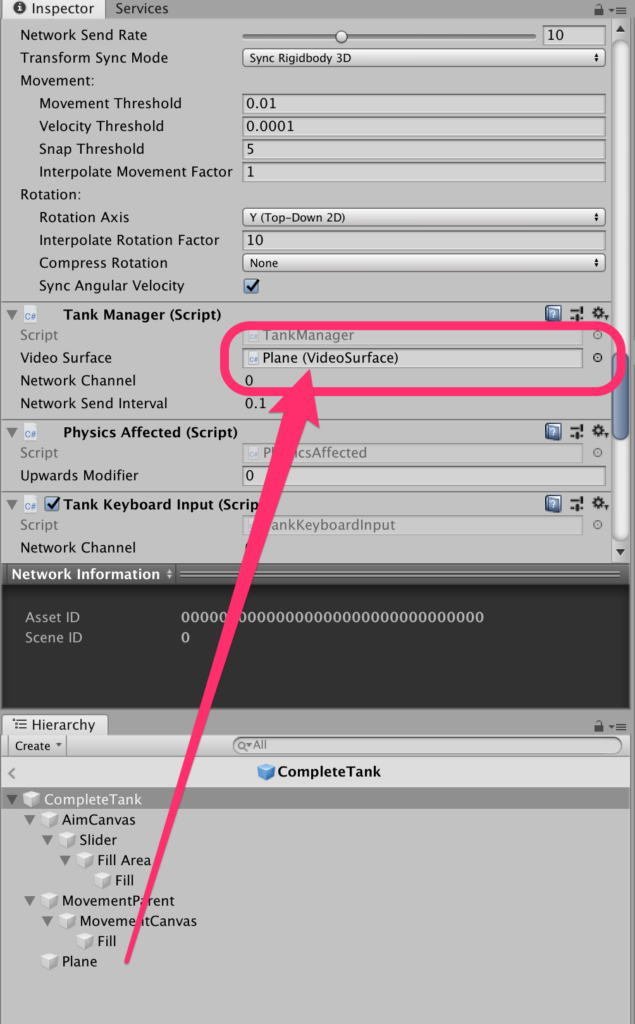
TankManager
1.) Add a field to bring in the VideoSurface instance that we added to the Plane and drag the Plane game object from the children to the field.
2.) Add a constant to name the video-surface.
public const string <strong>LocalTankVideoName </strong>= "Video-Local";
3.) Change code near the end of the initialize() method, where it looked like this before:
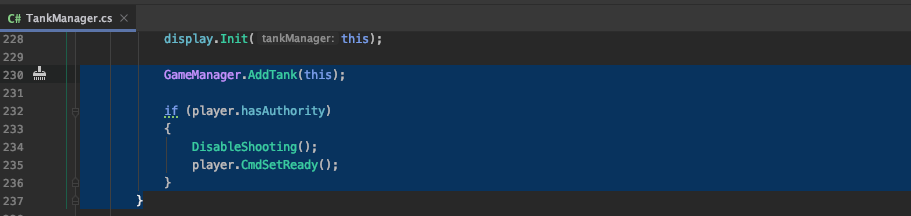
The new code:
Discussion: here is the code to associate the plane display that we created earlier to render the video feed. The VideoSurface script handles this work. The only thing it needs is the Agora Id. If it is the local player, the Agora Id will be default to 0, and the SDK will automatically render the device’s camera video onto the hosting plane. If this is a remote player, then the non-zero Agora Id is required to get the stream to render.
Calls JoinChannel()
The JoinChannel() function calls in AgoraVideoController class establish the local player status and starts a channel server. There are three places to initiate the call.
1.) CreateGame.cs: add a line to the StartMatchmakingGame() function inside the callback. It will look like this:
private void StartMatchmakingGame()
{
   GameSettings settings = GameSettings.s_Instance;
   settings.SetMapIndex(m_MapSelect.currentIndex);
   settings.SetModeIndex(m_ModeSelect.currentIndex);

m_MenuUI.ShowConnectingModal(false);

Debug.Log(GetGameName());
m_NetManager.StartMatchmakingGame(GetGameName(), (success, matchInfo) =>
{
if (!success)
{
m_MenuUi.ShowInfoPopup("Failed to create game.", null);
}
else
{
m_MenuUi.HideInfoPopup();
m_MenuUi.ShowLobbyPanel();
AgoraVideoController.instance.JoinChannel(m_MatchNameInput.text);
 }
});
}
2. LevelSelect.cs: add the call in OnStartClick(). And the function will look like this:
public void OnStartClick()
{
   SinglePlayerMapDetails details = m_MapList[m_CurrentIndex];
   if (details.medalCountRequired > m_TotalMedalCount)
   {
      return;
   }
GameSettings settings = GameSettings.s_Instance;
settings.SetupSinglePlayer(m_CurrentIndex, new ModeDetails(details.name, details.description, details.rulesProcessor));
m_NetManager.ProgressToGameScene();
AgoraVideoController.instance.JoinChannel(details.name);
}
3. LobbyServerEntry.cs: add the call in JoinMatch(). Modify the function signature to add string channelName. And the function will look like this:
private void JoinMatch(NetworkID networkId, string channelName)
{
   MainMenuUI menuUi = MainMenuUI.s_Instance;

menuUi.ShowConnectingModal(true);

m_NetManager.JoinMatchmakingGame(networkId, (success, matchInfo) =>
{
<em>//Failure flow
</em>if (!success)
{
menuUi.ShowInfoPopup("Failed to join game.", null);
}
<em>//Success flow
</em>else
{
menuUi.HideInfoPopup();
menuUi.ShowInfoPopup("Entering lobby...");
m_NetManager.gameModeUpdated += menuUi.ShowLobbyPanelForConnection;
AgoraVideoController.instance.JoinChannel(channelName);
 }
});
}
Update Populate() in the same file to reflect the signature change:
public void Populate(MatchInfoSnapshot match, Color c)
{
   string[] split = match.name.Split(new char[1] { '|' }, StringSplitOptions.RemoveEmptyEntries);
   string channel_name = split[1].Replace(" ", string.Empty);
   m_ServerInfoText.text = channel_name;

m_ModeText.text = split[0];

m_SlotInfo.text = string.Format("{0}/{1}", match.currentSize, match.maxSize);

NetworkID networkId = match.networkId;

m_JoinButton.onClick.RemoveAllListeners();
m_JoinButton.onClick.AddListener(() => JoinMatch(networkId, channel_name));

m_JoinButton.interactable = match.currentSize < match.maxSize;
NetworkManager.cs
Insert code for player leaving the channel in Disconnect():
public void Disconnect()
{
   switch (gameType)
   {
      case NetworkGameType.Direct:
         StopDirectMultiplayerGame();
         break;
      case NetworkGameType.Matchmaking:
         StopMatchmakingGame();
         break;
      case NetworkGameType.Singleplayer:
         StopSingleplayerGame();
         break;
   }
   AgoraVideoController.instance.LeaveChannel();
}
That’s basically all code changes we need to get the video streaming on local and remote player working! But wait, there is a catch we missed. The plane changes rotation with the tank when moving! See one of the tilted position:
We will need another script to fix the rotation:
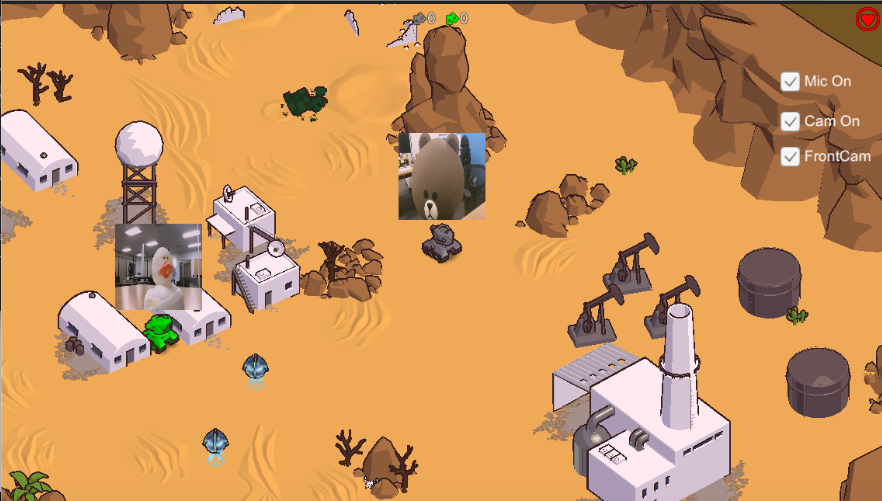
Build the project deploy the game to iOS or Android devices and start playing to a friend! You may see other person’s face (and yours) on top of the tanks and you can yell to each other now!
So, we are done building a fun project!
The current, complete code is hosted on Github.


