
Yesterday, when I was attending my online yoga class, I realized that I use so many live streaming applications for my everyday activities — from my business meetings to yoga classes, jam sessions, and movie nights. For most people who are stuck at home quarantining, live streaming is the best way to get closer to the world. This influx of users watching and starting their own live streams created a gap in the market for a “perfect” streaming application.
In this article, I will walk you through the process of building your own live streaming application using the Agora Flutter SDK. We will see how you can customize this application with an interface that meets your requirements. And we will do this while still maintaining the highest video quality and ultra-zero latency.
Prerequisites
If you’re new to Flutter, then install the Flutter SDK from here.
- Agora Flutter SDK v3.2.1
- Agora Flutter RTM SDK v0.9.14
- VS Code or another IDE of your choice
- Agora developer account (see How to Get Started with Agora)
Project Setup
- We begin by creating a Flutter project. Open your terminal, navigate to your development folder, and enter the following:
flutter create agora_live_streaming- Navigate to your
pubspec.yamlfile. In that file, add the following dependencies:
When adding the packages, be careful with the indentation to avoid errors.
- In your project folder, run the following command to install all the dependencies:
flutter pub get
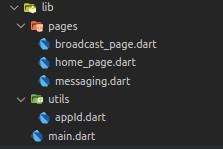
- Once we have all the dependencies, we can create the file structure. Navigate to the lib folder, and create a file structure like this:
Building Our Home Page
To begin with, I have created a simple login form that takes three inputs: username, channel name, and user role (audience or broadcaster). You can customize this interface for your needs.
https://gist.github.com/Meherdeep/49685630b92c0069655e6de1531b610b
This will create a UI similar to this:
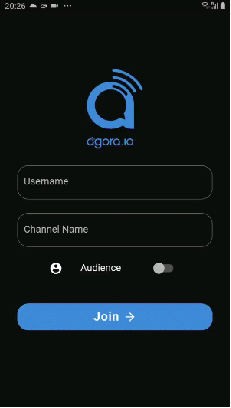
Whenever the join button is pressed, it calls the onJoin function, which first gets the user’s permission to access their camera and microphone during the call. Once the user grants these permissions, we move to the next page, broadcast_page.dart.
To ask the user for access to the camera and microphone, we use a package named permission_handler. Here I declare a function named _handleCameraAndMic(), which I will be referring to in the onJoin() function:
Building Our Streaming Page
By default, audiences have their cameras disabled and microphones muted, but the broadcasters have complete access. So while we build our interface we use the client role to style it accordingly.
Whenever a user selects the role as an audience member, we want this page to be called where they can view the broadcaster’s stream and have the option to interact with the broadcaster using the chat option.
But when a user selects the role of broadcaster, they can see the stream of other broadcasters in that channel, with an option to interact with everyone present in the channel (broadcasters and audiences).
Keeping all this in mind, let’s begin creating our interface.
Broadcast Page
Here I create a stateful widget called BroadcastPage whose constructor holds the value for channel name, username, and isBroadcaster (Boolean value).
In our BroadcastPage class, we declare an object of RtcEngine class provided by Agora. To initialize this, we create an initState() method in which we call the initialize function.
The initialize() function not only initializes the Agora SDK, it is also the function where I will be calling other major functions, such as _initAgoraRtcEngine(), _addAgoraEventHandlers(), and joinChannel().
Now let’s go through the significance of these three functions called in our initialize() function:
_initAgoraRtcEngine()is used to create an instance of the Agora SDK. Initialize it using the App ID that you got from the Agora dashboard. Inside this, we use theenableVideo()function to enable the video module through the object that we declared for our RtcEngine class. To change the channel profile from video calling (default value) to streaming, we call thesetChannelProfile()method and then set the user role.
_addAgoraEventHandlers()is a function that takes care of all the major callback functions. We begin withsetEventHandler(), which listens for engine events and receives the statistics of the corresponding RtcEngine.
Some important callbacks include:
joinChannelSuccess()is triggered whenever a local user joins the specified channel. It returns the channel name, the uid of the user, and the time elapsed (in ms) for the local user to join the channel.leaveChannel()is the opposite ofjoinChannelSuccess()because it is triggered when the user leaves the channel. It returns the stats of the call whenever the user leaves the channel. These stats include latency, CPU usage, duration, etc.userJoined()is a method that is triggered when a remote user joins a particular channel. A successful callback returns the uid and the time elapsed of the remote user.userOffline()is the opposite ofuserJoined()because it occurs when a user leaves the channel. A successful callback returns the uid and the reason for going offline, which includes dropping, quitting, etc.firstRemoteVideoFrame()is a method that is called when the first video frame of a remote video is rendered. This helps you in returning the uid, the width, the height, and the time elapsed.
joinChannel()A channel acts as a common room for people to be in the same video call. AjoinChannel()function helps in subscribing to a particular channel. This can be declared using our RtcEngine object:
await _engine.joinChannel(token, "channel-name", "Optional Info", uid);Note: This project is meant for reference purposes and development environments, it is not intended for production environments. Token authentication is recommended for all RTE apps running in production environments. For more information about token based authentication within the Agora platform please refer to this guide: https://bit.ly/3sNiFRs
This sums up all the functions and methods required to make this video streaming application. Now we can make our widgets, which will take care of the complete UI for our application.
In my build method I am declaring two widgets (_viewRows() and _toolbar()), which take care of displaying a grid of broadcasters, and a toolbar that consists of buttons for disconnecting, muting, switching the camera and messaging.
Let’s start with _viewRows(). For this, we need to know our broadcasters and their uid for displaying their video. We need a common list of local and remote users with their uid. To implement this, we create a widget named _getRendererViews(), in which we use RtcLocalView and RtcRemoteView.
With this, you will have a complete video calling app implemented. To add features like disconnecting the call, muting yourself, switching the camera, and messaging, we will create a basic widget called _toolbar() with four buttons. These buttons are then styled according to the user role so that audiences can only chat while the broadcaster gets access to all the functions:
Let’s take a look at the four functions that we declared:
_onToggleMute()lets you mute and unmute your stream. Here, we use themuteLocalAudioStream()method, which takes a Boolean input to mute or unmute the stream.
_onSwitchCamera()lets you toggle between the front and the rear cameras. Here, we use the switchCamera() method, which helps you achieve the desired functionality.
_onCallEnd()disconnects the call and takes the user back to the home page.
_goToChatPage()navigates to the chat screen.
Building Our Chat Screen
To extend the interaction between audiences and broadcasters, we add a chat page where anyone can send messages. To do this, we use the Agora Flutter RTM package, which provides the option of sending a message to a specific peer or broadcasting it to the channel. In this tutorial, we will be broadcasting our message to the channel.
We begin by creating a stateful widget whose constructor holds all the input values: channel name, username, and isBroadcaster. We will be using these values in our logic and also in styling our page.
To initialize our SDK, we declare the initState() method, in which I am declaring a _createClient(), which takes care of initialization.
In our _createClient() function, we create an object of our AgoraRtmClient. This object is then used to log in and log out from a particular channel.
In my _createClient() function I have referred two other functions:
_toggleLogin()uses the object of our AgoraRtmClient to log in and log out from a channel. It takes a token and a user ID as a parameter. Here, I am using a username for the user ID.
_toggleJoinChannel()creates an object of AgoraRtmChannel and uses this to subscribe to a particular channel. This object is then used for all the callbacks that are triggered when a member joins, a member leaves, or a user receives a message.
At this point, you will have a fully functional chat application. Now we can make our widgets, which will take care of the complete UI for our application.
In my build, I have declared two widgets: _buildSendChannelMessage() and _buildInfoList(). creates an input field and triggers a function to send the message.
_buildSendChannelMessage()_buildInfoList() styles the messages and places them in unique containers. You can customize these widgets according to your design requirements.
Here are the two widgets:
_buildSendChannelMessage()I have declared a Row that adds a text input field and a button. This button calls_toggleSendChannelMessagewhen pressed.
This function calls thesendMessage() method from the AgoraRtmChannel class using the object that we declared earlier. This takes an input of type AgoraRtmMessage
_buildInfoList()aligns all the local messages on the right, while all the messages a user receives are on the left. This text message is then wrapped inside a container and styled according to your needs.
Testing
Once we are done building the live video streaming application, we can test it on our device. To do that, navigate to your project directory in your terminal and run this command:
flutter runConclusion
Congratulations! You have implemented your own live video streaming application, which you built using the Agora Flutter SDK, with interactivity through the Agora Flutter RTM SDK.
You can get the complete code for this application here.
Other Resources
To learn more about the Agora Flutter SDK and other use cases, see the developer guide here.
You can also have a look at the complete documentation for the functions discussed above and many more here.
And I invite you to join the Agora Developer Slack community.


