
“You’re live!” — that’s a phrase that used to be limited to celebrities and other famous people. But now we see everyone going live and sharing their life stories. We have seen the market evolve so much that live streaming has become one of the biggest sources of real-time engagement (RTE).
Building your video streaming application for Android can be difficult especially if scalability is a concern. Agora makes our lives much easier by providing an easy-to-use SDK that also gives developers low-level control of exactly how we want the streaming service to work. While using the Agora platform, you don’t have to worry about scalability, call drops, or latency.
In this tutorial, we will walk through how to add live video streaming to an Android application with multiple broadcasters and audiences who can subscribe to their stream.
So let’s get started!
Requirements
- An Agora developer account (see How to get started)
- Android Studio
- A basic understanding of Android development
Project Setup
- Though I won’t be going over the UI building part of the app, I have created a simple UI for our application. You can head over to GitHub to get the design used in this tutorial: https://github.com/Meherdeep/agora-android-live-streaming/tree/design
- Navigate to the strings.xml file, and add your App ID to the private_app_id resource. Make sure to then sync your Gradle files.

MainActivity.java
Now, let’s create a file called MainActivity.java. This file contains the logic of what the users see when they first open the app. The main UI elements include a radio button and a text box. The radio button allows a user to decide whether they want to be a host or an audience for the live video stream. The text box allows the user to input the channel name they wish to join.
In our onCreate method, we add the user permission so that the application asks for camera and microphone permissions as soon as the page is built.
We’ll be adding two methods to our class:
- The first method will be called when the user chooses an option from the radio buttons. We will be setting a variable accordingly. We will be setting it to a value that will determine whether the user is a broadcaster or an audience.
- We then implement a function that is called when the user submits the details. Here we will be getting all the details we need and sending them over to the next activity.
VideoActivity.java
By default, in a video streaming application audiences have their cameras disabled and microphones muted, but the broadcasters have complete access. So when users join as a broadcaster, their videos are automatically added to the interface.
So first we are adding some variables that we will be using throughout the class. We then modify the onCreate method to get the data that we had passed in from the previous activity.
We declare a method called initAgoraEngineAndJoinChannelthat will call all the other methods needed in the life cycle of the broadcast. We also define the event handler that will decide what methods to call when a remote user joins or leaves or when the remote feed is muted.
Let’s take a deeper look into the initAgoraEngineAndJoinChannel()method and all the other methods referred in it.
initializeAgoraEngine(): This is a method used to initialize the RtcEngine.
setChannelProfile(): This is a method that is referred using our AgoraRtcEngine object. Agora provides various profiles that can be easily used and integrated into an application by this method call.setClientRole(): This method sets the role of a user to host or an audience (default). This method should be called before joining the channel. You can call it again after joining the channel to switch the client role.setupVideoProfile(): This method is used to define how the video needs to be rendered. You can use your own custom configuration for attributes like frame rate, bitrate, orientation, mirror mode, and degradation preference.
setupLocalVideo(): This function is used to refer the setupLocalVideo method from our AgoraRtcEngine through which we set a surface view for our local user that is used in the live stream.
joinChannel(): A channel acts as a common room for people to be in the same video call. The joinChannel() method can be called like this:
This method takes four parameters to run successfully:
- Token: Token authentication is recommended for all RTE apps running in production environments. For more information about token-based authentication in the Agora platform, see https://docs.agora.io/en/Video/token?platform=All%20Platforms.
- Channel Name: It takes a string input to put users into a common video call.
- Optional Info: This is an optional field through which you can pass additional information about the channel.
- uid: It is the unique ID for every user who joins the channel. If you pass 0 or the null value, then Agora automatically assigns a uid for every user.
Note: This project is meant for reference purposes and development environments, it is not intended for production environments. Token authentication is recommended for all RTE apps running in production environments. For more information about token based authentication within the Agora platform please refer to this guide: https://bit.ly/3sNiFRs
In our initializefunction we passed mRtcEventHandleras one of the parameters to the create method. This sets up a series of callback events that are triggered whenever a user joins a channel or leaves a channel.
We then add the onDestroy method for releasing the resources that we have used.
You can also add features like switching the camera by calling the switchCamera() method using our RtcEngine’s object:
mRtcEngine.switchCamera()Or muting the microphone by calling the muteLocalAudioStream() method using our RtcEngine’s object:
mRtcEngine.muteLocalAudioStream(true)With this, you’re ready to go and build your own live streaming application.
Testing
Before you build the app, make sure that you did the following:
- You added your App ID while initializing RtcEngine.
- You added your channel name for both RtcEngine and RtcChannel.
- If your project has App Certificate enabled, you used your token in the token variable.
- You followed all the instructions correctly, such as adding the correct dependencies to the build.gradle file, adding the permissions to your manifest, and so on.
After you build the app, you should see something like this:
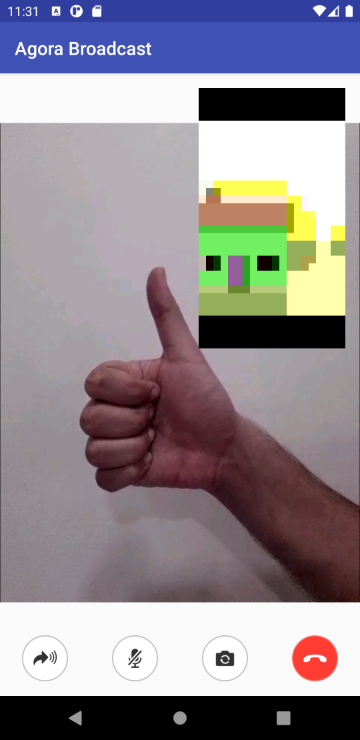
Here I have added two broadcaster streams while multiple audiences have subscribed to it.
Conclusion
Congratulations! You have implemented your own live video streaming app for Android built using the Agora Android SDK. The above given code explains how you can live broadcast your stream.
You can get the complete code for this application here.
Other Resources
For more information about Agora applications, take a look at the Agora Video Call Quickstart Guide and Agora API Reference.
And take a look at the complete documentation for the functions discussed above and many more here.
I also invite you to join the Agora Developer Slack community.


