
This blog was written by Sai Sandeep Rayanuthala, an Agora Superstar. The Agora Superstar program empowers developers around the world to share their passion and technical expertise, and create innovative real-time communications apps and projects using Agora’s customizable SDKs.
Last week I had to do a review session for my college project, which got a low score, It was a big deal for me so I attended the review and explained my project. On a video chat, my professor had a lot of recommendations for me and suggested some changes to the paper of the project. I was too distracted at the moment and nodded my agreement to whatever she was saying.
Two days later when I sat down to work on the changes, I didn’t remember any of the suggestions my professor gave. Then it hit me: If only I had a recording of this video call I wouldn’t have to worry so much about forgetting or noting down every detail while in a call.
To help you avoid making the same mistake that I did, I’ll set up a cloud recording feature for a video chat web app. We will use the Agora Cloud Recording API for this tutorial.
Prerequisites
- Clone the quick start repo as the base project to work on.
- An Agora developer account (see How to Get Started).
- An AWS account.
- A Heroku account or another service to deploy the back end.
Architecture
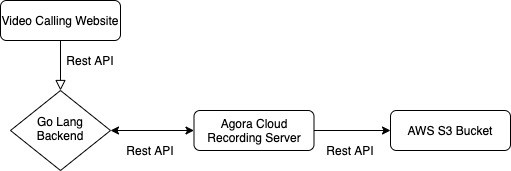
We are using a small client-server architecture. All the communication will be through REST APIs.
Video Calling Website: The front end will be responsible for starting and stopping the recording.
GoLang Backend: A back-end server that has all the access keys and secrets required for recording.
Agora Cloud Recording Server: Responsible for uploading all the media fragments to an AWS S3 bucket.
AWS S3 Bucket: A bucket to store media fragments.
Agora Setup
- Create a project in the Agora Console.
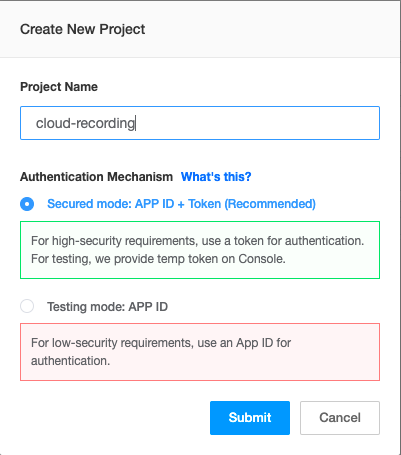
Note: Choose Secured Mode while creating the project.
2. Enable cloud recording by clicking the View usage button and enabling the cloud recording.
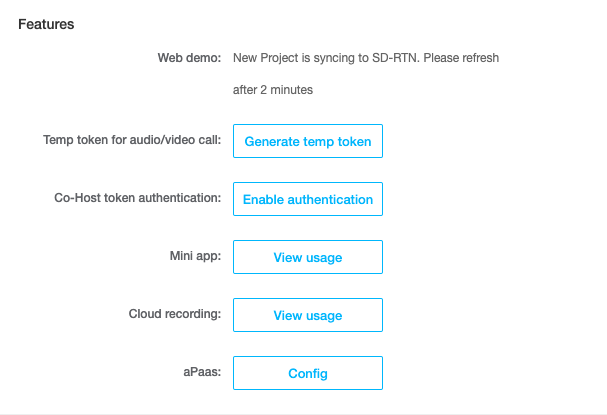
3. Copy the App ID and the App Certificate from the same page to a text file. We will need this in the future.
4. Click this link and click the Add Secret button. Copy the Customer Id and the Customer Secret to the text file.
AWS Setup
- Go to your AWS IAM Console and create a user. If you can’t find it, click this link.

Note: Make sure you add the AmazonS3FullAccess Policy with Programmatic Access.
2. Copy your AWS Access Key and Secret Key to the text file.
3. Create an AWS S3 bucket. If you already have a bucket, you can skip this step. If you can’t find the AWS S3 service, click this link.
4. Create a bucket and note down the bucket name and equivalent bucket number. In my case, the number is 14. You can find yours in this table:

Back End
- Before deploying our back end, make sure we have all our environment variables:
APP_ID=
APP_CERTIFICATE=
RECORDING_VENDOR=
RECORDING_REGION=
BUCKET_NAME=
BUCKET_ACCESS_KEY=
BUCKET_ACCESS_SECRET=
CUSTOMER_ID=
CUSTOMER_CERTIFICATE=
Note: RECORDING_VENDOR=1 for AWS. Click this link for more information.
2. To deploy, click the Deploy button and enter your environment variables.

3. Import the Postman collection. ( Optional step )

Hurray! Now, your back-end setup is complete. If you want to test your back end, you can call the APIs from Postman and use the web demo front end to join the call. ( Optional step )
Front End
Download the base code for the front end. We will use the Agora NG SDK for this tutorial.
git clone https://github.com/technophilic/Agora-NG-basic
Let’s add a base URL on top of the scripts.js file.
Let’s make a helper function to fetch tokens from our back end.
Now, call the getToken() function after fetching the channelName from the form. And assign the token and the uid to two different variables.
Edit the client.join method and pass the uid and the token.
Add two buttons to the front end namely — Start Recording and Stop Recording in the index.html file. Both buttons are disabled by default.
After publishing the local streams, enable the Start Recording button.
Let’s make an onclick event listeners for the Start Recording button.
initStopRecording is defined at the end of the code for stopping call recording.
Conclusion
Hurray! Now, I can record my calls during my project review! The codebase for this tutorial is available on GitHub.
Note: The deployed backend has a token server embedded in it. So you don’t need to deploy a new token server!
Not sure how to merge cloud recorded files?
Check this out!
Other Resources
Join our Slack community here to learn about product updates, participate in beta programs, and engage in meaningful conversations with other developers.
If you see room for improvement, feel free to fork the repo and make a pull request!


