
Hey everyone, today I want to walk through how to build a live Streaming web app that leverages WebXR to display a live video stream as part of a 3D model that exists in both WebAR and WebVR environments.
In this project we’ll build a simple web app that supports two user roles. The WebVR scene allows users to broadcast themselves into a 3D model that they can rotate and move around a virtual scene. The WebAR scene allows users to view the virtual scene in augmented reality where the 3D model and video stream are controlled by the broadcast user.

Pre-Requisites
- A simple web server — I like to use Live Server
- A server with an SSL cert or way to have an https connection (I use ngrok)
- A developer account with Agora
- A basic to moderate understanding of HTML/CSS/JS
- A basic understanding of Bootstrap and jQuery
(minimal knowledge needed)
Architecture and Structure Design
In “How To: Build a Live Broadcasting Web App,” the build conformed to the broadcasting scenario. This build will follow a similar structure with two user roles: broadcaster and audience. Just as in the traditional broadcasting scenario, broadcasters will share their camera stream into the channel, while the audience will be able to watch the broadcaster(s), but with a WebXR twist.
In this project, the broadcaster will be represented by a 3D model, and we will play the camera stream as a texture as the face of the model.
Broadcaster by digitallysavvy on Sketchfab
For this build I’m planning to use 3 frameworks: AFrame because its virtual DOM makes it very clear and easy to understand the structure of the scene; AR.js for its cross-platform WebAR; and Agora for the live streaming, because it it makes integrating real-time video simple.
Given the fragmentation that is pervasive throughout the JS landscape, I wanted to write this tutorial using the most basic versions of HTML, CSS, and JS. As we go along, you’ll notice that I’ve mixed Vanilla JS and jQuery but that was done intentionally because Vanilla JS can be a bit verbose for certain DOM tasks, so I used jQuery, to simplify a few things. Within the WebXR specific code, I stuck to Vanilla JS to keep it very clear how things are connected. We are going to cut a few more corners and use Bootstrap so we don’t have to worry about writing too much custom CSS.
Core Structure (HTML)
In our live broadcast web app, we will have two clients (broadcaster/audience), each with their own UI. The broadcaster UI will use AFrame to create the WebVR part experience, while the audience will use AR.js with AFrame to create the WebAR portion of the experience.
Broadcaster UI
Let’s start with the basic html structure of the Broadcaster UI. There are a few UI elements we must have. First, we need a toolbar that will contain buttons for toggling audio/video streams, and a way to leave the chat. We’ll also need an area to act as our 3D canvas for our AFrame scene.
Before we start, it’s worth noting that AFrame implements an entity component system that virtualizes the DOM. We’ll use AFrame’s custom DOM elements to build our virtual scene, starting with the <a-scene> component that defines our scene, and then its components:
<a-assets>to properly load our broadcaster model as part of the scene.<a-sky>to set the scene’s background color.- 2
<a-entity>’s, one for the camera and the other as the camera’s target, this is for theaframe-orbit-controls-component.
We’ll also include Agora’s Video and RTM Web SDKs. We’ll implement them within the Broadcaster Client to display our video stream and allow Broadcaster&; to move the 3D model within the virtual scene.
At the bottom of the page, we’ll include a code block to disable the UI controls and a link to our Broadcaster Client. When we build the Broadcaster Client, we’ll enable the UI controls when the user joins the channel.
Audience UI
Now that we have the Broadcaster UI ready, we can build the Audience UI. It will be much simpler than the Broadcaster UI, as we only need to support displaying 3D models with AR.js/AFrame and Agora’s Video and RTM Web SDKs.
Within the scene, we’ll use the <a-assets> element to preload the broadcaster 3D model, but this time the <a-entity> camera is empty, because AR.js will control the camera within the scene (just like all other AR frameworks).
You’ll notice that we have a new element <a-marker>. This represents the marker image that AR.js is tracking for the AR experience. The type='barcode' and value=6 dictate the marker type and the “fingerprint” that AR.js will “track” (more about AR.js Marker Tracking). I chose to use the Barcode type for simplicity.
Note: We are using the legacy marker tracking and not the new AR.js NFT Image Tracking because there is an issue with dynamically loaded models and NFT markers. Once this issue is resolved, I plan to update the project to use NFT Image Tracking.
CSS & Styling
Within each of the UI’s above I’ve included some Bootstrap classes. Bootstrap is really nice, but we also need to include a few custom CSS blocks to adjust a few elements that we won’t get perfect out of the box. We’ll use the Font Awesome CSS framework because we are going to need to incorporate icons for the various buttons and FA makes it really simple.
As I mentioned, Bootstrap is great, but sometimes you still need a little bit of custom CSS. Here are the styling blocks for the above referenced style.css. The CSS is pretty straight-forward without anything really worth noting.
Building the Broadcaster Client
Now we are ready to build our WebVR Broadcaster Client. To get us started, below is a barebones implementation of the Agora RTC and RTM Web SDKs that will serve as our Broadcaster Client.
I’ve included the required callbacks and implemented the key functions but left the function block empty for us to walk through. We’ll have a few functions to fill in, but the two I want to highlight for this section are:
- The
createBroadcasterfunction which will create the<a-entity>for the 3D model with a video texture. - The
connectStreamToVideofunction that will connect the Agora Video stream as the source for the video texture.
Note: You will need to add your Agora AppID at the top of the script. You can find this in the Projects section of your Agora Console
You’ll notice a few empty functions for sending messages with Agora’s RTM SDK. We’ll first focus on adding the Broadcaster and Audience video clients, then we’ll walk through the RTM integration.
Note: In this implementation, I’m using dynamic user ID’s but you can easily connect this to a user management system and use your own UIDs. In the code above, I use the same user ID for both the RTC and RTM clients.
Adding the 3D Model
Now that we have our bare bones implementation, let’s implement the createBroadcaster function.
First, we want to create a video element that will be used as part of the Video Texture. We need to set the webkit-playsinline and playsinline attributes to ensure the video doesn’t play fullscreen. Once the video element is ready, we can add it to the DOM as a child of <a-assets>. AFrame’s asset loader will handle loading the video in such a way that we can use it in our virtual scene.
Next we need to configure our settings for our 3D model, such as scale, rotation, and position. While the first time we call this function is within the localStream’s init, this function is generic and called whenever a new stream is added to the channel. To allow for multiple hosts, we need to include an offset for the position.
For the gltfModel, we’ll take advantage of AFrame’s DOM virtualization. We’ll pass the id of the 3D model asset that we loaded in the <a-assets> let AFrame’s loader do the rest. AFrame provides a model-loaded event that we can listen for. Once the model is loaded we can traverse its mesh’s to find the mesh named 'face-geo'. This is the name I gave the mesh to make it easier to find.
You’ll notice that we are creating a <a-gltf-model>. This is a component that wraps <a-entity> specifically for loading .glTF and .glb files. In this project we’ll use .glb, because it efficiently packs the model into a single file.
Once we find the 'face-geo', we need to create a Video Texture, set the minFilter, magFilter, and flipY properties to ensure the video is properly sampled and doesn’t appear flipped. Next we’ll update the 'face-geo' node’s material. We’ll start with setting the .map property to the Video Texture. Then we’ll set the .color to an empty color object to ensure the video doesn’t appear with any tint. Lastly we’ll set the .metalness to 0 so the video doesn’t have any reflections.
Implementing the Real Time Video
Now that our 3D model has been added to the scene, it’s relatively simple to connect the video stream as the source of the Video Texture.
The important thing to remember is to use the 'onloadedmetadata' to wait for the stream to load before trying to play it.
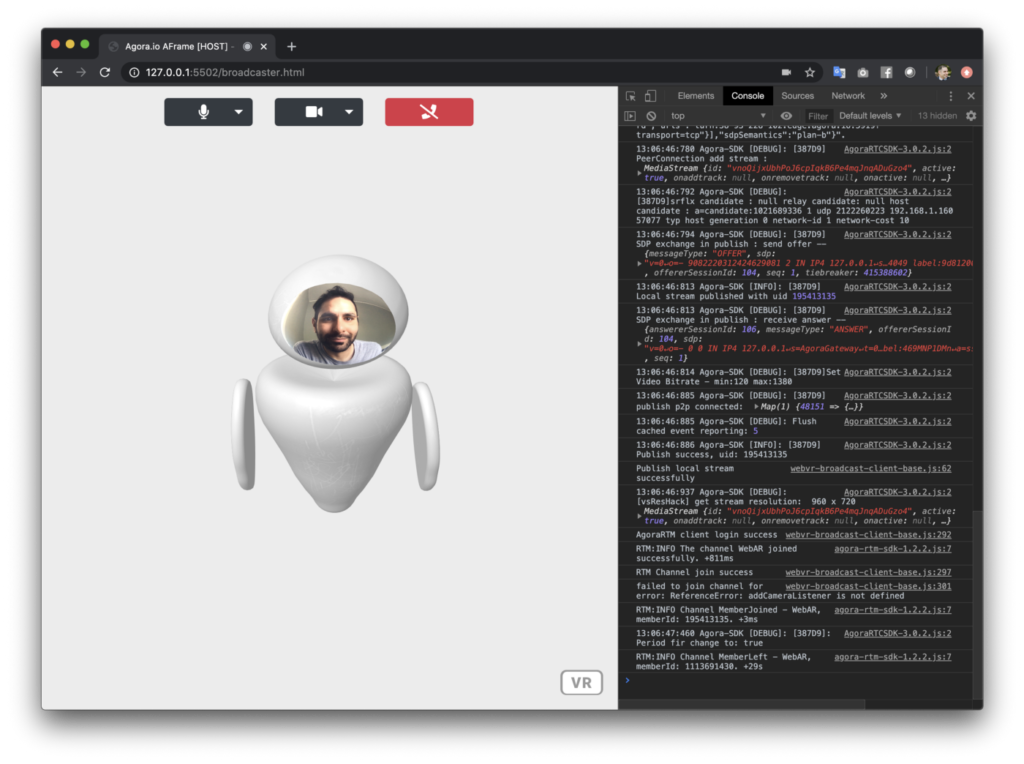
Test the Broadcaster
At this point we are ready to test the Broadcaster Client. Start your local web server, and navigate to:
/broadcaster.htmlIf you followed the steps above and everything works, you should see yourself in the 3D model.
Building the Audience Client
Now that we have a working WebVR Broadcaster Client, we need to build the WebAR Audience Client. To get us started, below is a barebones implementation of the Agora RTC and RTM Web SDKs that will serve as our Audience Client.
This part is a bit easier because we are still using AFrame, the only difference is we’ve added AR.js, and since this is an audience user they don’t need to publish a stream. I’ve included the Audience Client below, you’ll notice two minor differences when we add the model:
- The model is added as a child of
<a-marker>so that it will display tracking to the marker. - The scale is much smaller to make the model fit on the screen better and the reason it’s negative is because I need to flip the UVs because the video was appearing inverted.
- The model is rotated 180 degrees over the x-axis, this allows the model to appear upright when tracking to the marker.
Note: You will need to add your Agora AppID at the top of the script. You can find this in the Projects section of your Agora Console.
Test the Audience
Let’s start our local web server, and navigate to the Broadcaster Client
/broadcaster.htmlThis is where you’ll need to either deploy this to a web server or use a tunnel out service (like ngrok) to map your local web server to a secure (https) url.
On your mobile device navigate to
/index.htmlWhen you run the demo on your mobile device, you’ll have to accept camera access and sensor permissions for AR.js. Point your phone at the marker image and you should see the 3D broadcaster appear.
Adding the RTM Messages
Ok, so the video in AR is cool, but what would make this more interesting would be adding the ability to move the 3D model within the scene and synchronize that across all clients. Now that we have our Broadcaster and Audience Clients, all we need to do is add in the ability to send and receive messages with Agora’s Real-Time Messaging SDK.
Send RTM Messages
Within our Broadcaster Client, you’ll notice we have key bindings set to control some of the streaming functionality:
mto toggle the micvto toggle the video andqto leave the channel
You’ll also notice we have a few others:
eandrthat rotate the modeld,x,z, andcto move forward, back, left and right [respectively]
Tapping these buttons triggers one of two functions
- rotateModel to handle rotations
- moveModel to handle (changes in position)
Within each function, you’ll also notice that it calls sendChannelMessage to send an RTM message that lets each of the other clients in the RTM channel know to update the rotation/position.
Let’s fill in the missing pieces so the sendChannelMessage function can pass along our updates to others in the channel. We’ll use a JSON object to structure our message, designating one key for the property we are changing, and the direction.
const jsonMsg = {
  property: property,
  direction: direction
};
In this case direction is mapped to a set of keywords:
- counter-clockwise: positive rotation around the
y-axis - clockwise: negative rotation around the
y-axis - forward: move positively on the
z-axisposition - backward: move negatively on the
z-axisposition - left: move positively on the
x-axisposition - right: move negatively on the
x-axisposition
Next let’s package our message into an Agora RTM message. The Agora RTM SDK uses a JSON object to structure messages, the most important element being the text property as this holds the message that will get passed to the receiver. Since text expects a string value, we’ll use JSON.stringify() to convert our object to a string.
Receive RTM Messages
Now that we are able to send messages into the RTM channel, we also need a way of handling the messages when they are received. Let’s take a look at the .on('ChannelMessage', ... ) callback that exists in both the Broadcaster and Receiver Clients.
Note: We listen for this event on the Broadcaster Client so that we can support multiple Broadcasters in each channel.
When we receive the message, we use JSON.parse() to convert from a string back to a JSON object, which allows us to quickly update the appropriate property.
rtmChannel.on('ChannelMessage', ({ text }, senderId) => {
  // convert from string to JSON
  const msg = JSON.parse(text);  // Handle RTM msg
  if (msg.property === 'rotation') {
    rotateModel(senderId, msg.direction)
  } else if (msg.property == 'position') {
    moveModel(senderId, msg.direction)
  }
});
Test the RTMTest the Audience
Let’s start our local web server, and navigate to the Broadcaster Client
/broadcaster.htmlAgain this is where you’ll need to either deploy this to a web server or use a tunnel out service (like ngrok) to map your local web server to a secure (https) url.
On your mobile device navigate to
/index.htmlWhen you run the demo on your mobile device, you’ll have to accept camera access and sensor permissions for AR.js. Point your phone at the marker image and you should see the 3D Broadcaster appear.
Next on the Broadcaster Client, use e, r, d, x, c, and z to move the Broadcaster around in the virtual scene, and watch as it’s updated in real-time for everyone in the channel.
All Done
Wow, that was intense! Thanks for following and coding along with me; below is a link to the completed project. Feel free to fork and make pull requests with any feature enhancements. Now it’s your turn to take this knowledge and go build something cool.
https://github.com/digitallysavvy/AgoraWebXR
Other Resources
For more information about the Agora Video SDK, please take a refer to the Agora Video Web SDK API Reference. For more information about the Agora RTM SDK, please take a refer to the Agora RTM Web SDK API Reference.
I also invite you to join the Agora Developer Slack community.


