
비디오 게임을 개발할 때 그래픽, 코드, 사용 중인 플러그인에서 성능을 최대한 끌어내는 것이 중요합니다. Agora의 Unity SDK는 낮은 리소스 사용량과 성능 비용을 갖추고 있어 모바일부터 VR까지 모든 플랫폼에 적합한 훌륭한 도구입니다!
이 튜토리얼에서는 Agora SDK와 Photon Unity Networking (PUN)을 사용하여 Unity MMO 데모 자산에서 실시간 비디오 파티 채팅 기능을 만드는 방법을 보여드리겠습니다.
데모가 끝날 때쯤에는 Unity용 Agora 플러그인을 다운로드하는 방법, 다른 플레이어의 채널에 참여하거나退出하는 방법, 플레이어 파티를 확장 가능하게 표시하는 방법을 이해하게 될 것입니다.
이 튜토리얼에서는 Unity 2018.4.18을 사용합니다.
시작하기 전에 두 가지 중요한 요소에 대해 간단히 살펴보겠습니다:
이 데모는 네트워크 연결이 필요한 데모이기 때문에 테스트를 위해 두 가지 전략이 있습니다:
- 두 대의 다른 컴퓨터를 사용하며 각 컴퓨터에 웹캠을 연결합니다(저는 PC와 Mac 노트북을 사용했습니다)
- 같은 컴퓨터에서 Unity 빌드에서 실행된 클라이언트와 Unity 에디터에서 실행된 클라이언트를 사용해 테스트합니다(이 방법은 최적의 방법이 아닙니다. 두 빌드가 웹캠 액세스를 경쟁할 수 있으며 문제가 발생할 수 있습니다)
시작하기
- 여기에서 Agora 개발자 계정을 생성하여 AppID를 획득하세요
- Photon 개발자 계정을 생성하여 appID를 획득하세요
- Unity Asset Store에서 Agora SDK를 프로젝트에 임포트하세요
- Photon Viking Multiplayer Showcase를 프로젝트에 임포트하세요
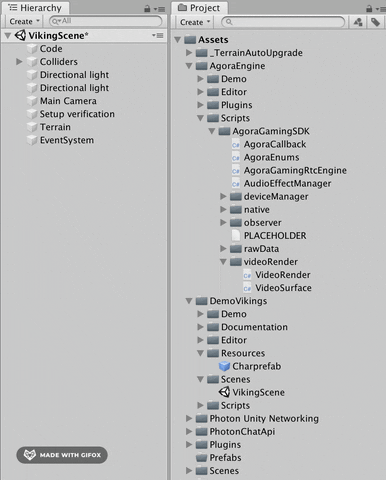
아고라 엔진을 생성하세요
우리의 “Charprefab”은 기본 Viking 캐릭터입니다. 이 오브젝트는 Assets > DemoVikings > Resources에 위치합니다.
이 오브젝트는 Photon을 통해 네트워크 로비/방에 참여하고 네트워크를 통해 메시지를 전송하도록 이미 설정되어 있습니다.
AgoraVideoChat이라는 새로운 스크립트를 생성하고 CharPrefab에 추가하세요.
AgoraVideoChat에 다음 코드를 추가하세요:
using agora_gaming_rtc;
// *NOTE* Add your own appID from console.agora.io
[SerializeField]
private string appID = "";
[SerializeField]
private string channel = "unity3d";
private string originalChannel;
private IRtcEngine mRtcEngine;
private uint myUID = 0;
void Start()
{
   if (!photonView.isMine)
     return;
   // Setup Agora Engine and Callbacks.
   if(mRtcEngine != null)
   {
       IRtcEngine.Destroy();
   }
     originalChannel = channel;
     mRtcEngine = IRtcEngine.GetEngine(appID);
     mRtcEngine.OnJoinChannelSuccess = OnJoinChannelSuccessHandler;
     mRtcEngine.OnUserJoined = OnUserJoinedHandler;
     mRtcEngine.OnLeaveChannel = OnLeaveChannelHandler;
     mRtcEngine.OnUserOffline = OnUserOfflineHandler;
     mRtcEngine.EnableVideo();
     mRtcEngine.EnableVideoObserver();
     mRtcEngine.JoinChannel(channel, null, 0);
}
private void OnApplicationQuit()
{
    if(mRtcEngine != null)
    {
        mRtcEngine.LeaveChannel();
        mRtcEngine = null;
        IRtcEngine.Destroy();
    }
}
이것은 아고라의 기본 설정 프로토콜이며, Unity SDK 다운로드에 포함된 AgoraDemo와 매우 유사하거나 동일합니다. 이 프로토콜에 익숙해지시면 Agora 플랫폼을 마스터하는 첫 걸음을 내딛을 수 있습니다! photon.isMine이 이제 우리에게 오류 메시지를 표시하고 있으며, Agora 콜백 메서드를 구현해야 합니다.
Photon의 적절한 동작을 포함하려면 public class AgoraVideoChat : MonoBehaviour를 public class AgoraVideoChat : Photon.MonoBehaviour
로 변경하면 됩니다. Agora에는 사용할 수 있는 많은 콜백 메서드가 있으며, 여기에서 확인할 수 있습니다. 그러나 이번 경우에 필요한 것은 다음과 같습니다:
    // Local Client Joins Channel.
    private void OnJoinChannelSuccessHandler(string channelName, uint uid, int elapsed)
    {
        if (!photonView.isMine)
            return;
        myUID = uid;
        Debug.LogFormat("I: {0} joined channel: {1}.", uid.ToString(), channelName);
        //CreateUserVideoSurface(uid, true);
    }
    // Remote Client Joins Channel.
    private void OnUserJoinedHandler(uint uid, int elapsed)
    {
        if (!photonView.isMine)
            return;
        //CreateUserVideoSurface(uid, false);
    }
    // Local user leaves channel.
    private void OnLeaveChannelHandler(RtcStats stats)
    {
        if (!photonView.isMine)
            return;
    }
    // Remote User Leaves the Channel.
    private void OnUserOfflineHandler(uint uid, USER_OFFLINE_REASON reason)
    {
        if (!photonView.isMine)
            return;
    }
이제 “VikingScene” 레벨을 플레이하고 로그를 확인해 보세요.
(로그에 다음과 같은 내용이 표시되어야 합니다: “[your UID]가 채널에 참여했습니다: unity3d”)
와아!
우리는 16명의 다른 플레이어와 비디오 채팅을 하거나 약 100만 명의 시청자에게 방송할 수 있는 Agora 채널에 있습니다!
하지만 이게 뭐지? 정확히 어디에 있는 거지?
아고라 VideoSurface 생성
Agora의 Unity SDK는 RawImage 객체를 사용하여 웹캠과 모바일 카메라의 비디오 피드, 그리고 큐브와 다른 기본 모양을 렌더링합니다(이 기능의 예시는 AgoraEngine > Demo > SceneHome에서 확인할 수 있습니다).
- Raw Image를 생성합니다(히어러키 창에서 오른쪽 클릭 > UI > Raw Image)하고 이름을 “UserVideo”로 지정합니다.
VideoSurface스크립트를 추가합니다(Component > Scripts > agora_gaming_rtc > VideoSurface).- 객체를 Assets > Prefabs 폴더로 드래그합니다.
- 히어러키에서 UserVideo 객체를 삭제합니다(캔버스는 남겨두어도 됩니다). 우리는 프리팹만 필요로 했습니다.
5. 이 코드를 AgoraVideoChat에 추가하세요.
    // add this to your other variables
    [Header("Player Video Panel Properties")]
    [SerializeField]
    private GameObject userVideoPrefab;
    private int Offset = 100;
    private void CreateUserVideoSurface(uint uid, bool isLocalUser)
    {
        // Create Gameobject holding video surface and update properties
        GameObject newUserVideo = Instantiate(userVideoPrefab);
        if (newUserVideo == null)
        {
            Debug.LogError("CreateUserVideoSurface() - newUserVideoIsNull");
            return;
        }
        newUserVideo.name = uid.ToString();
        GameObject canvas = GameObject.Find("Canvas");
        if (canvas != null)
        {
            newUserVideo.transform.parent = canvas.transform;
        }
        // set up transform for new VideoSurface
        newUserVideo.transform.Rotate(0f, 0.0f, 180.0f);
        float xPos = Random.Range(Offset - Screen.width / 2f, Screen.width / 2f - Offset);
        float yPos = Random.Range(Offset, Screen.height / 2f - Offset);
        newUserVideo.transform.localPosition = new Vector3(xPos, yPos, 0f);
        newUserVideo.transform.localScale = new Vector3(3f, 4f, 1f);
        newUserVideo.transform.rotation = Quaternion.Euler(Vector3.right * -180);
        // Update our VideoSurface to reflect new users
        VideoSurface newVideoSurface = newUserVideo.GetComponent<VideoSurface>();
        if (newVideoSurface == null)
        {
            Debug.LogError("CreateUserVideoSurface() - VideoSurface component is null on newly joined user");
        }
        if (isLocalUser == false)
        {
            newVideoSurface.SetForUser(uid);
        }
        newVideoSurface.SetGameFps(30);
}- 새로 생성한 프리팹을 Charprefab 캐릭터의 UserPrefab 슬롯에 추가하고, 콜백 메서드에서
CreateUserVideoSurface()를 주석 해제합니다. - 다시 실행해 보세요! 이제 게임에 로컬 비디오 스트림이 렌더링되는 것을 확인할 수 있습니다. 다른 아고라 채널에서 호출하면 화면에 더 많은 비디오 프레임이 표시됩니다. 저는 모바일 기기에서 “AgoraDemo” 앱을 사용하여 테스트했지만, 연결성을 테스트하려면 1-to-1 호출 웹 데모를 사용하거나 다른 기계에서 동일한 데모에 연결하여 테스트할 수 있습니다.
Agora 모듈이 정상적으로 작동 중이며, 이제 Photon에서 두 명의 네트워크 연결된 플레이어를 연결하여 기능을 구현할 때입니다.
Photon 네트워킹 – 파티 참여
파티에 참여하거나 초대하거나 탈퇴하기 위해 간단한 UI를 만들 것입니다.
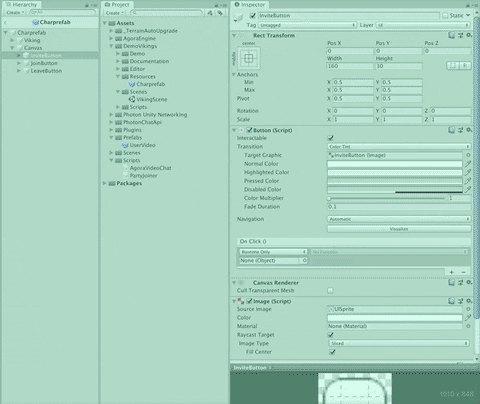
CharPrefab 내부에 캔버스를 생성하고, 각각 InviteButton, JoinButton, LeaveButton이라는 이름의 3개의 버튼을 추가합니다.
캔버스가 CharPrefab의 첫 번째 자식 요소인지 확인합니다.
다음으로 기본 CharPrefab 오브젝트에 PartyJoiner라는 새로운 스크립트를 생성합니다. 이 스크립트에 다음 내용을 추가합니다:
    using UnityEngine.UI;
    [Header("Local Player Stats")]
    [SerializeField]
    private Button inviteButton;
    [SerializeField]
    private GameObject joinButton;
    [SerializeField]
    private GameObject leaveButton;
    [Header("Remote Player Stats")]
    [SerializeField]
    private int remotePlayerViewID;
    [SerializeField]
    private string remoteInviteChannelName = null;
    private AgoraVideoChat agoraVideo;
    private void Awake()
    {
        agoraVideo = GetComponent<AgoraVideoChat>();
    }
    private void Start()
    {
        if(!photonView.isMine)
        {
            transform.GetChild(0).gameObject.SetActive(false);
        }
        inviteButton.interactable = false;
        joinButton.SetActive(false);
        leaveButton.SetActive(false);
    }
    private void OnTriggerEnter(Collider other)
    {
        if (!photonView.isMine || !other.CompareTag("Player"))
        {
            return;
        }
        // Used for calling RPC events on other players.
        PhotonView otherPlayerPhotonView = other.GetComponent<PhotonView>();
        if (otherPlayerPhotonView != null)
        {
            remotePlayerViewID = otherPlayerPhotonView.viewID;
            inviteButton.interactable = true;
        }
    }
    private void OnTriggerExit(Collider other)
    {
        if(!photonView.isMine || !other.CompareTag("Player"))
        {
            return;
        }
        remoteInviteChannelName = null;
        inviteButton.interactable = false;
        joinButton.SetActive(false);
    }
    public void OnInviteButtonPress()
    {
    //PhotonView.Find(remotePlayerViewID).RPC("InvitePlayerToPartyChannel", PhotonTargets.All, remotePlayerViewID, agoraVideo.GetCurrentChannel());
    }
    public void OnJoinButtonPress()
    {
        if (photonView.isMine && remoteInviteChannelName != null)
        {
            //agoraVideo.JoinRemoteChannel(remoteInviteChannelName);
            joinButton.SetActive(false);
            leaveButton.SetActive(true);
        }
    }
    public void OnLeaveButtonPress()
    {
        if (!photonView.isMine)
            return;
    }
    [PunRPC]
    public void InvitePlayerToPartyChannel(int invitedID, string channelName)
    {
        if (photonView.isMine && invitedID == photonView.viewID)
        {
            joinButton.SetActive(true);
            remoteInviteChannelName = channelName;
        }
    }
방금 생성한 Unity UI 버튼에 해당하는 “OnButtonPress” 함수를 추가하세요.
[예시: InviteButton -> “OnInviteButtonPress()”]
- CharPrefab 태그를 “Player”로 설정합니다.
- CharPrefab에 SphereCollider 컴포넌트를 추가합니다 (컴포넌트 바 > 물리 > SphereCollider, “Is Trigger” 상자를 true로 설정하고 반경을 1.5로 설정합니다).
빠른 Photon 팁 – 로컬 기능
AgoraVideoChat 클래스에 두 개의 메서드를 더 구현해야 합니다. 그 전에 방금 복사한 코드를 살펴보겠습니다.
    private void Start()
    {
        if (!photonView.isMine)
        {
            transform.GetChild(0).gameObject.SetActive(false);
        }
        inviteButton.interactable = false;
        joinButton.SetActive(false);
        leaveButton.SetActive(false);
    }
“이 광자 뷰가 내 것이 아니라면 내 첫 번째 자식 요소를 False로 설정하세요“ - 이 스크립트는 귀하의 기계/키보드 입력으로 로컬로 제어되는 CharPrefab에서 실행되지만, 이 스크립트는 또한 장면 내 모든 다른 CharPrefab에서도 실행됩니다. 그들의 캔버스가 표시되며, 그들의 출력 문장도 표시됩니다.
모든 다른 CharPrefab의 첫 번째 자식(제 “Canvas” 객체)을 False로 설정함으로써, 저는 로컬 캔버스를 제 화면에만 표시합니다 - Photon “Room” 내의 모든 플레이어가 아닌.
두 개의 다른 클라이언트로 빌드하고 실행하여 무슨 일이 발생하는지 확인해 보겠습니다…
…잠깐, 우리는 이미 같은 파티에 있나요?
기억나시나요? 우리는 private string channel = “unity3d”를 설정했고, Start() 메서드에서 mrtcEngine.JoinChannel(channel, null, 0);를 호출했습니다. 모든 클라이언트에서 시작 시 “unity3d”라는 이름의 Agora 채널을 생성하거나 연결합니다.
이를 방지하려면 각 클라이언트에서 기본 채널 이름을 새로 설정해야 합니다. 이렇게 하면 각 클라이언트가 별도의 Agora 채널에서 시작되며, 서로를 고유한 채널 이름으로 초대할 수 있습니다.
이제 AgoraVideoChat 내부에 두 가지 메서드를 추가해 보겠습니다:
JoinRemoteChannel(string remoteChannelName) 및 GetCurrentChannel().
    public void JoinRemoteChannel(string remoteChannelName)
    {
        if (!photonView.isMine)
            return;
        mRtcEngine.LeaveChannel();
        mRtcEngine.JoinChannel(remoteChannelName, null, myUID);
        mRtcEngine.EnableVideo();
        mRtcEngine.EnableVideoObserver();
        channel = remoteChannelName;
    }
public string GetCurrentChannel() => channel;이 코드는 Photon 네트워크를 통해 전송되는 이벤트를 수신할 수 있도록 합니다. 이 이벤트는 각 플레이어를 거쳐 전달되며, 초대된 Photon ID가 로컬 플레이어 ID와 일치할 때 해당 플레이어에게 고정됩니다.
Photon 이벤트가 올바른 플레이어에게 도달하면 해당 플레이어는 다른 플레이어의 “원격 채널에 참여” 옵션을 선택하고 Agora 네트워크를 통해 비디오 채팅으로 연결할 수 있습니다.
빌드를 테스트하여 PartyJoiner가 작동하는 모습을 확인하세요!
최종 조정 – UI 및 파티 탈퇴
이제 Agora를 사용하여 채널에 참여하고 채널 내 다른 플레이어의 비디오 피드를 볼 수 있게 되었습니다. 사용자가 채널에 참여할 때마다 비디오 컨테이너가 화면에 표시됩니다.
그러나 이 모습은 좋지 않으며, 게임을 종료하고 다시 참여하지 않고는 채널을 떠날 수 없습니다. 이 문제를 해결해 보겠습니다!
UI 프레임워크
이제 버튼을 보관하고 정리하기 위해 ScrollView 객체를 생성합니다.
Charprefab > Canvas 내부에 들어가서 CanvasScaler의 UI Scale Mode가 “Scale With Screen Size”로 설정되어 있는지 확인하세요(기본값은 “Constant Pixel Size”로, 제 경험상 대부분의 Unity UI 상황에서는 적합하지 않습니다).
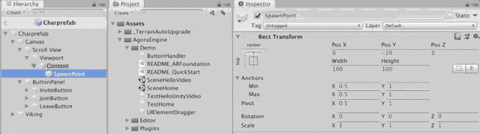
- CharPrefab 객체 내부에 들어가서 Canvas를 오른쪽 클릭한 후 UI > Scroll View를 선택하세요.
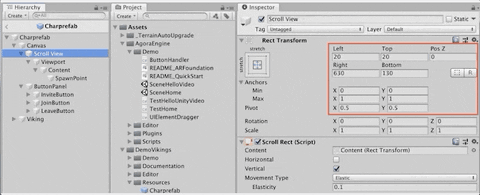
- “Scroll View”의 Rect Transform을 “Stretch/Stretch”로 설정하고 (하단 오른쪽 모서리), Anchors, Pivots 및 Rect Transform이 위 그림의 빨간 상자에 표시된 값과 일치하는지 확인하세요.
- “Horizontal”을 해제하고 HorizontalScrollbar 자식 객체를 삭제하세요.
- ‘Content’ 자식 객체를 “Top/Stretch”로 설정하세요 (오른쪽 가장자리 열, 위에서 두 번째).
- 높이를 300으로 설정했습니다.
- 최소 X: 0 Y: 1
- 최대 X: 1 Y: 1
- 피봇 X: 0 Y: 1
- “Content”의 자식 객체로 “SpawnPoint”라는 이름의 빈 게임 오브젝트를 생성합니다. Rect Transform을 “Top/Center”로 설정합니다 (중간 열, 위에서 두 번째) - “Pos Y” 값을 -20으로 설정합니다.
- 앵커: 최소/최대 및 피봇 값이 표시된 값과 일치하는지 확인하세요.
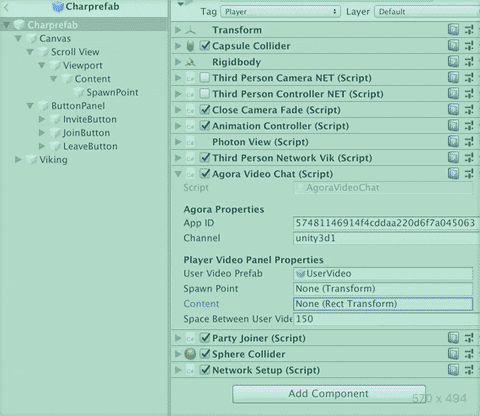
AgoraVideoChat에 추가:
    [SerializeField]
    private RectTransform content;
    [SerializeField]
    private Transform spawnPoint;
    [SerializeField]
    private float spaceBetweenUserVideos = 150f;
    private List<GameObject> playerVideoList;
Start()에 playerVideoList = new List();를 추가합니다.
CreateUserVideoSurface 메서드를 완전히 다음과 같이 대체합니다:
    // Create new image plane to display users in party
    private void CreateUserVideoSurface(uint uid, bool isLocalUser)
    {
        // Avoid duplicating Local player video screen
        for (int i = 0; i < playerVideoList.Count; i++)
        {
            if (playerVideoList[i].name == uid.ToString())
            {
                return;
            }
        }
        // Get the next position for newly created VideoSurface
        float spawnY = playerVideoList.Count * spaceBetweenUserVideos;
        Vector3 spawnPosition = new Vector3(0, -spawnY, 0);
        // Create Gameobject holding video surface and update properties
        GameObject newUserVideo = Instantiate(userVideoPrefab, spawnPosition, spawnPoint.rotation);
        if (newUserVideo == null)
        {
            Debug.LogError("CreateUserVideoSurface() - newUserVideoIsNull");
            return;
        }
        newUserVideo.name = uid.ToString();
        newUserVideo.transform.SetParent(spawnPoint, false);
        newUserVideo.transform.rotation = Quaternion.Euler(Vector3.right * -180);
        playerVideoList.Add(newUserVideo);
        // Update our VideoSurface to reflect new users
        VideoSurface newVideoSurface = newUserVideo.GetComponent<VideoSurface>();
        if(newVideoSurface == null)
        {
            Debug.LogError("CreateUserVideoSurface() - VideoSurface component is null on newly joined user");
        }
        if (isLocalUser == false)
        {
            newVideoSurface.SetForUser(uid);
        }
        newVideoSurface.SetGameFps(30);
        // Update our "Content" container that holds all the image planes
        content.sizeDelta = new Vector2(0, playerVideoList.Count * spaceBetweenUserVideos + 140);
        UpdatePlayerVideoPostions();
        UpdateLeavePartyButtonState();
    }
그리고 두 개의 새로운 메서드를 추가합니다:
// organizes the position of the player video frames as they join/leave
private void UpdatePlayerVideoPostions()
{
    for (int i = 0; i < playerVideoList.Count; i++)
    {
        playerVideoList[i].GetComponent<RectTransform>().anchoredPosition = Vector2.down * 150 * i;
    }
}
// resets local players channel
public void JoinOriginalChannel()
{
    if (!photonView.isMine)
            return;
    if(channel != originalChannel || channel == myUID.ToString())
    {
        channel = originalChannel;
    }
    else if(channel == originalChannel)
    {
        channel = myUID.ToString();
    }
    JoinRemoteChannel(channel);
}UpdateLeavePartyButtonState()를 현재는 주석 처리하고, 새로 생성한 ScrollView UI 객체를 적절한 슬롯에 드래그하세요.
이제 거의 다 됐어요!
이제 AgoraVideoChat에 “Leave Party” 기능의 메서드를 추가하기만 하면 됩니다.
    public delegate void AgoraCustomEvent();
    public static event AgoraCustomEvent PlayerChatIsEmpty;
    public static event AgoraCustomEvent PlayerChatIsPopulated;
    private void RemoveUserVideoSurface(uint deletedUID)
    {
        foreach (GameObject player in playerVideoList)
        {
            if (player.name == deletedUID.ToString())
            {
                // remove videoview from list
                playerVideoList.Remove(player);
                // delete it
                Destroy(player.gameObject);
                break;
            }
        }
        // update positions of new players
        UpdatePlayerVideoPostions();
        Vector2 oldContent = content.sizeDelta;
        content.sizeDelta = oldContent + Vector2.down * spaceBetweenUserVideos;
        content.anchoredPosition = Vector2.zero;
        UpdateLeavePartyButtonState();
    }
    private void UpdateLeavePartyButtonState()
    {
        if (playerVideoList.Count > 1)
        {
            PlayerChatIsPopulated();
        }
        else
        {
            PlayerChatIsEmpty();
        }
    }
그리고 AgoraVideoChat 콜백을 업데이트합니다:
    // Local Client Joins Channel.
    private void OnJoinChannelSuccessHandler(string channelName, uint uid, int elapsed)
    {
        if (!photonView.isMine)
            return;
        myUID = uid;
        CreateUserVideoSurface(uid, true);
    }
    // Remote Client Joins Channel.
    private void OnUserJoinedHandler(uint uid, int elapsed)
    {
        if (!photonView.isMine)
            return;
        CreateUserVideoSurface(uid, false);
    }
    // Local user leaves channel.
    private void OnLeaveChannelHandler(RtcStats stats)
    {
        if (!photonView.isMine)
            return;
        foreach (GameObject player in playerVideoList)
        {
            Destroy(player.gameObject);
        }
        playerVideoList.Clear();
    }
    // Remote User Leaves the Channel.
    private void OnUserOfflineHandler(uint uid, USER_OFFLINE_REASON reason)
    {
        if (!photonView.isMine)
            return;
        if (playerVideoList.Count <= 1)
        {
            PlayerChatIsEmpty();
        }
        RemoveUserVideoSurface(uid);
    }
그리고 PartyJoiner에서:
    private void OnEnable()
    {
        AgoraVideoChat.PlayerChatIsEmpty += DisableLeaveButton;
        AgoraVideoChat.PlayerChatIsPopulated += EnableLeaveButton;
    }
    private void OnDisable()
    {
        AgoraVideoChat.PlayerChatIsEmpty -= DisableLeaveButton;
        AgoraVideoChat.PlayerChatIsPopulated -= EnableLeaveButton;
    }
    public void OnLeaveButtonPress()
    {
        if(photonView.isMine)
        {
            agoraVideo.JoinOriginalChannel();
            leaveButton.SetActive(false);
        }
    }
    private void EnableLeaveButton()
    {
        if(photonView.isMine)
        {
            leaveButton.SetActive(true);
        }
    }
    private void DisableLeaveButton()
    {
        if(photonView.isMine)
        {
            leaveButton.SetActive(false);
        }
    }
이 데모를 두 가지 다른 편집기에서 실행하고 파티에 참여하세요! 먼저 Photon 네트워크를 통해 동일한 네트워크 게임 로비에 연결한 후, Agora의 SD-RTN 네트워크를 통해 비디오 채팅 파티를 연결합니다!
요약
- Agora 네트워크에 연결하여 비디오 채팅 채널을 표시했습니다.
- 다른 사용자가 파티에 참여하고 얼굴을 보고 실시간으로 대화할 수 있도록 했습니다.
- 한 단계 더 나아가, 대화하고 싶은 모든 사람을 수용할 수 있는 확장 가능한 UI를 구축했습니다!
네트워크 기반 그룹 비디오 채팅을 구축하는 과정에서 질문이 있거나 문제가 발생하면 언제든지 직접 연락하거나 Agora Slack 채널을 통해 문의해 주세요!
눈이 아프신가요?
설정 화면의 “기타” 섹션으로 이동하여 야간 테마를 선택하세요 ❤️


