
이것은 우리 중 많은 사람들이 한 번쯤 경험해본 일일 것입니다: 헤어드라이어나 히터를 플러그에 연결하자마자 갑자기 모든 불이 꺼지고 TV 화면이 검게 변하는 것입니다.
이제 당신은 절망적으로 서비스 제공업체의 고객 지원 센터에 전화해야 합니다. 발생한 상황을 설명하자 그들은 단순히 공기 회로 차단기를 켜면 될 수도 있다고 말했습니다. 그러나 전기 패널을 열자마자 당신은 궁금해집니다: 이 중 어느 것이 공기 회로 차단기일까요? 고객 지원 담당자와 20분 동안 이 스위치를 찾기 위해 대화를 나눈 끝에, 결국 당신의 집에는 그런 것이 전혀 없다는 것을 알게 됩니다.
현재 대부분의 원격 지원은 음성 통화나 텍스트 메시지를 통해 이루어집니다. 이는 사용자가 문제를 설명하거나 문제 해결을 위해 필요한 새로운 개념과 용어를 이해하는 데 거의 편리하지 않습니다.
다행히도 기술은 이제 비디오 채팅과 증강 현실을 활용해 이 문제를 해결할 수 있는 단계에 이르렀습니다. 이 가이드에서는 ARCore와 비디오 채팅을 활용해 상호작용형 경험을 만드는 안드로이드 앱을 개발하는 방법을 단계별로 안내해 드리겠습니다.
필수 조건
- 자바(Java) 및 안드로이드 SDK에 대한 기본에서 중간 수준의 이해
- ARCore 및 증강 현실(AR) 개념에 대한 기본적인 이해
- 아고라 개발자 계정
- 하드웨어: 안드로이드 API 레벨 24 이상을 실행하는 안드로이드 기기 2대 (Google Play Store가 기본으로 설치된 기기)
* 자세한 기기 요구 사항은 여기에서 확인할 수 있습니다.
참고 사항: 자바/안드로이드 지식이 없어도 따라할 수 있지만, 자바/ARCore의 일부 기본 개념은 설명되지 않습니다.
개요
이 가이드에서는 AR 기능을 지원하는 고객 지원 앱을 개발할 것입니다. 한 사용자는 채널 이름을 입력하여 채널을 생성하고, 스트리머(지원이 필요한 사람)로 채널에 참여합니다. 다른 사용자는 동일한 채널 이름을 입력하여 시청자(고객 지원)로 동일한 채널에 참여할 수 있습니다. 두 사용자가 모두 채널에 참여하면 스트리머는 자신의 후방 카메라를 시청자에게 방송합니다. 시청자는 자신의 기기에서 그림을 그릴 수 있으며, 터치 입력은 스트리머의 세계에서 증강현실로 렌더링됩니다!
이 기사에서 진행할 모든 단계는 다음과 같습니다:
이 기사의 참고 자료로 제 GitHub 데모 앱을 확인할 수 있습니다.
- 새 프로젝트 설정
- UI 생성
- ARCore 활성화
- 스트리머의 영상 통화 활성화
- 관객의 영상 통화 활성화
- 원격 지원 기능
- 기기에서 빌드 및 테스트
새 프로젝트 설정
시작하기 위해 Android Studio를 열고 새 빈 프로젝트를 생성합니다.
- Android Studio를 열고 새 Android Studio 프로젝트 시작을 클릭합니다.
- 프로젝트 선택 패널에서 전화 및 태블릿 > 빈 활동을 선택한 후 다음을 클릭합니다.
- 완료를 클릭합니다. 플러그인을 설치해야 하는 경우 화면에 표시되는 지침을 따릅니다.
SDK 통합
프로젝트의 /app/build.gradle 파일에 다음 줄을 추가합니다:
dependencies {
    implementation fileTree(dir: 'libs', include: ['*.jar'])
    implementation 'androidx.appcompat:appcompat:1.1.0'
    implementation 'androidx.constraintlayout:constraintlayout:1.1.3'
    testImplementation 'junit:junit:4.12'
    androidTestImplementation 'androidx.test.ext:junit:1.1.1'
    androidTestImplementation 'androidx.test.espresso:espresso-core:3.2.0'

    //ARCore
    implementation 'com.google.ar:core:1.0.0'
    implementation 'de.javagl:obj:0.2.1'
    implementation 'com.google.android.material:material:1.1.0'
    implementation 'com.android.support:appcompat-v7:27.0.2'
    implementation 'com.android.support:design:27.0.2'

    //Video
    implementation 'io.agora.rtc:full-sdk:2.9.4'
}
변경 사항을 적용한 후 프로젝트를 동기화합니다. /app/src/main/AndroidManifest.xml 파일에 다음 프로젝트 권한을 추가합니다:
<uses-permission android:name="android.permission.CAMERA" />
<uses-permission android:name="android.permission.INTERNET" />
<uses-permission android:name="android.permission.RECORD_AUDIO" />
<uses-permission android:name="android.permission.MODIFY_AUDIO_SETTINGS" />
<uses-permission android:name="android.permission.ACCESS_NETWORK_STATE" />
<uses-permission android:name="android.permission.WRITE_EXTERNAL_STORAGE" />
<uses-permission android:name="android.permission.BLUETOOTH" />
ARCore를 실행하려면 AndroidManifest.xml 파일에 다음 내용을 추가해야 합니다. 이 설정은 이 애플리케이션이 ARCore를 필요로 함을 나타냅니다.
<uses-feature
    android:name="android.hardware.camera.ar"
    android:required="true" /><application
...
<meta-data
    android:name="com.google.ar.core"
    android:value="required" />
</application>
UI 생성
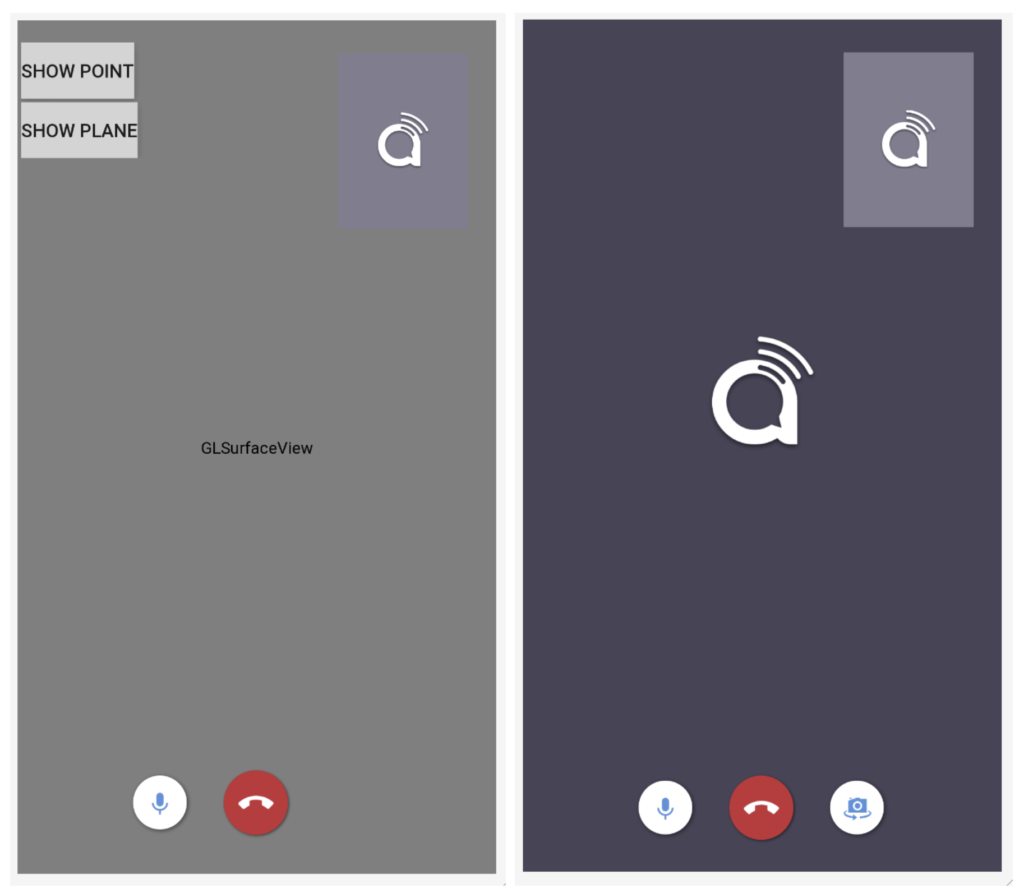
사용자 양쪽을 위한 UI 컴포넌트를 생성해 보겠습니다. AR을 통해 자신의 세계를 공유하는 사용자는 “스트리머”라고 부르겠습니다. 채널에 참여해 지원을 제공하는 다른 사용자는 “관객”이라고 부르겠습니다. 아래는 제가 사용할 예시 UI입니다:
참고: UI용 .xml 파일은 여기에서 확인할 수 있습니다.
스트리머 UI와 시청자 UI의 주요 차이점은 스트리머 UI는 AR 카메라 뷰를 렌더링하기 위해 android.opengl.GLSurfaceView를 사용하며, 시청자 UI는 스트리머로부터 전송된 동영상을 렌더링하기 위해 RelativeLayout을 사용합니다.
스트리머 UI 페이지의 오른쪽 상단 모서리에 있는 컨테이너는 시청자의 로컬 카메라에서 전송되는 원격 비디오를 렌더링하기 위해 사용됩니다. 시청자 UI 페이지의 오른쪽 상단 모서리에 있는 컨테이너는 시청자의 로컬 카메라 뷰를 렌더링하기 위해 사용됩니다.
사용자가 채널 이름을 입력하고 스트리머 또는 시청자로 채널에 참여할 수 있는 화면도 생성할 것입니다.
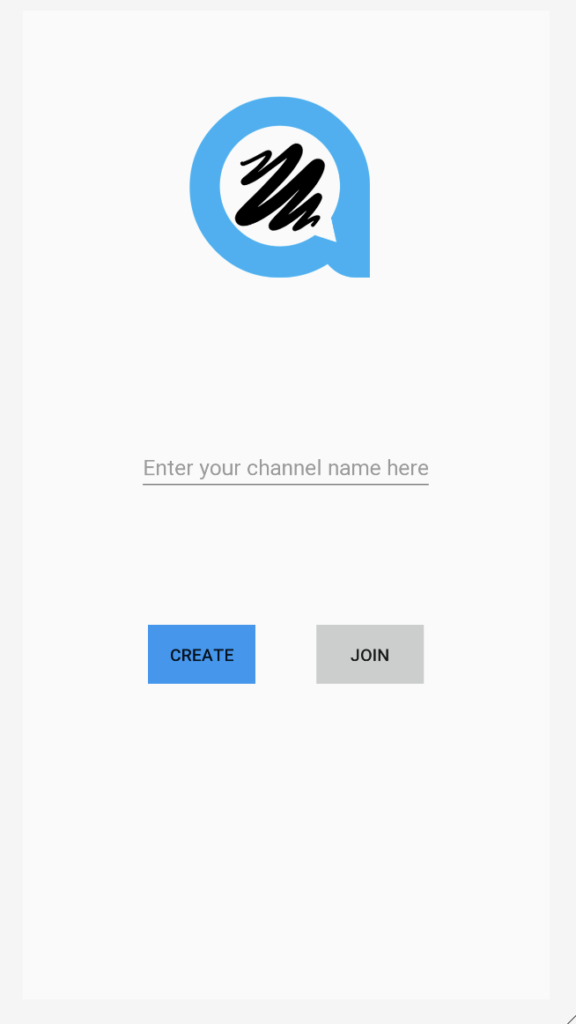
참고: Join Channel UI의 .xml 파일은 여기에서 찾을 수 있습니다.
Channel UI의 논리는 매우 간단합니다. 사용자가 CREATE 버튼을 클릭하면 스트리밍 논리를 처리하는 스트리머의 활동 페이지로 이동합니다. 사용자가 JOIN 버튼을 클릭하면 시청자 상호작용 논리를 처리하는 시청자 활동 페이지로 이동합니다. 이제 두 활동의 논리를 정의해야 합니다.
ARCore 설정
프로젝트에 ARCore를 설정하는 것은 대부분의 사람들이 생각하는 것보다 어렵지 않습니다. streamer 활동의 OnResume() 메서드에서 Session 인스턴스를 생성해야 합니다. Session 인스턴스는 AR 시스템 상태를 관리하고 라이프사이클을 처리합니다. 이를 통해 카메라 이미지에 접근할 수 있는 프레임을 수신할 수 있습니다. 그러나 그 전에 ARCore가 설치되어 있는지 확인해야 합니다.
@Override
protected void onResume() {
    super.onResume();

    if (mSession == null) {
        String message = null;
        try {
            switch (ArCoreApk.getInstance().requestInstall(this, !installRequested)) {
                case INSTALL_REQUESTED:
                    installRequested = true;
                    return;
                case INSTALLED:
                    break;
            }

            // ARCore requires camera permissions to operate. If we did not yet obtain runtime permission on Android M and above, now is a good time to ask the user for it.
            if (!CameraPermissionHelper.hasCameraPermission(this)) {
               CameraPermissionHelper.requestCameraPermission(this);
                return;
            }

            mSession = new Session(this);
        } catch (Exception e) {
            ...
        }         // Create default config and check if supported.
        Config config = new Config(mSession);
        if (!mSession.isSupported(config)) {
            showSnackbarMessage("This device does not support AR", true);
        }
        ...
}
GLSurfaceView.Renderer를 구현합니다
AR 카메라를 렌더링하기 위해 GLSurfaceView를 사용할 것입니다. 이를 위해 스트리머 활동은 GLSurfaceView.Renderer를 구현해야 합니다. 오버라이드해야 할 세 가지 메서드가 있습니다: onSurfaceCreated, onSurfaceChanged 및 onDrawFrame.
onSurfaceCreated 오버라이드
onSurfaceCreated 메서드는 렌더링 시작 시점에 호출되며, AR 장면을 위한 초기화를 수행해야 합니다.
- BackgroundRenderer 인스턴스를 생성하고 해당 ID를 세션 카메라에 전달합니다.
- 3D 객체를 초기화합니다. 이 3D 객체는 나중에 스트리머의 AR 세계에 렌더링됩니다.
- 평면 감지 렌더링을 초기화합니다.
- 포인트 클라우드 초기화합니다.
@Override
public void onSurfaceCreated(GL10 gl, EGLConfig config) {
    GLES20.glClearColor(0.1f,0.1f,0.1f,1.0f);

    // Create the texture and pass it to ARCore session to be filled during update().
    mBackgroundRenderer.createOnGlThread(/*context=*/ this);
    if (mSession != null) {
  mSession.setCameraTextureName(mBackgroundRenderer.getTextureId());
    }    // Prepare the other rendering objects.
    try {
        mVirtualObject.createOnGlThread(/*context=*/this, "andy.obj", "andy.png");
        mVirtualObject.setMaterialProperties(0.0f, 3.5f, 1.0f, 6.0f);
        mVirtualObjectShadow.createOnGlThread(/*context=*/this,
                "andy_shadow.obj", "andy_shadow.png");
        mVirtualObjectShadow.setBlendMode(ObjectRenderer.BlendMode.Shadow);
        mVirtualObjectShadow.setMaterialProperties(1.0f, 0.0f, 0.0f, 1.0f);
    } catch (IOException e) {
        ...
    }
    try {
        mPlaneRenderer.createOnGlThread(/*context=*/this, "trigrid.png");
    } catch (IOException e) {
        ...
    }
    mPointCloud.createOnGlThread(/*context=*/this);
}
onSurfaceChanged 메서드 재정의
onSurfaceChanged 메서드는 표면이 생성된 후 및 표면 크기가 변경될 때 호출되며, 이 메서드에서 뷰포트 설정을 수행합니다.
@Override
public void onSurfaceChanged(GL10 gl, int width, int height) {
    ...
    GLES20.glViewport(0, 0, width, height);
}
onDrawFrame 메서드 재정의
현재 프레임을 그리기 위해 호출되는 onDrawFrame 메서드에서 GLSurfaceView의 렌더링 로직을 구현해야 합니다.
- 화면 초기화
- ARSession에서 최신 프레임을 가져옵니다.
- 사용자의 터치 위치를 캡처하고 장면에 평면이 있는지 확인합니다. 평면이 발견되면 해당 위치에 앵커를 생성합니다.
- 배경 그리기.
- 포인트 클라우드 그리기.
- 모든 앵커를 순회하며 각 앵커에 3D 객체를 그립니다.
@Override
public void onDrawFrame(GL10 gl) {
    // Clear screen to notify driver it should not load any pixels from previous frame.
    GLES20.glClear(GLES20.GL_COLOR_BUFFER_BIT | GLES20.GL_DEPTH_BUFFER_BIT);
    ...

    try {
        // Obtain the current frame from ARSession. When the configuration is set to
        // UpdateMode.BLOCKING (it is by default), this will throttle the rendering to the camera framerate.
        Frame frame = mSession.update();
        Camera camera = frame.getCamera();

        // Handle taps. Handling only one tap per frame, as taps are usually low frequency
        // compared to frame rate.
        MotionEvent tap = queuedSingleTaps.poll();
        if (tap != null && camera.getTrackingState() == TrackingState.TRACKING) {
            for (HitResult hit : frame.hitTest(tap)) {
                // Check if any plane was hit, and if it was hit inside the plane polygon
                Trackable trackable = hit.getTrackable();
                // Creates an anchor if a plane or an oriented point was hit.
                if ((trackable instanceof Plane && ((Plane) trackable).isPoseInPolygon(hit.getHitPose()))
                        || (trackable instanceof Point
                        && ((Point) trackable).getOrientationMode()
                        == Point.OrientationMode.ESTIMATED_SURFACE_NORMAL)) {
                    // Hits are sorted by depth. Consider only closest hit on a plane or oriented point.
                    // Cap the number of objects created. This avoids overloading both the
                    // rendering system and ARCore.
                    if (anchors.size() >= 250) {
                        anchors.get(0).detach();
                        anchors.remove(0);
                    }
                    // Adding an Anchor tells ARCore that it should track this position in
                    // space. This anchor is created on the Plane to place the 3D model
                    // in the correct position relative both to the world and to the plane.
                    anchors.add(hit.createAnchor());
                    break;
                }
            }
        }

        // Draw background.
        mBackgroundRenderer.draw(frame);

        ...        if (isShowPointCloud()) {
            // Visualize tracked points.
            PointCloud pointCloud = frame.acquirePointCloud();
            mPointCloud.update(pointCloud);
            mPointCloud.draw(viewmtx, projmtx);

            // Application is responsible for releasing the point cloud resources after
            // using it.
            pointCloud.release();
        }

        ...

        if (isShowPlane()) {
            // Visualize planes.
            mPlaneRenderer.drawPlanes(
                    mSession.getAllTrackables(Plane.class), camera.getDisplayOrientedPose(), projmtx);
        }

        // Visualize anchors created by touch.
        float scaleFactor = 1.0f;

        for (Anchor anchor : anchors) {
            if (anchor.getTrackingState() != TrackingState.TRACKING) {
                continue;
            }
            // Get the current pose of an Anchor in world space. The Anchor pose is updated
            // during calls to session.update() as ARCore refines its estimate of the world.
            anchor.getPose().toMatrix(mAnchorMatrix, 0);


            // Update and draw the model and its shadow.
            mVirtualObject.updateModelMatrix(mAnchorMatrix, mScaleFactor);
            mVirtualObjectShadow.updateModelMatrix(mAnchorMatrix, scaleFactor);
            mVirtualObject.draw(viewmtx, projmtx, lightIntensity);
            mVirtualObjectShadow.draw(viewmtx, projmtx, lightIntensity);
        }
    } catch (Throwable t) {
        ...
    }
}
참고: 일부 개념은 여기에서 설명되지 않았습니다. 자세한 내용은 Github 코드를 참조하세요.
스트리머의 비디오 통화 활성화
스트리머에서 비디오 통화 설정
AgoraARStreamerActivity의 onCreate() 메서드에서 다음 작업을 수행합니다:
- GLSurfaceView onTouchListener 초기화
- Agora RtcEngine 초기화
- 맞춤형 비디오 소스 설정
- 채널에 참여
1. GLSurfaceView의 onTouchListener 초기화
GLSurfaceView에 onTouchListener를 설정하면 터치 위치를 캡처하고 해당 위치에 AR 앵커를 설정할 수 있습니다.
mGestureDetector = new GestureDetector(this,
        new GestureDetector.SimpleOnGestureListener() {
            @Override
            public boolean onSingleTapUp(MotionEvent e) {
                onSingleTap(e);
                return true;
            }

            @Override
            public boolean onDown(MotionEvent e) {
                return true;
            }
        });

mSurfaceView.setOnTouchListener(new View.OnTouchListener() {
    @Override
    public boolean onTouch(View v, MotionEvent event) {
        return mGestureDetector.onTouchEvent(event);
    }
});
GestureDetector가 단일 탭을 감지하면 onSingleTap 메서드가 호출됩니다. 해당 메서드 내에서 이 탭을 단일 탭 큐에 추가합니다.
private void onSingleTap(MotionEvent e) {
    queuedSingleTaps.offer(e);
}
onDrawFrame 메서드에서 앵커를 생성했던 것을 기억하시나요? 우리는 queuedSingleTaps에서 사용자의 탭을 폴링했습니다. 이 부분이 탭이 큐에 추가되는 부분입니다.
2. 아고라 RtcEngine 초기화
아고라 비디오 엔진을 초기화하려면 단순히 RtcEngine.create(context, appid, RtcEventHandler)를 호출하여 RtcEngine 인스턴스를 생성하면 됩니다.
mRtcEngine = RtcEngine.create(this, getString(R.string.private_broadcasting_app_id), mRtcEventHandler);App ID를 매개변수에 가져오려면 다음 단계를 따르세요:
- Agora Console에서 Agora 프로젝트를 생성하세요.
- 왼쪽 탐색 패널의 프로젝트 관리 탭을 클릭하세요.
- “생성”을 클릭하고 화면에 표시되는 안내에 따라 프로젝트 이름을 설정하고 인증 메커니즘을 선택한 후 “제출”을 클릭하세요.
- 프로젝트 관리 페이지에서 프로젝트의 App ID를 찾아보세요.
mRtcEventHandler는 RtcEngine과 관련된 다양한 이벤트를 관리하는 핸들러입니다. 이 애플리케이션에 필요한 기본 이벤트 핸들러를 구현해 보겠습니다.
private IRtcEngineEventHandler mRtcEventHandler = new IRtcEngineEventHandler() {
    @Override
    public void onJoinChannelSuccess(final String channel, int uid, int elapsed) {
        //when local user joined the channel
        ...
    }

    @Override
    public void onRemoteVideoStateChanged(final int uid, int state, int reason, int elapsed) {
        super.onRemoteVideoStateChanged(uid, state, reason, elapsed);
        //when remote user join the channel
        if (state == Constants.REMOTE_VIDEO_STATE_STARTING) {
            runOnUiThread(new Runnable() {
                @Override
                public void run() {
                    addRemoteRender(uid);
                }
            });
        }
    }

    @Override
    public void onUserOffline(int uid, int reason) {
        //when remote user leave the channel
        runOnUiThread(new Runnable() {
            @Override
            public void run() {
                removeRemoteRender();
            }
        });
    }

    @Override
    public void onStreamMessage(int uid, int streamId, byte[] data) {
        //when received the remote user's stream message data
        ...
    }
};
각 이벤트 핸들러 메서드의 상단에 있는 댓글을 확인하여 해당 메서드를 더 잘 이해하세요. 사용 가능한 추가 RtcEngine 이벤트 핸들러는 Agora Rtc API 문서를 참고하세요.
참고: 화면에 비디오 뷰를 표시하는 일부 로직은 숨겨져 있습니다. 화면에 비디오 뷰를 동적으로 표시하고 제거하는 방법을 더 잘 이해하려면 GitHub 데모 앱을 확인하세요.
3. 사용자 정의 비디오 소스 설정
우리 애플리케이션에서는 스트리머가 자신의 AR 세계를 시청자에게 전송할 수 있도록 합니다. 따라서 전송되는 동영상은 일반 카메라 동영상 스트림이 아닌 맞춤형 동영상 소스에서 가져옵니다. 다행히 Agora Video SDK는 맞춤형 동영상 소스를 전송하는 API 메서드를 제공합니다.
AgoraVideoSource라는 클래스를 생성하고 IVideoSource 인터페이스를 구현합니다. IVideoSource 인터페이스는 사용자 정의 비디오 소스를 구현하고 기본 비디오 소스를 대체하기 위해 하위 미디어 엔진에 전달하는 프로토콜 세트를 정의합니다.
public class AgoraVideoSource implements IVideoSource {
    private IVideoFrameConsumer mConsumer;

    @Override
    public boolean onInitialize(IVideoFrameConsumer iVideoFrameConsumer) {
        mConsumer = iVideoFrameConsumer;
        return true;
    }

    @Override
    public boolean onStart() {
        return true;
    }

    @Override
    public void onStop() {
    }

    @Override
    public void onDispose() {
    }

    @Override
    public int getBufferType() {
        return MediaIO.BufferType.BYTE_ARRAY.intValue();
    }

    public IVideoFrameConsumer getConsumer() {
        return mConsumer;
    }
}
AgoraARStreamerActivity 내의 onCreate 메서드에서 AgoraVideoSource 인스턴스를 생성하기 위해 생성자 메서드를 호출합니다.
mSource = new AgoraVideoSource();AgoraVideoRender라는 클래스를 생성하고 IVideoSink 인터페이스를 구현합니다. IVideoSink 인터페이스는 사용자 정의 비디오 싱크를 생성하고 미디어 엔진에 전달하여 기본 비디오 렌더러를 대체하는 데 필요한 프로토콜 집합을 정의합니다.
public class AgoraVideoRender implements IVideoSink {
    private Peer mPeer;
    private boolean mIsLocal;

    public AgoraVideoRender(int uid, boolean local) {
        mPeer = new Peer();
        mPeer.uid = uid;
        mIsLocal = local;
    }

    public Peer getPeer() {
        return mPeer;
    }

    @Override
    public boolean onInitialize() {
        return true;
    }

    @Override
    public boolean onStart() {
        return true;
    }

    @Override
    public void onStop() {

    }

    @Override
    public void onDispose() {

    }

    @Override
    public long getEGLContextHandle() {
        return 0;
    }

    @Override
    public int getBufferType() {
        return MediaIO.BufferType.BYTE_BUFFER.intValue();
    }

    @Override
    public int getPixelFormat() {
        return MediaIO.PixelFormat.RGBA.intValue();
    }

    @Override
    public void consumeByteBufferFrame(ByteBuffer buffer, int format, int width, int height, int rotation, long ts) {
        if (!mIsLocal) {
            mPeer.data = buffer;
            mPeer.width = width;
            mPeer.height = height;
            mPeer.rotation = rotation;
            mPeer.ts = ts;
        }
    }

    @Override
    public void consumeByteArrayFrame(byte[] data, int format, int width, int height, int rotation, long ts) {

    }

    @Override
    public void consumeTextureFrame(int texId, int format, int width, int height, int rotation, long ts, float[] matrix) {

    }

}
AgoraVideoSource 인스턴스와 마찬가지로, AgoraVideoRender 인스턴스를 생성하려면 해당 생성자를 호출합니다. 여기서 uid를 0으로 전달하여 로컬 비디오 렌더를 나타냅니다.
mRender = new AgoraVideoRender(0, true);두 개의 인스턴스를 생성한 후, 우리는
mRtcEngine.setVideoSource(mSource);
mRtcEngine.setLocalVideoRenderer(mRender);
맞춤형 AR 비디오 소스와 로컬 비디오 렌더러를 설정합니다.
그러나 우리가 설정한 비디오 소스에는 데이터가 없습니다. AR 카메라 뷰를 비디오 소스에 전달해야 합니다. 이를 위해 이전에 오버라이드한 onDrawFrame 메서드의 끝에 논리를 추가할 것입니다.
@Override
public void onDrawFrame(GL10 gl) {
    ...
    final Bitmap outBitmap = Bitmap.createBitmap(mSurfaceView.getWidth(), mSurfaceView.getHeight(), Bitmap.Config.ARGB_8888);
    PixelCopy.request(mSurfaceView, outBitmap, new PixelCopy.OnPixelCopyFinishedListener() {
        @Override
        public void onPixelCopyFinished(int copyResult) {
            if (copyResult == PixelCopy.SUCCESS) {
                sendARView(outBitmap);
            } else {
                Toast.makeText(AgoraARCoreActivity.this, "Pixel Copy Failed", Toast.LENGTH_SHORT);
            }
        }
    }, mSenderHandler);
}private void sendARView(Bitmap bitmap) {
    if (bitmap == null) return;

    if (mSource.getConsumer() == null) return;

    //Bitmap bitmap = source.copy(Bitmap.Config.ARGB_8888,true);
    int width = bitmap.getWidth();
    int height = bitmap.getHeight();

    int size = bitmap.getRowBytes() * bitmap.getHeight();
    ByteBuffer byteBuffer = ByteBuffer.allocate(size);
    bitmap.copyPixelsToBuffer(byteBuffer);
    byte[] data = byteBuffer.array();

    mSource.getConsumer().consumeByteArrayFrame(data, MediaIO.PixelFormat.RGBA.intValue(), width, height, 0, System.currentTimeMillis());
}
여기서의 논리는 GLSurfaceView를 비트맵으로 복사한 후 해당 비트맵 버퍼를 사용자 정의 비디오 소스로 전송하는 것입니다.
4. 채널 연결
이제 이전 활동에서 전달받은 채널 이름을 RtcEngine 인스턴스에 전달하여 joinChannel() 메서드를 호출하여 채널에 연결할 준비가 되었습니다.
mRtcEngine.joinChannel(null, channelName, "", 0);참고: 매개변수의 토큰은 null로 설정할 수 있습니다.
이 함수를 호출하고 채널에 성공적으로 연결되면, 이전 단계에서 구현한 RtcEngineEventHandler가 onJoinChannelSuccess() 메서드를 트리거합니다. 이 메서드는 Agora 서버에서 생성된 고유한 Agora 비디오 ID를 반환합니다.
이 단계까지 완료되면 스트리머는 채널에 참여하고 AR 세계를 시청자에게 방송할 수 있습니다.
시청자의 비디오 통화 활성화
관객의 비디오 통화를 활성화하는 방법은 스트리머를 위해 작성한 것과 매우 유사합니다. 유일한 차이는 RtcEngine을 초기화한 후 로컬 카메라 비디오를 설정하는 것입니다.
mRtcEngine.enableVideo();
mLocalView = RtcEngine.CreateRendererView(getBaseContext());
mLocalContainer.addView(mLocalView);
mLocalView.setZOrderMediaOverlay(true);

VideoCanvas localVideoCanvas = new VideoCanvas(mLocalView, VideoCanvas.RENDER_MODE_HIDDEN, 0);
mRtcEngine.setupLocalVideo(localVideoCanvas);
이 기능은 시청자의 현지 카메라 뷰를 화면의 오른쪽 상단 모서리에 표시합니다.
참고: 자세한 내용은 Github 코드를 참조하세요.
이제 스트리머와 시청자 간 비디오 통화를 시작할 수 있습니다. 그러나 이 기능은 시청자가 스트리머의 AR 세계와 상호작용할 수 없기 때문에 아직 완전한 원격 지원 앱이 아닙니다. 다음 단계로 ARCore를 통해 시청자 마크업 기능을 구현할 예정입니다.
원격 지원 기능
이상적으로, 원격 기술자(관객)는 고객(스트리머)에게 지시를 위해 화면에 그림을 그릴 수 있어야 합니다. 이 마크업은 고객 측에 즉시 렌더링되어야 하며, 그려진 위치와 동일하게 유지되어야 합니다.
이를 위해 시청자의 터치 위치를 수집하고 스트리머에게 전송할 것입니다. 스트리머가 해당 터치 포인트를 수신하면 스트리머의 화면에 터치를 시뮬레이션하여 AR 객체를 생성할 수 있습니다.
먼저 시청자의 터치 위치를 수집합니다. AgoraARAudienceActivity의 onCreate 메서드에서 원격 뷰 컨테이너에 터치 리스너를 설정합니다. 화면 중심을 기준으로 모든 터치 포인트 위치를 수집합니다. Agora API 메서드 sendStreamMessage를 사용하여 데이터 스트림 메시지로 스트리머에게 전송합니다. 이로써 스트리머의 onStreamMessage 콜백이 트리거됩니다. 사용자는 초당 6kB의 데이터를 전송할 수 있으므로, 10개의 터치 포인트를 수집할 때마다 전송합니다.
mRemoteContainer.setOnTouchListener(new View.OnTouchListener() {
    @Override
    public boolean onTouch(View v, MotionEvent event) {
        switch (event.getAction()) {
            case MotionEvent.ACTION_MOVE:
                //get the touch position related to the center of the screen
                touchCount++;
                float x = event.getRawX() - ((float)mWidth / 2);
                float y = event.getRawY() - ((float)mHeight / 2);
                floatList.add(x);
                floatList.add(y);
                if (touchCount == 10) {
                    //send the touch positions when collected 10 touch points
                    sendMessage(touchCount, floatList);
                    touchCount = 0;
                    floatList.clear();
                }
                break;
            case MotionEvent.ACTION_UP:
                //send touch positions after the touch motion
                sendMessage(touchCount, floatList);
                touchCount = 0;
                floatList.clear();
                break;
        }
        return true;
    }
});
다음은 sendMessage 로직입니다:
/**
 * send the touch points as a byte array to Agora sdk
 * @param touchCount
 * @param floatList
 */
private void sendMessage(int touchCount, List<Float> floatList) {
    byte[] motionByteArray = new byte[touchCount * 4 * 2];
    for (int i = 0; i < floatList.size(); i++) {
        byte[] curr = ByteBuffer.allocate(4).putFloat(floatList.get(i)).array();
        for (int j = 0; j < 4; j++) {
            motionByteArray[i * 4 + j] = curr[j];
        }
    }
    mRtcEngine.sendStreamMessage(dataChannel, motionByteArray);
}
이제 AgoraARStreamerActivity에서 onStreamMessage 콜백을 재정의하여 시청자가 전송한 터치 포인트를 수신하고 스트리머의 화면에 터치를 시뮬레이션해야 합니다.
@Override
public void onStreamMessage(int uid, int streamId, byte[] data) {
    //when received the remote user's stream message data
    super.onStreamMessage(uid, streamId, data);
    int touchCount = data.length / 8;       //number of touch points from data array
    for (int k = 0; k < touchCount; k++) {
        //get the touch point's x,y position related to the center of the screen and calculated the raw position
        byte[] xByte = new byte[4];
        byte[] yByte = new byte[4];
        for (int i = 0; i < 4; i++) {
            xByte[i] = data[i + 8 * k];
            yByte[i] = data[i + 8 * k + 4];
        }
        float convertedX = ByteBuffer.wrap(xByte).getFloat();
        float convertedY = ByteBuffer.wrap(yByte).getFloat();
        float center_X = convertedX + ((float) mWidth / 2);
        float center_Y = convertedY + ((float) mHeight / 2);

        //simulate the clicks based on the touch position got from the data array
        instrumentation.sendPointerSync(MotionEvent.obtain(SystemClock.uptimeMillis(), SystemClock.uptimeMillis(), MotionEvent.ACTION_DOWN, center_X, center_Y, 0));
        instrumentation.sendPointerSync(MotionEvent.obtain(SystemClock.uptimeMillis(), SystemClock.uptimeMillis(), MotionEvent.ACTION_UP, center_X, center_Y, 0));
    }
}
기기에서 빌드 및 테스트
원격 지원 앱을 만들기 위해 필요한 모든 단계입니다. 이제 앱을 실행해 보겠습니다!
Android Studio로 이동하여 Android 기기가 연결되어 있는지 확인한 후 Run을 클릭하여 기기에서 앱을 빌드합니다. 비디오 통화를 시작하려면 두 대의 기기에서 앱을 빌드해야 합니다. 두 기기 모두 Android API 수준 24 이상을 실행해야 하며, 원래 Google Play Store와 함께 제공된 기기여야 합니다.
자세한 기기 요구 사항을 확인하려면 여기를 클릭하세요.
완료
축하합니다! 방금 증강현실 기능을 갖춘 원격 지원 애플리케이션을 직접 만들었습니다!
참여해 주셔서 감사합니다. 아래에 댓글을 남겨주세요! 질문이 있으시면 다음 이메일 주소로 연락해 주세요: devrel@agora.io.


