
本文介绍了如何在安卓(Kotlin)和 iOS(Swift)系统中使用 Lottie 动画在本地添加动画启动界面。
更新:安卓系统已不支持使用 Lottie,详见:
请使用 Android S 提供的新版启动页面 API。对于较低版本的安卓系统,显示 Flutter 的第一帧之前不再需要显示启动界面。
如果你仍想构建启动界面(为保证用户体验,不建议这样做),可参考这个 Github 资源库的方法。
我们可以使用 dart 代码直接在 Flutter 中添加动画启动界面,但如果使用这个方法,Flutter 应用程序需要在安卓和 iOS 中作为 FlutterActivity 或 FlutterViewController 来启动,就会在 Flutter 显示第一帧之前多出几秒钟的时间。构建本地启动界面可以在启动应用的同时启动动画,从而提升用户体验。
添加静态图像为启动界面非常简单,具体可参照 Flutter 官方文档,你可以轻松将图像添加到安卓的 drawable 和 iOS 的资源中,然后在安卓的 styles.xml 和 iOS的 LaunchScreen.storyboard 中使用。但是,该文档中没有构建动画启动界面的相关教程(比如使用 Lottie),因此我写了本文,希望能对大家有所帮助。
为什么要使用 Lottie?
Lottie 是一个支持多种平台(其中包括安卓和 iOS)的库,可以解析使用 Bodymovin 导出为 json 格式的 Adobe After Effects 动画,并在本地渲染。换句话说,动画是由设计人员创作并导出为 json 格式,开发人员无须对动画进行任何处理。
本教程将使用一个 LottieFiles 创建的免费示例文件,我们现在就开始吧!

首先,创建一个新的 flutter 项目:
安卓
1.首先,将 Lottie 依赖项添加到项目文件夹中的 /android/app/ 下的 build.gradle 文件中(我还添加了约束布局依赖项):
dependencies {
   ...
   implementation "com.airbnb.android:lottie:3.5.0"
   implementation "com.android.support.constraint:constraint-layout:2.0.4"
   ...
}
2.删除 AndroidManifest.xml 中的带有 io.flutter.embedding.android.SplashScreenDrawable 名称的元数据标签,用 NormalTheme 代替活动标签下的 LaunchTheme,文件将如下:
<manifest xmlns:android="http://schemas.android.com/apk/res/android"
    package="com.abedelazizshe.flutter_lottie_splash_app">
    <!-- io.flutter.app.FlutterApplication is an android.app.Application that
         calls FlutterMain.startInitialization(this); in its onCreate method.
         In most cases you can leave this as-is, but you if you want to provide
         additional functionality it is fine to subclass or reimplement
         FlutterApplication and put your custom class here. -->
    <application
        android:name="io.flutter.app.FlutterApplication"
        android:label="flutter_lottie_splash_app"
        android:icon="@mipmap/ic_launcher">
        <activity
            android:name=".MainActivity"
            android:launchMode="singleTop"
            android:theme="@style/NormalTheme"
            android:configChanges="orientation|keyboardHidden|keyboard|screenSize|smallestScreenSize|locale|layoutDirection|fontScale|screenLayout|density|uiMode"
            android:hardwareAccelerated="true"
            android:windowSoftInputMode="adjustResize">
            <!-- Specifies an Android theme to apply to this Activity as soon as
                 the Android process has started. This theme is visible to the user
                 while the Flutter UI initializes. After that, this theme continues
                 to determine the Window background behind the Flutter UI. -->
            <meta-data
              android:name="io.flutter.embedding.android.NormalTheme"
              android:resource="@style/NormalTheme"
              />
            <intent-filter>
                <action android:name="android.intent.action.MAIN"/>
                <category android:name="android.intent.category.LAUNCHER"/>
            </intent-filter>
        </activity>
        <!-- Don't delete the meta-data below.
             This is used by the Flutter tool to generate GeneratedPluginRegistrant.java -->
        <meta-data
            android:name="flutterEmbedding"
            android:value="2" />
    </application>
</manifest>
因为本项目不需要 LaunchTheme,所以可以从 /android/app/res/values/styles.xml 中将其删除。
3.无论你是自己创建的文件还是从上文的链接中下载的免费样本,都要在 /android/app/res/values 下创建一个 raw 目录并复制 .json 文件,将文件命名为 splash_screen.json。
4.要使用 .json 文件并显示动画视图,我们需要创建一个具有该文件布局的启动视图类。在 /android/app/res 下创建一个名为 layout(如果没有)的新目录,然后创建一个名为 splash_view.xml 的资源文件。打开 xml 文件,确保其如下:
<?xml version="1.0" encoding="utf-8"?>
<androidx.constraintlayout.widget.ConstraintLayout xmlns:android="http://schemas.android.com/apk/res/android"
    xmlns:app="http://schemas.android.com/apk/res-auto"
    android:layout_width="match_parent"
    android:layout_height="match_parent">

    <com.airbnb.lottie.LottieAnimationView
        android:layout_width="match_parent"
        android:layout_height="match_parent"
        app:layout_constraintBottom_toBottomOf="parent"
        app:layout_constraintStart_toStartOf="parent"
        app:layout_constraintTop_toTopOf="parent"
        app:lottie_autoPlay="true"
        app:lottie_rawRes="@raw/splash_screen"
        app:lottie_loop="false"
        app:lottie_speed="1.00" />

</androidx.constraintlayout.widget.ConstraintLayout>
我把这个 demo 的动画设置为自动播放,速度为 1.0 且不循环播放。大家可以根据个人需要设置不同的值,重要的是 app:lottie_rawRes 显示的是我们要使用添加在 raw 目录的 json 文件。现在,我们要创建启动视图类。你可以在 /android /app/src/main/kotlin/YOUR-PACKAGE-NAME/ 创建一个新的 kotlin 类,名为 SplashView,确保其外观如下:
import android.content.Context
import android.os.Bundle
import android.view.LayoutInflater
import android.view.View
import io.flutter.embedding.android.SplashScreen

class SplashView : SplashScreen {
    override fun createSplashView(context: Context, savedInstanceState: Bundle?): View? =
            LayoutInflater.from(context).inflate(R.layout.splash_view, null, false)

    override fun transitionToFlutter(onTransitionComplete: Runnable) {
        onTransitionComplete.run()
    }
}
如你所见,该视图正在放大 splash_view 布局。最后一步是让 MainActivity 知道我们的自定义启动视图。
5.找到 /android/app/src/main/kotlin/YOUR-PACKAGE-NAME/,单击 MainActivity.kt。FlutterActivity 提供了一个 provideSplashScreen 方法,我们只需按下列方式执行即可:
import io.flutter.embedding.android.FlutterActivity
import io.flutter.embedding.android.SplashScreen

class MainActivity: FlutterActivity() {

    override fun provideSplashScreen(): SplashScreen? = SplashView()
}
现在,项目目录应如下所示:
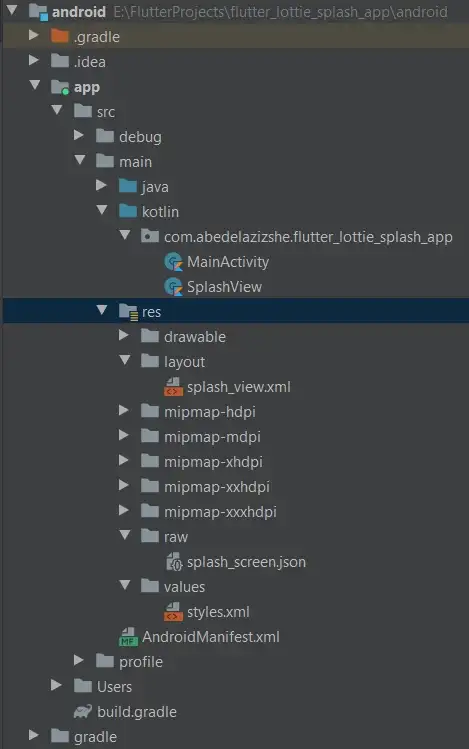
安卓项目目录
以上就是在安卓系统上设置动画启动界面的全部步骤。
现在运行该应用,即可在应用程序启动时看到你设置的动画启动界面:
动画启动画面-Android
iOS
接下来,我们在 iOS 中添加动画启动界面。
1.找到项目所在的目录,用 xcode 打开项目,单击 ios 文件夹,然后双击 Runner.xcworkspace。
2.单击 Main.storyboard,你将看到带有一个可视屏幕的布局编辑器。我们需要添加一个新的 ViewController 作为启动屏幕。你可以通过单击右上角的 + 符号来执行此操作,点击后会弹出一个窗口,在搜索框中搜索 View Controller 并将其拖动到编辑器,如下方截屏所示:
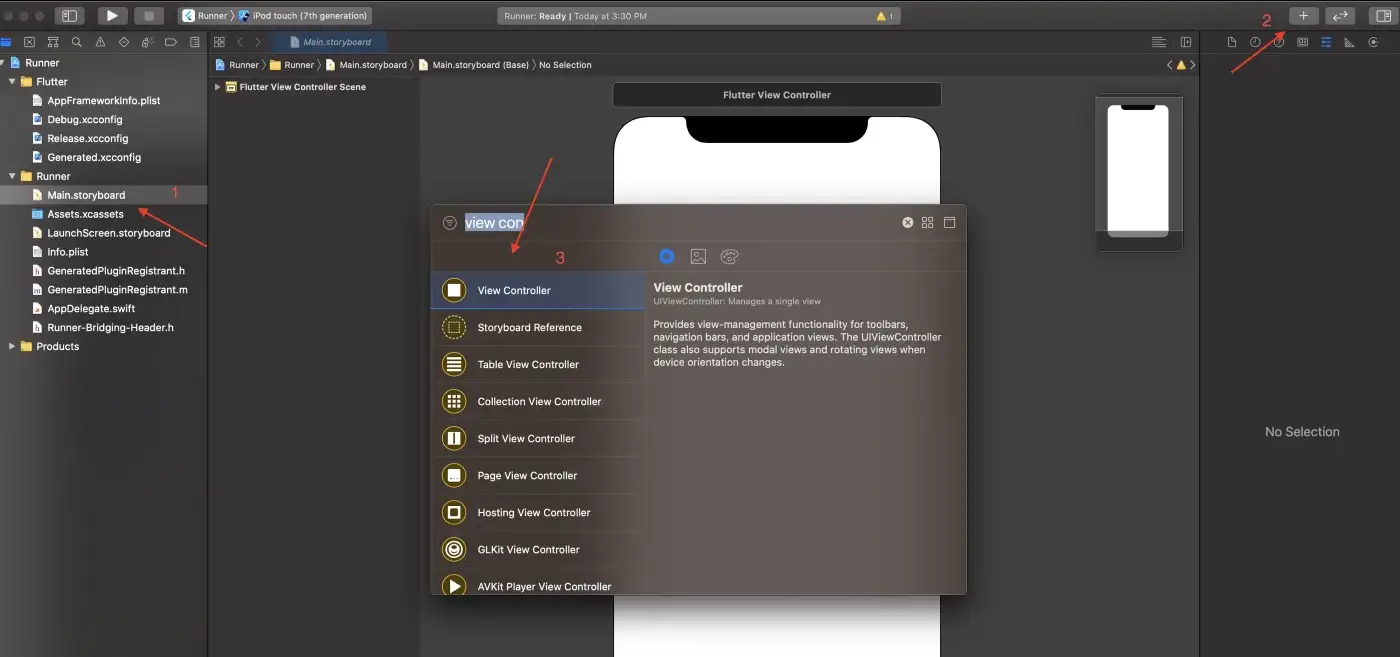
添加一个新的 View Controller
3.第 2 步完成后,你会看到 2 个屏幕。选择新的 View Controller,单击 attributes inspector 然后勾选 is initial view controller。
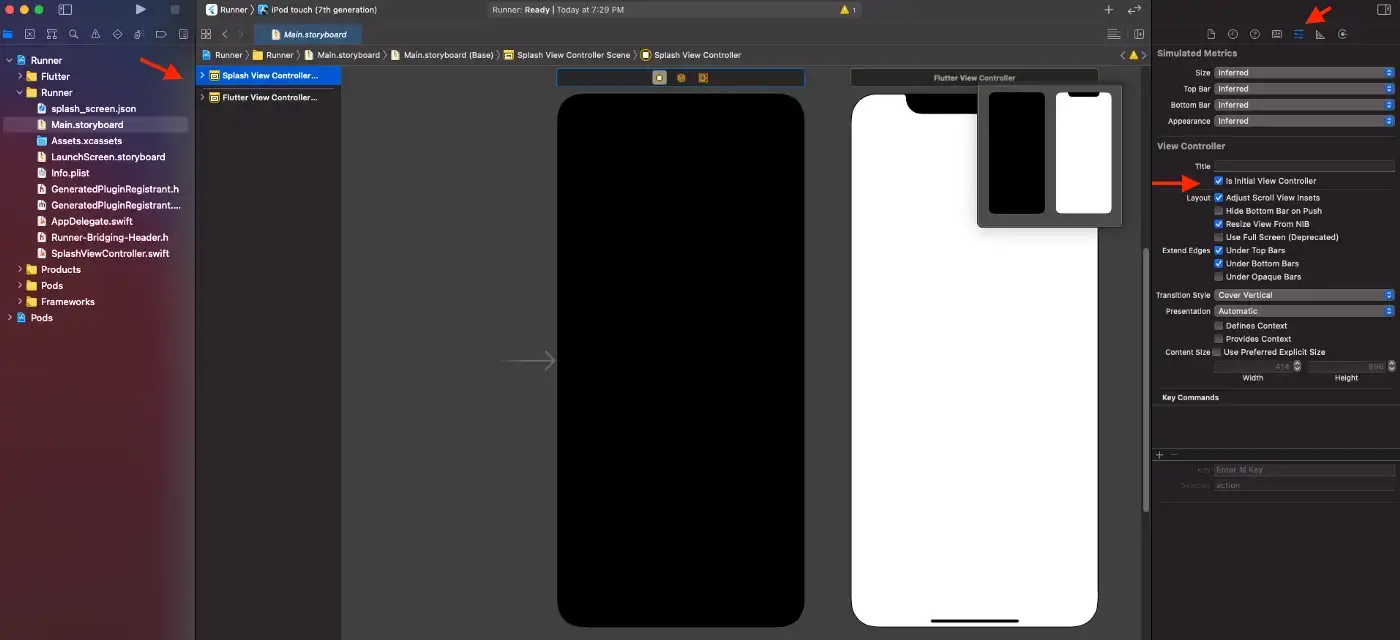 将启动 View Controller 设置为初始 View Controller
4.将 Lottie 依赖项添加到 /ios/podFile:
pod 'lottie-ios'文件将如下所示:
#platform :ios, '9.0'
target 'Runner' do
   use_frameworks!

   pod 'lottie-ios'
end
然后运行(请确保在 ios 目录中,如果不在,请在 flutter 项目的根目录中运行 cd ios)。
pod install5.无论你是自己创建的文件还是从上文链接下载的免费样本,都需将 .json 文件拖放到 /ios/Runner/ 下( 如果需要 ,选择复制项目选项),在本教程中,该文件名为 splash_screen.json 。
6.在已添加依赖项和 splash_screen.json 文件的情况下,我们可以创建 splash view controller(启动视图控制器),该控制器会处理显示动画,然后导航至 Flutter 的应用程序。在/ios/Runner/ 中创建一个新的 swift 文件,将其命名为 SplashViewController。在类中编写任何内容之前,修改 AppDelegate.swift 以创建一个 FlutterEngine。如果跳过此步骤,动画启动界面完成后就无法导航至 FlutterViewController。
import UIKit
import Flutter

@UIApplicationMain
@objc class AppDelegate: FlutterAppDelegate {

    lazy var flutterEngine = FlutterEngine(name: "MyApp")

    override func application(
        _ application: UIApplication,
        didFinishLaunchingWithOptions launchOptions: [UIApplication.LaunchOptionsKey: Any]?
    ) -> Bool {
        // Runs the default Dart entrypoint with a default Flutter route.
        flutterEngine.run()
        // Used to connect plugins (only if you have plugins with iOS platform code).
        GeneratedPluginRegistrant.register(with: self.flutterEngine)

        return super.application(application, didFinishLaunchingWithOptions: launchOptions)
    }
}
因此,我们创建了一个FlutterEngine,将其命名为 MyApp(可自定义命名),并且在 application 的 didFinishLaunchingWithOptions 中运行该引擎并在引擎上注册插件。注意,要将注册的默认代码 GeneratePluginRegistrant.register(with: self) 换成 self.flutterEngine。
7.完成后,我们可以准备 SplashViewController 来显示动画,然后导航到 Flutter 的 View Controller。
import UIKit
import Lottie

public class SplashViewController: UIViewController {

    private var animationView: AnimationView?

    public override func viewDidAppear(_ animated: Bool) {
        animationView = .init(name: "splash_screen")
        animationView!.frame = view.bounds
        animationView!.contentMode = .scaleAspectFit
        animationView!.loopMode = .playOnce
        animationView!.animationSpeed = 1.00
        view.addSubview(animationView!)
        animationView!.play{ (finished) in
            self.startFlutterApp()
        }
    }

    func startFlutterApp() {
        let appDelegate = UIApplication.shared.delegate as! AppDelegate
        let flutterEngine = appDelegate.flutterEngine
        let flutterViewController =
            FlutterViewController(engine: flutterEngine, nibName: nil, bundle: nil)

        flutterViewController.modalPresentationStyle = .custom
        flutterViewController.modalTransitionStyle = .crossDissolve

        present(flutterViewController, animated: true, completion: nil)

    }
}
在 viewDidAppear 中,我们初始化添加到 splash_screen.json 文件的动画视图。你可以播放诸如 loopMode、animationSpeed 等设置。完成动画后,我们将启动 flutter 应用程序。
为了获取 FlutterViewController,我们必须获取创建完的 FlutterEngine 的实例,并在 AppDelegate.swift 中运行。
let appDelegate = UIApplication.shared.delegate as! AppDelegate
let flutterEngine = appDelegate.flutterEngine

let flutterViewController = FlutterViewController(engine:
flutterEngine, nibName: nil, bundle: nil)
然后使用 present(completion:) 来启动视图控制器。
8.现在,将第 2 步创建的 ViewController 与 SplashViewController 类连接起来,通过单击 Main.storyboard 并选择新的 ViewController 来进行,然后从 identity inspector 中选择 SplashViewController,如下方截图所示:
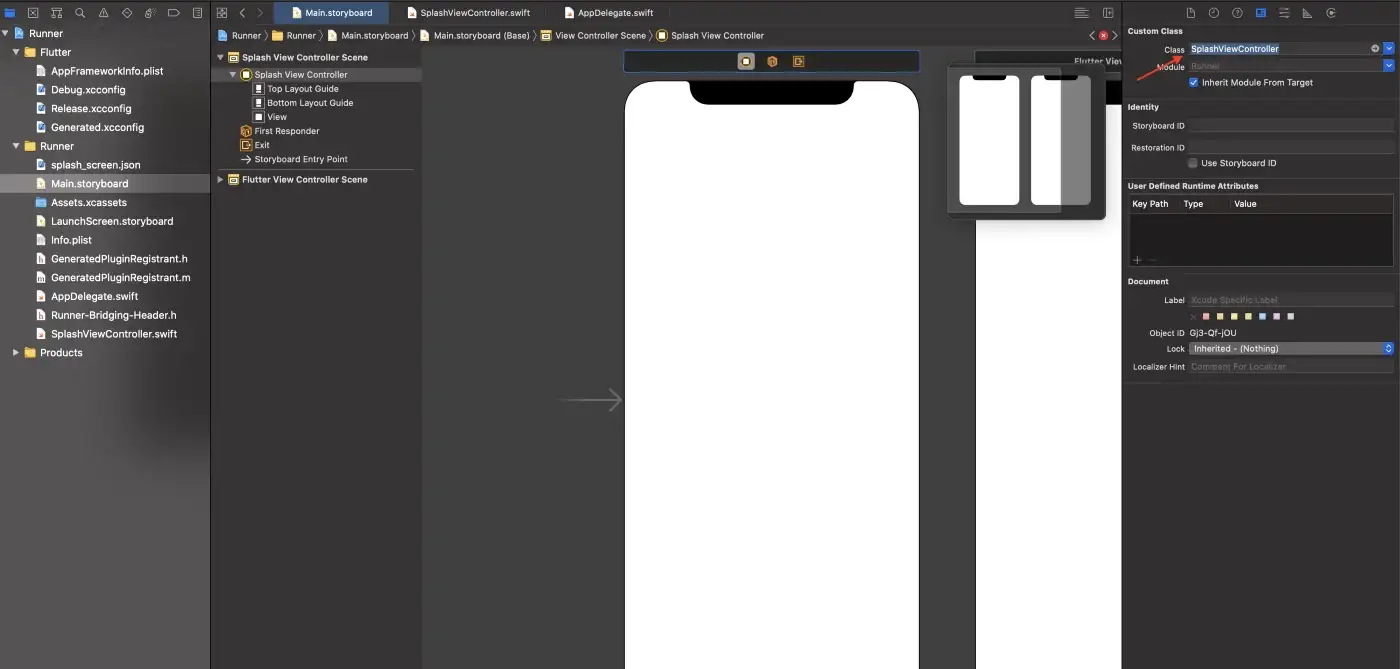 与 SplashViewController 链接
9.最后一步是设置 Main.storyboard 的主界面,而不是 LauncherScreen.storyboard。要实现这一点,单击 Runner,选择 General 选项卡,在 deployment info 下方,从下拉菜单中设置 Main interface 为 Main ,如截图所示:
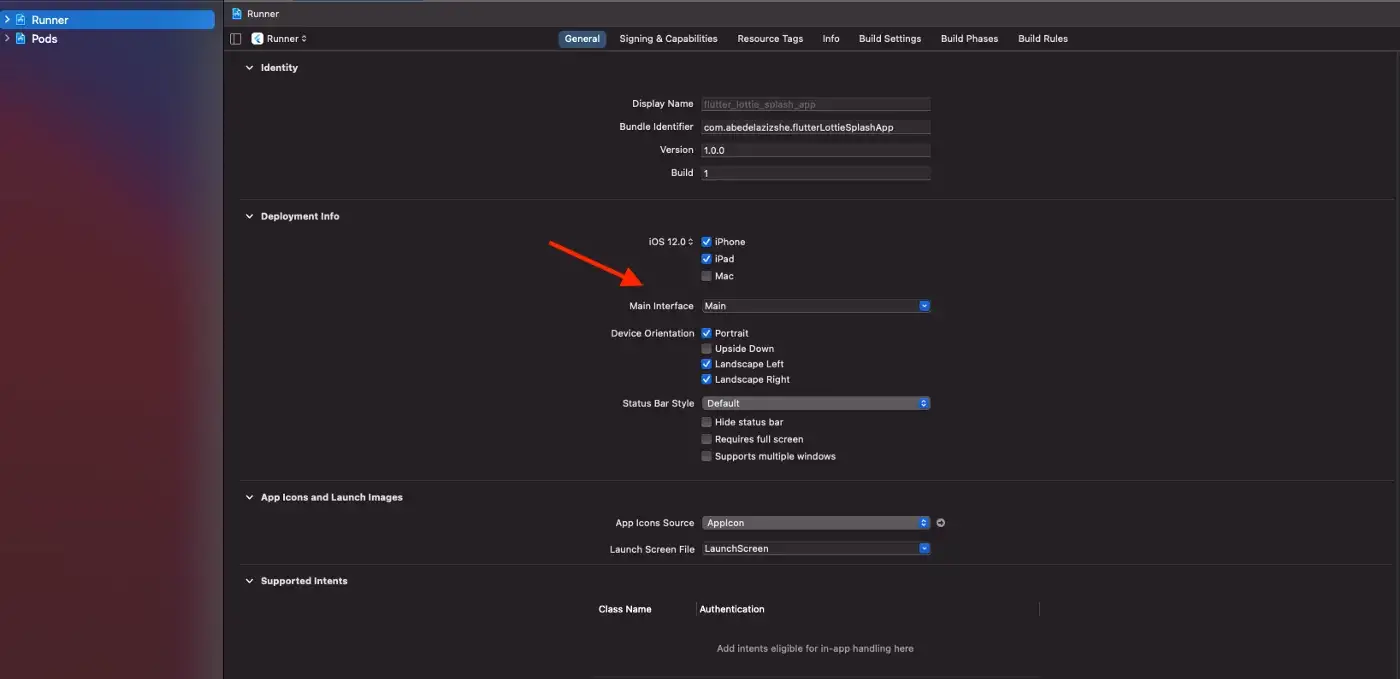 将主界面设置为MAIN
生成并运行 app,就能看到下图的动画启动界面。
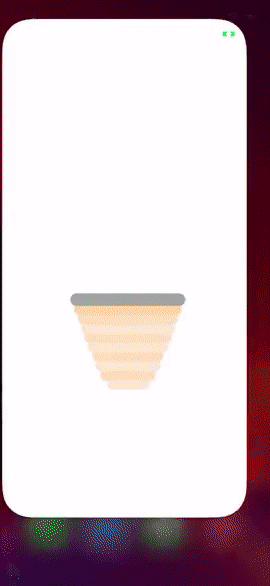
完成啦!我们可以在安卓和 iOS 应用程序上设置动画启动界面啦!

点击这里查看完整的源代码和 demo。
如有任何疑问,欢迎在下方评论。
原文作者:AbedElaziz Shehadeh
原文链接:https://medium.com/swlh/native-splash-screen-in-flutter-using-lottie-121ce2b9b0a4