

大家好,今天我们要学习的是如何用 NodeJS 和 Web sockets 作为后端,用 HTML5 API 和 JavaScript 作为前端,构建一个简单的一对一音频/视频聊天。大多数浏览器(如 Mozilla Firefox、Google Chrome 和 Opera)都支持 WebRTC(Web 实时通信)。我们的任务是为浏览器提供丰富的、高质量的 RTC 应用!
工作原理
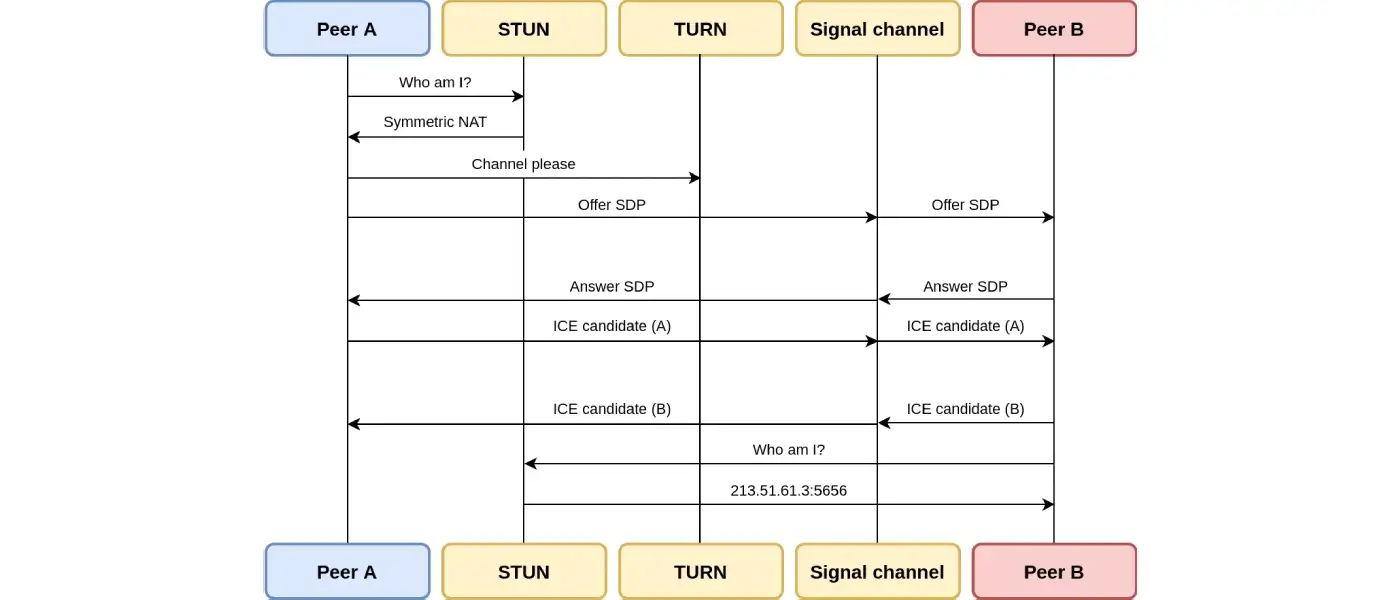
通常情况下,WebRTC 应用需要以下因素:
- 音频或视频流
- 网络信息
- 一个能报错(如有)/开始/暂停/终止会话的通信媒介
- 音频/视频流的播放器
首先,创建一个为 HTML 和 JavaScript 提供服务的 Web 服务器。
const express = require('express'),
    http = require('http'),
    app = express();
// use express static to deliver resources HTML, CSS, JS, etc)
// from the public folder
app.use(express.static('public'));
http.createServer(options, app).listen(3355);
console.log("The HTTP server is up and running");
我们已经创建了一个基础的 http 服务器,现在用这个服务器来处理 socket 会话,我们将用 ws 模块处理它们。再添加一些代码将两者组合在一起,会得到下列结果:
const express = require('express'),
    ws = require('ws'),
    http = require('http'),
    app = express();
// use express static to deliver resources HTML, CSS, JS, etc)
// from the public folder
app.use(express.static('public'));
var httpServer = http.createServer(options, app).listen(3355);
console.log("The HTTP server is up and running");
var wsServer = new ws.Server({server: httpServer});
wss.on('connection', function (client) {
    console.log("A new client was connected.");
    client.on('message', function (message) { // incoming client
        wss.broadcast(message, client);
});
});
// Define a method to broadcast to all clients
wss.broadcast = function (data, exclude) {
    var i = 0, n = this.clients ? this.clients.length : 0, client = null;
    if (n < 1) return;
    for (; i < n; i++) {
        client = this.clients[i];
        if (client === exclude) continue;
        if (client.readyState === client.OPEN) client.send(data);
        else console.error('Error: the client state is ' +     client.readyState);
}
};
我们已经学习了如何构建服务器。如果你注意该代码,就会发现从客户端收到的所有内容都会通过消息广播发回其他客户端。下一个任务是创建一个 UI(简单 UI)和一个 JavaScript 以处理 socket 消息/数据。我们也要构建一些基础的 HTML。另外,还需要几个视频标签:一个用于自己的视频,另一个用于接收者/呼叫者的视频。
<!DOCTYPE html>
<html>
     <head>
        <script src="webrtc.js"></script>
        <title>WebRTC Simple Video-Chat</title>
        </head>

        <body>
            <video id="remoteVideo" autoplay></video>
            <video id="localVideo" autoplay muted></video>
            <input id="videoCallButton" type="button" disabled value="Video Call"/>
            <input id="endCallButton" type="button" disabled value="End Call"/>
            <script>window.addEventListener("load", pageReady);</script>

     </body>
</html>
现在,我们已经构建了 HTML 和服务器,该使用 JavaScript 创建应用了,我们从 pageReady 方法开始:
function pageReady() {

// check browser WebRTC availability
    if(navigator.getUserMedia) {
        videoCallButton = document.getElementById("videoCallButton");
        endCallButton = document.getElementById("endCallButton");
        localVideo = document.getElementById('localVideo');
        remoteVideo = document.getElementById('remoteVideo');
        videoCallButton.removeAttribute("disabled");
        videoCallButton.addEventListener("click", initiateCall);
        endCallButton.addEventListener("click", function (evt){       wsc.send(JSON.stringify({"closeConnection": true }));
    });
 } else {
    alert("Sorry, your browser does not support WebRTC!")
 }
};
注意,我们定义了“呼叫”和“结束通话”这两个按钮以及“本地视频”和“远程视频”两个视频。单击“呼叫”按钮会开始呼叫,单击“结束呼叫”会结束呼叫。建立连接后就开始播放视频。大家可能发现我们还没有定义视频的播放方式,因为目前还没有任何内容。在进入下一步之前,我们先概括一些方法,这些方法在不同浏览器引擎中有不同名称,一起看下列代码:
navigator.getUserMedia = navigator.getUserMedia ||
navigator.mozGetUserMedia || navigator.webkitGetUserMedia;

window.RTCPeerConnection = window.RTCPeerConnection ||
window.mozRTCPeerConnection || window.webkitRTCPeerConnection;

window.RTCIceCandidate = window.RTCIceCandidate ||
window.mozRTCIceCandidate || window.webkitRTCIceCandidate;

window.RTCSessionDescription = window.RTCSessionDescription ||
window.mozRTCSessionDescription || window.webkitRTCSessionDescription;
这些方法虽然名称不同,但功能相同。getUserMedia 获取客户端/浏览器的媒体(音频、视频)。RTCPeerConnection 负责两个远程对等点之间的会话。RTCIceCandidate 有些特别,因为它是从我们定义的 ICE 服务器中获取的(请参阅 ICE Server)。RTCSessionDescriptor 介绍了两者之间的连接以及它们的配置方式。
总结
现在大家应该知道怎么把频通话及聊天功能与 WebRTC 和 Node.js 集成在一起了吧。我们构建视频聊天应用时可以采用多种编程语言,其中一些语言(例如 JavaScript)可以根据用户的要求提供准确的视频/语音聊天应用。
在如今的 WebRTC 市场中,Node.js 是构建 WebRTC 视频聊天应用的最佳选择。这款应用性能极佳,能构建 API 并处理并行的请求和需求扩展,还能在 Android、iOS 和 Web 中构建视频/语音聊天应用。
因此,请大家深入探索这些技术,将视频聊天功能集成到自己的项目里,用户可以使用该功能进行实时数据交换和视频推流。
原文作者:Rydot Infotech
原文链接:https://rydotinfotech.medium.com/building-a-video-chat-using-node-js-webrtc-and-socket-io-52b930346e6c