How to Build a Live Audio Streaming iOS App with Agora
Creating a live audio streaming application is easier than ever with Agora. Within minutes, you can create an app where users can join channels to listen to a university lecture or a panel of experts in a field, or to listen to the live stream of a podcast.
In this guide, we’ll walk through how to get a live audio streaming application up and running, while using the Agora RTM SDK to sync information such as usernames.
Requirements
- An Agora developer account (see How To Get Started with Agora)
- Xcode 11.0 or later
- An iOS device running on iOS 13.0 or later
- A basic understanding of iOS development
- CocoaPods
Project Setup
Create an iOS App with Xcode with a name of your choice. My app will be called Agora-Audio-Example-iOS.
Next, add a Podfile to the same directory as your xcodeproj, and add the packages AgoraAudio_iOS and AgoraRtm_iOS to the Podfile, like so:
target 'Agora-Audio-Example-iOS' do
  pod 'AgoraAudio_iOS', '~> 3.2'
  pod 'AgoraRtm_iOS', '~> 1.4'
end
Then open Terminal at the project directory and run pod install, to download and install the pods. This will create an xcworkspace, which you should now open instead of the xcodeproj.
For more information on Cocoapods, the official guide can be found here.
If you want to skip setup, you can go straight to the completed project:
Create the Form
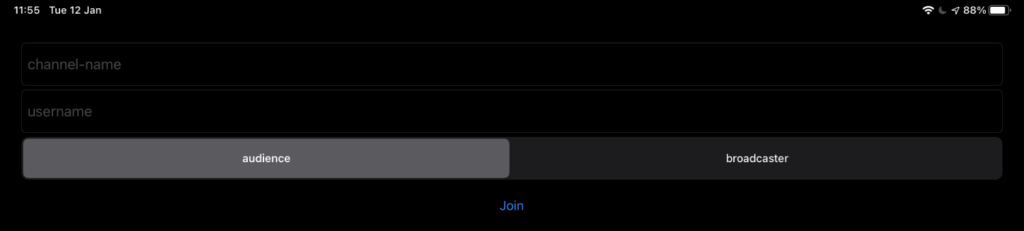
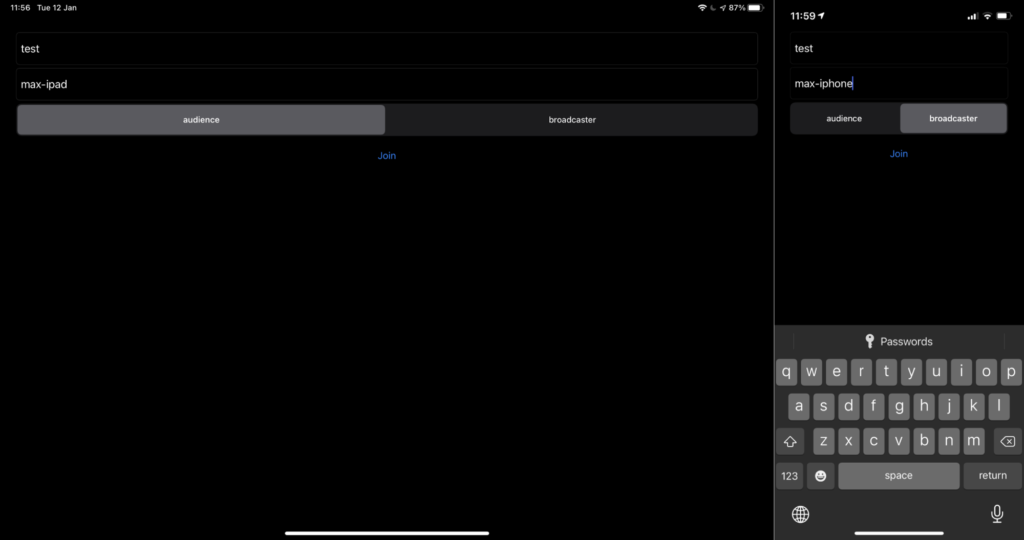
The first thing to do is add a small form so that users can select the channel they want to connect to, a username, and whether they’re going to be streaming or a member of the audience. For this form, I have chosen to create a couple of UITextField objects: a segmented control and a simple button that collects the data and sends it through to a new View Controller named AgoraAudioViewController.
Next, create a file, AgoraAudioViewController.swift, which contains our class for connecting to the Agora RTM and Audio RTC channels and displaying information about who’s speaking in our channels.
Connect to RTC
The AgoraAudioViewController will contain the logic for connecting to Agora. Creating the connection to Agora Audio RTC is similar to the video version of the app. If you haven’t seen the video version, here are the steps:
- Create an instance of
AgoraRtcEngineKitwithAgoraRtcEngineKit.sharedEngine(). - Enable audio using
enableAudio()on the previously createdAgoraRtcEngineKitinstance. - In my example, I opt to enable volume indication tracking, set the channel profile to
.liveBroadcastingand set the client role to either audience or streamer. But these steps are not required to simply connect to the Audio SDK. - Now simply call
joinChannel, passing the token, the channel name, and either a specific userID or a request to be assigned one by passing 0.
The process can be summarised here:
let agkit = AgoraRtcEngineKit.sharedEngine(
  withAppId: self.appId, delegate: self
)
agkit?.enableAudio()
agkit?.setChannelProfile(.liveBroadcasting)
agkit?.setClientRole(role)
agkit?.joinChannel(
  byToken: self.token, channelId: self.channel,
  info: nil, uid: 0
)
Connect to RTM
Similar to the Agora RTC (Real-Time Communication) SDK for Voice and Video, connecting to the Agora RTM (Real-Time Messaging) SDK requires initialisation of the engine and then connecting to a channel.
- Create an instance of AgoraRtmKit, passing the AppId and an optional delegate to the initialiser.
- Log in to Agora RTM, passing a token and username for this device with the login method.
- Create a channel with the specified name using createChannel(), and with an optional delegate.
- Join the channel that you just created by calling the join method.
The process can be summarised here:
let rtmkit = AgoraRtmKit(appId: self.appId, delegate: self)
rtmkit?.login(byToken: self.token, user: self.username)

let channel = rtmkit?.createChannel(withId: channel, delegate: self) channel?.join())
Associating Usernames
When joining the RTC channel, we’re assigned a UserID. We’ve added RTM here because we want to see everyone’s usernames. So, once we’ve joined the RTM channel, we can send out the assigned RTC userID. That way, everyone else in the channel can get the association of our username with our userID.
self.rtmChannel?.send(
  AgoraRtmMessage(text: self.userID.description)
)
Whenever someone else joins the channel, we should tell that user our userID. We can do that by using the memberJoined AgoraRtmChannelDelegate callback:
func channel(
  _ channel: AgoraRtmChannel, memberJoined member: AgoraRtmMember
) {
  self.rtmkit?.send(
    AgoraRtmMessage(text: self.userID.description),
    toPeer: member.userId
  )
}
On receiving the message from either the AgoraRtmDelegate or the AgoraRtmChannelDelegate, we can parse and store the connection in a dictionary — in this case named usernameLookups.
func channel(
  _ channel: AgoraRtmChannel,
  messageReceived message: AgoraRtmMessage, from member: AgoraRtmMember
) {
  self.newMessage(message.text, from: member.userId)
}
func rtmKit(
  _ kit: AgoraRtmKit,
  messageReceived message: AgoraRtmMessage, fromPeer peerId: String
) {
  self.newMessage(message.text, from: peerId)
}
/// New message from peer
/// - Parameters:
///   - message: Message text, containing the user's RTC id.
///   - username: Username of the user who send the message
func newMessage(_ message: String, from username: String) {
  if let uidMessage = UInt(message) {
    usernameLookups[uidMessage] = username
  }
}
Displaying Peers and Hosts
Now all that’s left is displaying a list of users who are speaking and a list of users who are audience members. For the purposes of this demo, we will put them into two separate groups and display those two groups in a UITableView.
Categorising
We want to know whenever someone joins or leaves the RTM channel so that we have a complete list of all the users currently connected.
For this list, we can have two sets, called activeAudience and activeSpeakers: one set for the audience and another set for the speakers. Since the RTC userIds are always unique, that’s a good choice for the members of the sets.
When someone joins the RTM channel, they send a message with their RTC userID. We can use that message to put them into the activeAudience list and then use the RTC remoteAudioStateChangedOfUid delegate method to move that user to the activeSpeakers list as needed.
// newMessage modified from the above example, adding
// activeAudience.insert(...)
func newMessage(_ message: String, from username: String) {
  if let uidMessage = UInt(message) {
    usernameLookups[uidMessage] = username
    self.activeAudience.insert(uidMessage)
  }
}
func rtcEngine(
  _ engine: AgoraRtcEngineKit,
  remoteAudioStateChangedOfUid uid: UInt,
  state: AgoraAudioRemoteState,
  reason: AgoraAudioRemoteStateReason,
  elapsed: Int
) {
 switch state {
  case .decoding, .starting:
    self.activeAudience.remove(uid)
    self.activeSpeakers.insert(uid)
  case .stopped, .failed:
    self.activeSpeakers.remove(uid)
  default:
    break
  }
}
Displaying
Now we need to make a UITableView with two sections, one for those who are streaming to the RTC channel, and another for peers who are the audience listening.
The sets, activeAudience and activeSpeakers, will be the data sources for our table view.
Since the table view being made is very simple, there’s no need to create subclasses for the table or the cell itself. All we need is a table that fills the UIViewController and the callback methods for numberOfRowsInSection, numberOfSections, titleForHeaderInSection, and cellForRowAt indexPath. The entire UITableView section looks like this:
As a result, given a user max-ipad connecting to a channel as audience and another user max-iphone as a broadcaster:
The resulting view on the iPad will look like this once both devices are connected to the Agora RTC Audio channel:
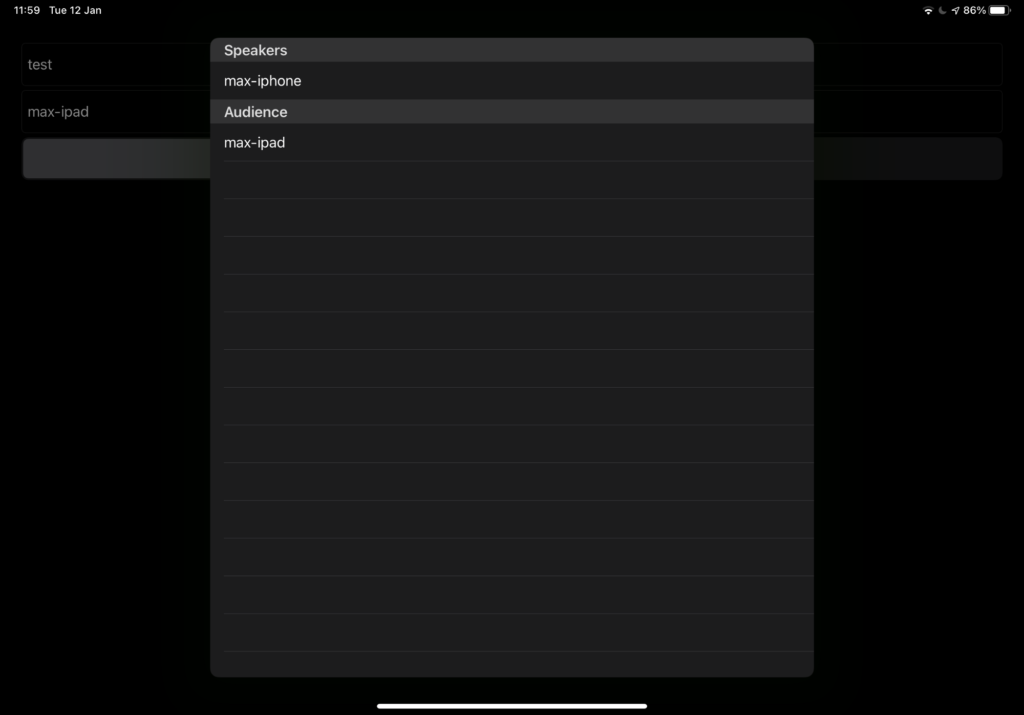
As a result, the iPad user can hear the stream delivered from the iPhone user in this case, as well as seeing anyone who later connects to the channel.
You now have an iOS application where users can listen to or participate in live audio streams with ease. It’s perfect for tuning into different speakers at an online conference if you want to save bandwidth by not delivering video. Or if you have a regular podcast, users of your app can listen to the live feed in real-time.
Active Speaker
Since there is not much UI in this view, we can compensate by signaling which speaker is regarded as the active speaker, meaning the speaker who is contributing to the incoming audio channel the most.
To enable this monitoring, call enableAudioVolumeIndication() on the AgoraRtcEngineKit instance, like so: agkit?.enableAudioVolumeIndication(300, smooth: 3, report_vad: true) Then, using the activeSpeaker delegate method, log changes to the activeSpeaker and then reload the table so the cells get updated:
extension AgoraAudioViewController: AgoraRtcEngineDelegate {
func rtcEngine(
_ engine: AgoraRtcEngineKit, activeSpeaker speakerUid: UInt
) {
self.activeSpeaker = speakerUid
self.speakerTable?.reloadData()
}
}
Finally, add something to the cellForRowAt UITableViewDelegate method so we can see who is the active speaker:
extension AgoraAudioViewController: UITableViewDelegate {
func tableView(
_ tableView: UITableView, cellForRowAt indexPath: IndexPath
) -> UITableViewCell {
// other functionality as seen in the above gist...
if indexPath.section == 0, cellUserID == self.activeSpeaker {
// set background to green if at active speaker cell
cell.backgroundColor = .systemGreen
} else {
// otherwise set background to normal
cell.backgroundColor = .systemBackground
}
}
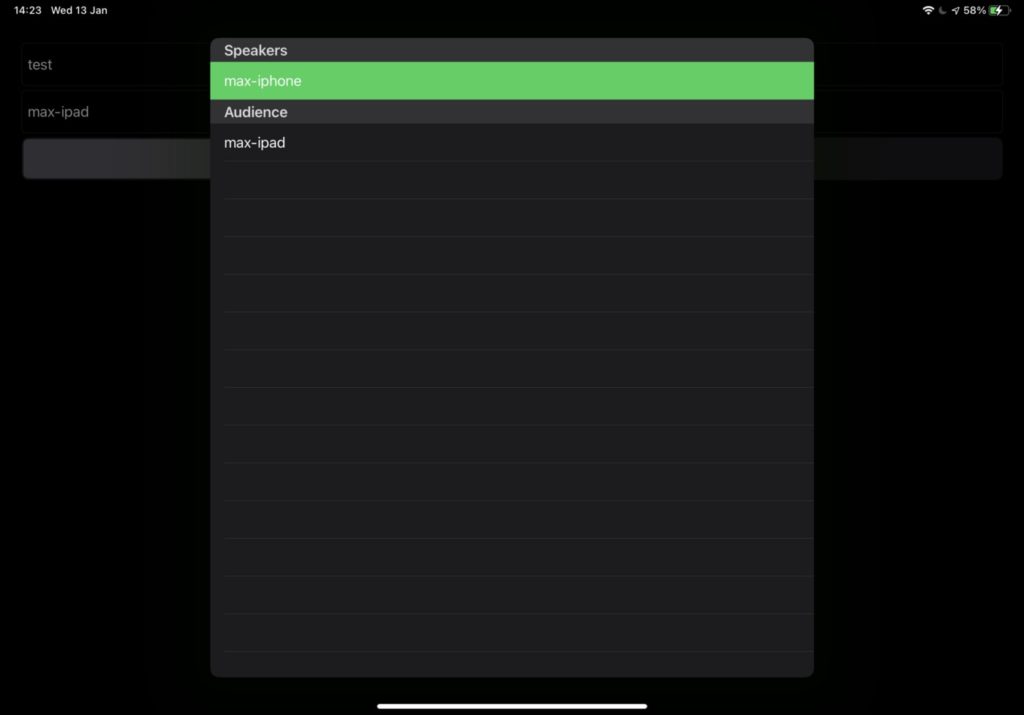
}The simplest example would look like this, where the only speaker (max-iphone) is also the active speaker, so the background of that cell is changed to green:
Testing
Check out the public project, which uses all of the above features to create the live audio streaming application powered by Agora.
Other Resources
For more information about building applications using Agora SDKs, take a look at Agora Video Call Quickstart Guide and Agora API Reference.
I also invite you to join the Agora Developer Slack community.