
流媒体是我们每天在 Instagram、Tik Tok、Twitter、Twitch 和 Youtube 等应用程序中随时都能看到的东西。在应用程序中拥有流媒体功能听起来有点困难,然而,对我们来说幸运的是,React Native直播视频和第三方库使事情变得简单多了。那就让我们来看看如何将直播视频功能添加到应用程序中。
React Native 直播视频的要求
在这个项目中,我们将使用react-native-nodemediaclient库。
因此,在运行“ npx react-native init ProjectName ”并创建我们的项目后,我们将转到项目的根文件夹中并在控制台中运行以下一个命令进行库的安装:
- npm 安装 react-native-nodemediaclient
或者
- yarn 添加 react-native-nodemediaclient
如果我们使用的是 Mac,那我们将转到 iOS 文件夹并通过运行以下命令来安装 pod 依赖项:
- 光盘
- 安装pod
我们还须做的最后一件事是为我们的项目授予相机权限。
对于 Android,只需将以下内容添加到ProjectName/android/app/src/main/AndroidManifest.xml:
<uses-feature android:name="android.hardware.camera"/>
<uses-feature android:name="android.hardware.camera.autofocus"/>

<uses-permission android:name="android.permission.CAMERA"/>
<uses-permission android:name="android.permission.RECORD_AUDIO"/>
<uses-permission android:name="android.permission.FLASHLIGHT"/>
<uses-permission android:name="android.permission.WRITE_EXTERNAL_STORAGE"/>
对于 iOS,将以下内容添加到ProjectName/ios/QLive/Info.plist:
<?xml version="1.0" encoding="UTF-8"?>
<!DOCTYPE plist PUBLIC "-//Apple//DTD PLIST 1.0//EN" "http://www.apple.com/DTDs/PropertyList-1.0.dtd">
<plist version="1.0">
<dict>

<!-- ADD THE NEXT FOUR LINES -->
<key>NSCameraUsageDescription</key>
<string>AwesomeProject requires access to your phone’s camera.</string>
<key>NSMicrophoneUsageDescription</key>
<string>AwesomeProject requires access to your phone’s Microphone.</string>

</dict>
</plist>
现在,我们的准备工作已经完成,现在要继续进行应用程序的开发。
转到代码
在应用程序中,我们将有 3 个屏幕:
- 主屏幕
- 视频流屏幕
- 播放流屏幕
注意:此步骤的实现是通过使用功能组件和钩子进行编写的。
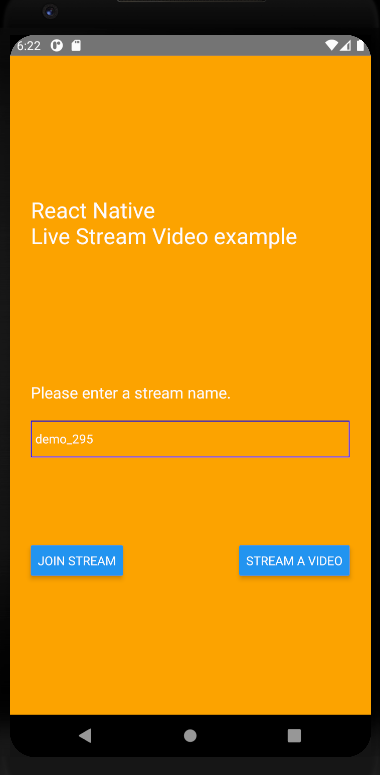
主屏幕
这是我们将在应用程序启动时看到的屏幕。顾名思义,函数“requestCameraPermission”将要求我们的设备授予相机和录制音频权限。
useState 钩子用于存储流播放器和实时会话服务器 URL。
当我们的组件第一次挂载时,useEffect 钩子使用 Android 设备上的请求权限功能(使用平台 API)。
然后,在屏幕容器中,我们需输写要放置在 URL 末尾的流名称。
在屏幕底部,我们有两个按钮可以转到其他两个屏幕。
最后,我们有一个导航组件可以在我们的应用程序中用于导航。
import React, { useState, useEffect } from "react";
import {
  Text,
  TextInput,
  View,
  Button,
  Platform,
  PermissionsAndroid,
} from "react-native";
import { NavigationContainer } from "@react-navigation/native";
import { createStackNavigator } from "@react-navigation/stack";
import PlayScreen from "./Screens/PlayScreen";
import PushScreen from "./Screens/PushScreen";

const requestCameraPermission = async () => {
  try {
    const granted = await PermissionsAndroid.requestMultiple(
      [
        PermissionsAndroid.PERMISSIONS.CAMERA,
        PermissionsAndroid.PERMISSIONS.RECORD_AUDIO,
      ],
      {
        title: "Camera And Microphone Permission",
        message: "Streaming App needs access to your camera ",
        buttonNeutral: "Ask Me Later",
        buttonNegative: "Cancel",
        buttonPositive: "OK",
      }
    );
    if (granted === PermissionsAndroid.RESULTS.GRANTED) {
      console.log("You can use the camera");
    } else {
      console.log("Camera permission denied");
    }
  } catch (err) {
    console.warn(err);
  }
};

const HomeScreen = (props) => {
  const [playserver, setPlayserver] = useState("http://192.168.1.2/live/");
  const [pushserver, setPushserver] = useState("http://192.168.1.2/live/");
  const [stream, setStream] = useState("demo_295");

  useEffect(() => {
    if (Platform.OS === "android") {
      requestCameraPermission();
    }
  }, []);

  return (
    <View
      style={{
        flex: 1,
        flexDirection: "column",
        padding: 24,
        backgroundColor: "orange",
        justifyContent: "center",
      }}
    >
      <Text
        style={{
          color: "#fff",
          fontSize: 25,
          marginBottom: 150,
        }}
      >
        {"React Native\nLive Stream Video example"}
      </Text>
      <Text style={{ color: "#fff", fontSize: 18 }}>
        Please enter a stream name.
      </Text>
      <View
        style={{
          borderWidth: 1,
          borderColor: "blue",
          marginTop: 20,
          marginBottom: 100,
        }}
      >
        <TextInput
          style={{ color: "#fff", height: 40 }}
          placeholder="Write stream name here"
          placeholderTextColor="#555"
          value={stream}
          onChangeText={(stream) => setStream(stream)}
        />
      </View>
      <View
        style={{
          flexDirection: "row",
          justifyContent: "space-between",
        }}
      >
        <Button
          onPress={() =>
            props.navigation.navigate("Play", {
              playserver: playserver,
              stream: stream,
            })
          }
          title="Join Stream"
        />
        <Button
          onPress={() =>
            props.navigation.navigate("Push", {
              pushserver: pushserver,
              stream: stream,
            })
          }
          title="Stream a Video"
        />
      </View>
    </View>
  );
};

const Stack = createStackNavigator();

function StackNavigation() {
  return (
    <NavigationContainer>
      <Stack.Navigator initialRouteName="Home" headerMode="none">
        <Stack.Screen
          name="Home"
          component={HomeScreen}
          options={{ title: "iShow" }}
        />
        <Stack.Screen name="Play" component={PlayScreen} />
        <Stack.Screen name="Push" component={PushScreen} />
      </Stack.Navigator>
    </NavigationContainer>
  );
}

export default function App() {
  return <StackNavigation />;
}
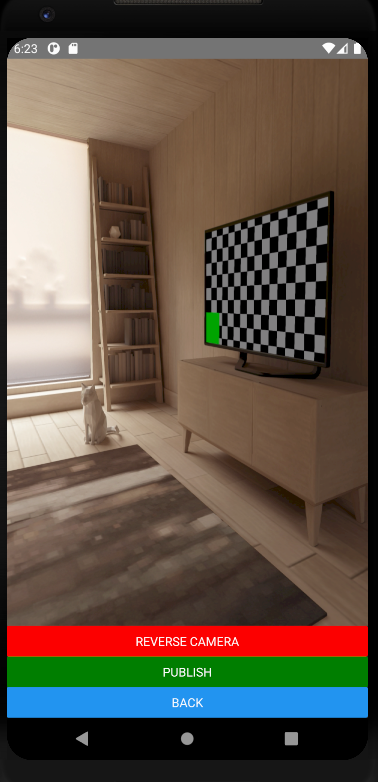
视频流屏幕
我们将在此屏幕上使用手机的前置或后置摄像头开始流式传输。
记住,我们第一次进入此屏幕或播放流屏幕时,会要求我们授予相机和音频权限。
我们使用 useState 钩子设置对 NodeCameraView 组件的引用,并使用 useEffect 钩子在我们到达屏幕后停止流式传输内容。
在 NodeCameraView 组件中,我们有一些道具可以用来调整音频定义、视频分辨率、可用的摄像头等等。
这个组件的一个重要道具是outputUrl,它是我们设置播放流的 URL 和端口的地方,以便其他人可以加入它。
在组件的末尾,我们有三个具有以下功能的按钮:
- 在前后摄像头之间切换。
- 开始或停止流传输。
- 返回主屏幕。
import React, { useState, useEffect } from "react";
import { View, Button, StyleSheet } from "react-native";
import { NodeCameraView } from "react-native-nodemediaclient";

const StreamContent = (props) => {
  const [playerRef, setPlayerRef] = useState(null);

  useEffect(() => {
    return () => {
      if (playerRef) playerRef.stop();
    };
  }, []);

  return (
    <View style={{ flex: 1, backgroundColor: "#333" }}>
      <NodeCameraView
        style={{ flex: 1 }}
        ref={(vb) => {
          setPlayerRef(vb);
        }}
        outputUrl={props.route.params.pushserver + props.route.params.stream}
        camera={{ cameraId: 1, cameraFrontMirror: true }}
        audio={{ bitrate: 32000, profile: 1, samplerate: 44100 }}
        video={{
          preset: 1,
          bitrate: 500000,
          profile: 1,
          fps: 15,
          videoFrontMirror: false,
        }}
        smoothSkinLevel={3}
        autopreview={true}
        onStatus={(code, msg) => {
          console.log("onStatus=" + code + " msg=" + msg);
        }}
      />
      <View>
        <Button
          onPress={() => {
            playerRef.switchCamera();
          }}
          color="red"
          title="Reverse Camera"
        />
        <Button
          onPress={() => {
            playerRef.start();
          }}
          color="green"
          title="Publish"
        />
        <Button
          onPress={() => {
            props.navigation.goBack();
          }}
          title="Back"
        />
      </View>
    </View>
  );
};

export default StreamContent;
播放 REACT NATIVE LIVE STREAM 屏幕
对于最后一个屏幕,我们可以使用 useState 和 useEffect 挂钩来获取和设置组件引用,但在本例中,我们将使用 NodePlayerView。
该组件用于查看流媒体内容。在其inputUrl道具上,我们将从我们想要观看的流媒体中设置 URL。
我们的示例从主屏幕上的输入设置 URL,然后可以在其中写入我们想要加入的流的名称。
NodePlayerView 拥有的其他道具是自动播放选项、缓冲时间和最大缓冲时间;如果视频有一些延迟,最后两个可用于调整传输。
本示例中使用 onStatus 道具在控制台上显示流式传输状态,因此我们将能够看到传输何时完成或何时断开连接。
注意,如果我们设置了错误的 URL 格式并且传输完成,就会黑屏。
在组件的末尾,我们有一个返回按钮可以返回到主屏幕。
import React, { useState, useEffect } from "react";
import { View, Button } from "react-native";
import { NodePlayerView } from "react-native-nodemediaclient";

const PlayStream = (props) => {
  const [playerRef, setPlayerRef] = useState(null);

  useEffect(() => {
    return () => {
      if (playerRef) playerRef.stop();
    };
  }, []);

  return (
    <View style={{ flex: 1 }}>
      <NodePlayerView
        style={{ flex: 1, backgroundColor: "#333" }}
        ref={(vp) => {
          setPlayerRef(vp);
        }}
        inputUrl={props.route.params.playserver + props.route.params.stream}
        scaleMode={"ScaleAspectFill"}
        bufferTime={300}
        maxBufferTime={1000}
        autoplay={true}
        onStatus={(code, msg) => {
          console.log("onStatus=" + code + " msg=" + msg);
        }}
      />

      <Button
        onPress={() => {
          props.navigation.goBack();
        }}
        title="Back"
      />
    </View>
  );
};

export default PlayStream;
应用预览
对 React Native Live Stream Video 的最终想法
React Native最大的好处之一是总是有第三方库可以让我们的工作变得更轻松。正如我们在这个例子中看到的,正因为有Node Media Client库,才能使将流功能集成到我们的应用程序中变得非常简单。你准备好了吗?
原文作者 Joaquin Viera
原文链接 https://www.asapdevelopers.com/react-native-live-stream-video/