
如何快速查看、评估 PyTorchVideo 库的活动分类模型

FiftyOne 中的 PyTorchVideo 预测(图片来自作者)
在浩如烟海的计算机视觉模型中寻找最佳模型,或仅仅是寻找相关基线,是非常困难的。 大家可以使用 TensorFlow Hub 和 Facebook Detectron2 等模型库(model zoo),这些模型库里有很多常用模型。此外,还可以在 PyTorch Lightning 等库根据自己的需求对模型进行自定义修改。这些库处理图像都不在话下,但处理视频来就完全不一样了。现在视频数据越来越流行,但因为视频数据的处理较为复杂,所以视频类的任务都很难完成。
PyTorchVideo 是一个全新的库,旨在使视频模型与图像模型一样易于加载、创建和训练。
PyTorchVideo 集成了多种视频理解模型,提供视频处理、数据增强等功能。PyTorchVideo 还提供专门处理视频的加速器,用来部署 PyTorch 支持的模型,可以在当前工作流上无缝集成所有功能。
PyTorchVideo 在完成视频工作流方面 唯一缺少的功能是数据集可视化 和解释模型结果的方法 , 这就需要用到 FiftyOne 。
FiftyOne 是我一直在 Voxel51 上使用的一个开源工具。它可以帮助我们快速实现图像或视频数据集可视化,并探索存储在本地或云存储中的人工标注和预测标签。FiftyOne 数据集和 FiftyOne 应用的表示非常灵活,可以让我们快速掌握数据集并解释模型以查找故障模式、注释错误、使复杂标签可视化等。
本篇文章是最近的 PyTorchVideo 教程的扩展,目的是教会大家集成 PyTorchVideo 与 FiftyOne ,从而全面了解视频的机器学习工作流。
本文涵盖以下内容:
-
下载 Kinetics 数据集的子集
-
PyTorchVideo 模型的可视化和评估
跟随 Colab 的脚步!
打开 Google Colab notebook ,直接在浏览器上运行本文的示例!
Google Colab 中的示例截图(图片来自作者)
设置
要完成本示例的操作,需安装 FiftyOne、PyTorchVideo、PyTorch 和 TorchVision:
pip install fiftyone pytorch torchvision
虽然 PyTorchVideo也可以通过 pip 安装,但本文的功能需求需要通过 GitHub安装 PyTorchVideo:
git clone https://github.com/facebookresearch/pytorchvideo.git
cd pytorchvideo
pip install -e .
本示例使用 Kinetics-400 数据集的一个子集,可以用以下代码段下载:
pip install youtube-dl
wget https://storage.googleapis.com/deepmind-media/Datasets/kinetics400.tar.gz
tar -xvf ./kinetics400.tar.gz
视频数据集比图像数据集更难处理的其中一个原因是,许多流行的视频数据集只能通过 YouTube 获得。因此,我们无法下载完整版 zip 文件,只能运行类似下面的脚本,从 YouTube 下载单个视频,而这些视频还有可能因为数据集审校而变得不可用。
from datetime import timedelta
import json
import os
import subprocess

import youtube_dl
from youtube_dl.utils import (DownloadError, ExtractorError)

def download_video(url, start, dur, output):
    output_tmp = os.path.join("/tmp",os.path.basename(output))
    try:
    # From https://stackoverflow.com/questions/57131049/is-it-possible-to-download-a-specific-part-of-a-file
        with youtube_dl.YoutubeDL({'format': 'best'}) as ydl:
            result = ydl.extract_info(url, download=False)
            video = result['entries'][0] if 'entries' in result else result

        url = video['url']
        if start < 5:
            offset = start
        else:
            offset = 5
        start -= offset
        offset_dur = dur + offset
        start_str = str(timedelta(seconds=start))
        dur_str = str(timedelta(seconds=offset_dur))

        cmd = ['ffmpeg', '-i', url, '-ss', start_str, '-t', dur_str, '-c:v',
                'copy', '-c:a', 'copy', output_tmp]
        subprocess.call(cmd)

        start_str_2 = str(timedelta(seconds=offset))
        dur_str_2 = str(timedelta(seconds=dur))

        cmd = ['ffmpeg', '-i', output_tmp, '-ss', start_str_2, '-t', dur_str_2, output]
        subprocess.call(cmd)
        return True

    except (DownloadError, ExtractorError) as e:
        print("Failed to download %s" % output)
        return False

with open("./kinetics400/test.json", "r") as f:
    test_data = json.load(f)

target_classes = [
 'springboard diving',
 'surfing water',
 'swimming backstroke',
 'swimming breast stroke',
 'swimming butterfly stroke',
]
data_dir = "./videos"
max_samples = 5

classes_count = {c:0 for c in target_classes}

for fn, data in test_data.items():
    label = data["annotations"]["label"]
    segment = data["annotations"]["segment"]
    url = data["url"]
    dur = data["duration"]
    if label in classes_count and classes_count[label] < max_samples:
        c_dir = os.path.join(data_dir, label)
        if not os.path.exists(c_dir):
            os.makedirs(c_dir)


        start = segment[0]
        output = os.path.join(c_dir, "%s_%s.mp4" % (label.replace(" ","_"), fn))

        results = True
        if not os.path.exists(output):
            result = download_video(url, start, dur, output)
        if result:
            classes_count[label] += 1

print("Finished downloading videos!")
加载和探索视频数据集
图像数据集的一些基本选项可用于使批次数据可视化,如 Pillow 和 OpenCV,但是让视频数据集可视化的选项几乎没有,FiftyOne 是一个新的开源库,为图像和视频数据集提供简单而强大的可视化服务。
如果你的数据集使用通用的格式,例如用于检测的 COCO 格式,使用单行代码就可以加载:
import fiftyone as fo

dataset = fo.Dataset(
    "/path/to/dataset_dir",
    dataset_type=fo.types.COCODetectionDataset,
    name="my_dataset"
)
如果你的数据集采用自定义格式,可以使用 FiftyOne 直接加载数据集。例如,如果你使用的是对象检测视频模型,则可以按以下方式加载数据:
import random
import fiftyone as fo

num_frames = 5
num_objects_per_frame = 3
video_path = "/path/to/video.mp4"

# Create video sample
sample = fo.Sample(filepath=video_path)

# Add some frame labels
for frame_number in range(1, num_frames + 1):
    # Frame classification
    weather = random.choice(["sunny", "cloudy"])
    sample[frame_number]["weather"] = fo.Classification(label=weather)

    # Object detections
    detections = []
    for _ in range(num_objects_per_frame):
        label = random.choice(["cat", "dog", "bird", "rabbit"])

        # Bounding box coordinates are stored as relative numbers in [0, 1]
        # in the following format:
        # [top-left-x, top-left-y, width, height]
        bounding_box = [
            0.8 * random.random(),
            0.8 * random.random(),
            0.2,
            0.2,
        ]
        detections.append(fo.Detection(label=label, bounding_box=bounding_box))

    # Object detections
    sample[frame_number]["objects"] = fo.Detections(detections=detections)

# Create dataset
dataset = fo.Dataset(name="my-labeled-video-dataset")
dataset.add_sample(sample)
在本示例中,我们将遵循运行视频分类模型的 PyTorchVision 教程。通常,视频分类数据集存储在磁盘上的目录树中,目录树的子文件夹定义数据集类别。这种格式可以通过单行代码加载:
import fiftyone as fo

name = "kinetics-subset"
dataset_dir = "./videos"

# Create the dataset
dataset = fo.Dataset.from_dir(
    dataset_dir, fo.types.VideoClassificationDirectoryTree, name=name
)

# Launch the App and view the dataset
session = fo.launch_app(dataset)
如果也操作到这一步,请将鼠标悬停或单击样例播放视频:
https://miro.medium.com/max/875/1*YDzvrZDlgwJ12RsBIyCafA.gif
FiftyOne App 中可见的 Kinetics 视频(图片来自作者)
我们还需要下载并存储默认类名称列表, 评估预测时会使用这个列表。
wget https://dl.fbaipublicfiles.com/pyslowfast/dataset/class_names/kinetics_classnames.json
with open("kinetics_classnames.json", "r") as f:
    kinetics_classnames = json.load(f)

dataset.default_classes = kinetics_classnames
运行 PyTorchVideo 模型
本节我们用 PyTorchVideo 下载视频分类模型,然后在上一节加载的数据上运行视频分类模型,将结果存储在我们的数据集中。本节中的代码改编自 PyTorchVideo 教程。
Torch Hub 是预训练 PyTorch 模型的存储库,我们可以这个存储库里下载模型,在数据集上运行推理。PyTorchVideo 通过 Torch Hub 支持的模型库(包括 SlowFast、I3D、C2D、R(2+1)D 和 X3D)提供了许多视频分类模型。下列代码段用 ResNet50 主干下载 SlowFast 的慢速分支,将其加载到 Python 中:
import json
import torch
from torchvision.transforms import Compose, Lambda
from torchvision.transforms._transforms_video import (
    CenterCropVideo,
    NormalizeVideo,
)
from pytorchvideo.transforms import (
    ApplyTransformToKey,
    ShortSideScale,
    UniformTemporalSubsample
)

# Device on which to run the model
#device = "cuda:0"
device = "cpu"

# Pick a pretrained model
model_name = "slow_r50"

# Local path to the parent folder of hubconf.py in the pytorchvideo codebase
path = '../pytorchvideo'
model = torch.hub.load(path, source="local", model=model_name, pretrained=False)

model_url = "https://dl.fbaipublicfiles.com/pytorchvideo/model_zoo/kinetics/SLOW_8x8_R50.pyth"

checkpoint = torch.hub.load_state_dict_from_url(model_url, map_location=device)

# Unwrap the DistributedDataParallel module
# module.layer -> layer
state_dict = checkpoint["model_state"]

# Apply the state dict to the model
model.load_state_dict(state_dict)

# Set to eval mode and move to desired device
model = model.eval()
model = model.to(device)

# Create an id to label name mapping
kinetics_id_to_classname = {v:k for v,k in enumerate(dataset.default_classes)}
每个模型都有特定的输入结构。标准工作流程是:首先,编写自定义脚本,脚本执行必要的加载和转换功能来格式化每个模型的数据。PyTorchVideo 灵活地提供这些功能来加快此过程,适用于大多数视频的处理需求,例如,以下代码创建转换来从视频中采样帧,对视频帧进行标准化、缩放和裁剪,无需编写任何函数:
side_size = 256
mean = [0.45, 0.45, 0.45]
std = [0.225, 0.225, 0.225]
crop_size = 256
num_frames = 8

# Note that this transform is specific to the slow_R50 model.
# If you want to try another of the torch hub models you will need to modify this transform
transform =  ApplyTransformToKey(
    key="video",
    transform=Compose(
        [
            UniformTemporalSubsample(num_frames),
            Lambda(lambda x: x/255.0),
            NormalizeVideo(mean, std),
            ShortSideScale(
                size=side_size
            ),
            CenterCropVideo(crop_size=(crop_size, crop_size))
        ]
    ),
)
由于数据集存储在 FiftyOne 中,我们可以轻松地迭代样本,用 PyTorchVideo 在样本上加载并运行我们的模型,再将预测存储回 FiftyOne,以进行进一步的可视化和分析:
from pytorchvideo.data.encoded_video import EncodedVideo

def parse_predictions(preds, kinetics_id_to_classname, k=5):
    preds_topk = preds.topk(k=k)
    pred_classes = preds_topk.indices[0]
    pred_scores = preds_topk.values[0]

    preds_top1 = preds.topk(k=1)
    pred_class = preds_top1.indices[0]
    pred_score = preds_top1.values[0]

    # Map the predicted classes to the label names
    pred_class_names = [kinetics_id_to_classname[int(i)] for i in pred_classes]
    pred_class_name = kinetics_id_to_classname[int(pred_class)]

    prediction_top_1 = fo.Classification(
        label=pred_class_name,
        confidence=pred_score,
    )
    predictions_top_k = []

    for l, c in zip(pred_class_names, pred_scores):
        cls = fo.Classification(label=l, confidence=c)
        predictions_top_k.append(cls)

    predictions_top_k = fo.Classifications(classifications=predictions_top_k)

    return prediction_top_1, predictions_top_k

for sample in dataset:
    video_path = sample.filepath

    # Initialize an EncodedVideo helper class
    video = EncodedVideo.from_path(video_path)

    # Select the duration of the clip to load by specifying the start and end duration
    # The start_sec should correspond to where the action occurs in the video
    start_sec = 0
    clip_duration = int(video.duration)
    end_sec = start_sec + clip_duration

    # Load the desired clip
    video_data = video.get_clip(start_sec=start_sec, end_sec=end_sec)

    # Apply a transform to normalize the video input
    video_data = transform(video_data)

    # Move the inputs to the desired device
    inputs = video_data["video"]
    inputs = inputs.to(device)

    # Pass the input clip through the model
    preds_pre_act = model(inputs[None, ...])

    # Get the predicted classes
    post_act = torch.nn.Softmax(dim=1)
    preds = post_act(preds_pre_act)

    # Generate FiftyOne labels from predictions
    prediction_top_1, predictions_top_5 = parse_predictions(
        preds,
        kinetics_id_to_classname,
        k=5,
    )

    # Add FiftyOne label fields to Sample
    sample["predictions"] = prediction_top_1
    sample["predictions_top_5"] = predictions_top_5
    sample.save()
评估 PyTorchVideo 模型
FiftyOne 不仅是一个数据集管护的开源生态系统,还支持快速查找和解决模型故障模式来对模型进行可视化、评估和解释。
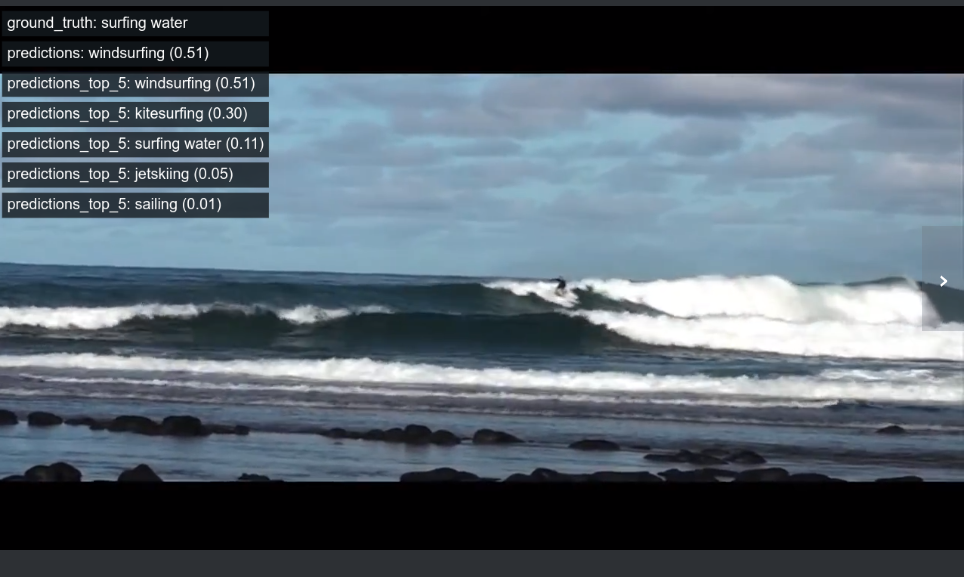
我们可以先让上一节中生成的预测可视化:
import fiftyone as fo

session = fo.launch_app(dataset)

FiftyOne 中可视的 PyTorchVideo 模型预测(图片来自作者)
然后,我们可以使用 FiftyOne 来评估有人工标注的预测,查看聚合指标和显示混淆矩阵和精确召回曲线等内容的图。该评估将每个样本的正确标签(“eval”)添加到数据集,让用正确/不正确的预测过滤视频变得简单,笼统来说,就是用 TP/FP/FN 进行对象检测。只需一行代码即可执行评估:
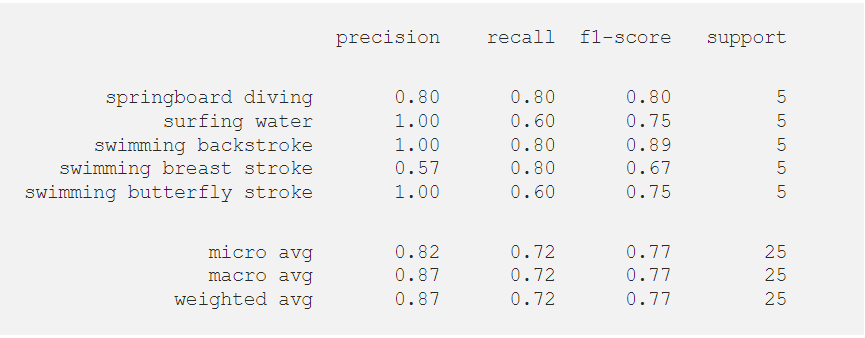
results = dataset.evaluate_classifications("predictions", "ground_truth", eval_key="eval")

target_classes = [
 'springboard diving',
 'surfing water',
 'swimming backstroke',
 'swimming breast stroke',
 'swimming butterfly stroke',
]
results.print_report(classes=target_classes)
现在,我们绘制自己喜欢的类的混淆矩阵:
plot = results.plot_confusion_matrix(classes=target_classes)
plot.show()

FiftyOne 中的混淆矩阵中的可视化结果(图片来自作者)
我们可以把这个图片附加到会话对象上,使其具有交互性。这样,只需单击其中一个单元格,FiftyOneApp 就可以更新会话,显示该单元格中的样本。
# If you are in a Jupyter notebook, attach plot to session
session.plots.attach(plot)

- 在 FiftyOne 中打开的 Jupyter Lab 中的交互式混淆矩阵(图片来自作者)*
注意:图片当前仅在 Jupyter Notebooks 中可交互,很快会支持其他环境!
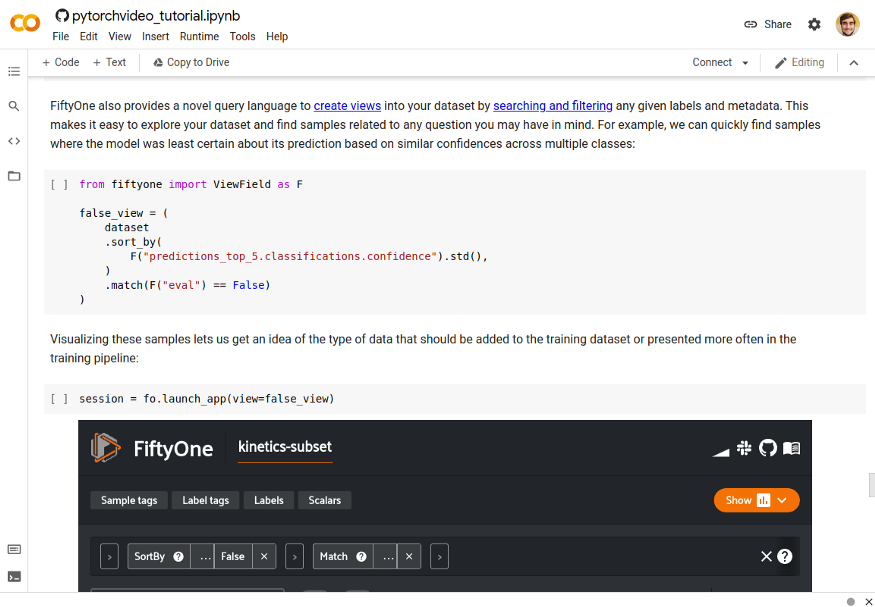
FiftyOne 还提供了一种新的查询语言,通过搜索和过滤任何给定的标签和元数据来创建数据集视图。这让探索数据集及寻找特定样本变得更容易。例如,我们可以根据跨多个类的相似置信度快速找到模型预测的最不确定的样本,并使用先前评估中的每个样本正确性标签(“eval”)只查看错误预测的样本:
from fiftyone import ViewField as F

# Create a view into the dataset
# Sort samples so ones with the lowest standard deviation across top 5 confidences are first
# Match only samples that were incorrectly predicted
false_view = (
    dataset
    .sort_by(
        F("predictions_top_5.classifications.confidence").std(),
    )
    .match(F("eval") == False)
)

# Visualize these samples in the FiftyOne App
session = fo.launch_app(view=false_view)
在 FiftyOne 中可视的不确定 PyTorchVideo 模型预测(图片来自作者)
通过查看这些样本,我们能够了解应添加到训练数据集中的数据类型。我们可以使用 FiftyOne 应用的标记功能进行标记,供以后参考:
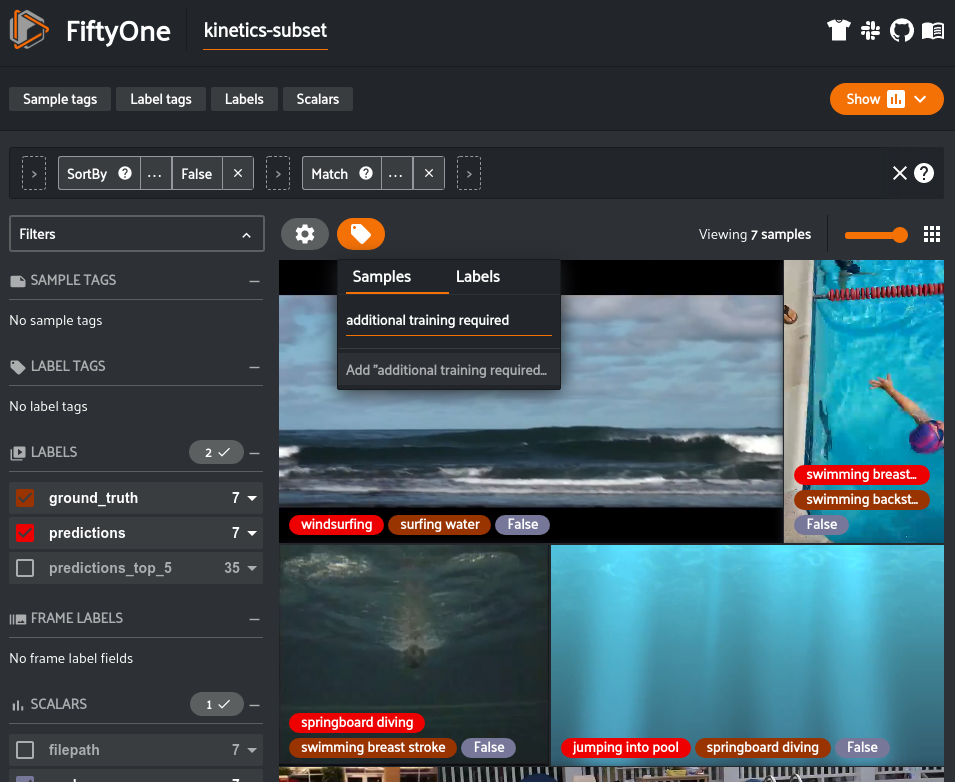
在 FiftyOne 应用App 中标记样本(图片来自作者)
这种简单的手动分析通常会显著提高数据集质量,进而提高模型性能,比只使用聚合数据集统计数据的分析要快。
视频中的对象检测
虽然大多数大型视频数据集和研究工作都以人类活动识别等分类问题为中心,但基于视频的 ML 的应用通常涉及对象检测。目前,PyTorchVideo 主要支持视频分类问题,但是,FiftyOne 中提供了视频对象检测功能。
FiftyOne 支持大家在 FiftyOne Model Zoo 中从基于图像的对象检测模型中生成预测,或把我们自己模型的预测添加到视频数据集。模型库里有很多可供选择模型。例如,我们可以使用 EfficientDet-D0。首先,我们需要安装 TensorFlow 和 AutoML。我们可以使用 FiftyOne 自带的 eta 包轻松安装 AutoML:
pip install tensorflow==1.14
eta install automl
现在,我们将模型应用到一个视频上,让结果可视化:
import fiftyone as fo
import fiftyone.zoo as foz

model = foz.load_zoo_model("efficientdet-d0-coco-tf1")

subset = dataset.take(1)
subset.apply_model(model, "detections")

session = fo.launch_app(view=subset)
这种可视化需要编写自定义脚本来加载原始视频、注释和预测,然后使用 OpenCV 等软件绘制框,然后将可视化导出到磁盘上的新视频。如果想更改正在查看的标签,需要每次都重写脚本并重新生成视频。所有这一切只需要几行代码,而且我们的数据会更易于使用和表示。
总结
基于视频的机器学习模型越来越受欢迎,但因为缺乏相同级别且好用的代码库,所以无法快速开发和评估图像模型。PyTorchVideo 旨在通过模型库(model zoo)、专注于视频的组件和加速功能,从而简化视频模型的实现、训练和评估。另外,通过 PyTorchVideo 使用视频模型非常简单,FiftyOne 是一个开源库,可以高效管理、评估和改进视频(和图像)数据集。把 FiftyOne 和 PyTorchVideo 集成起来大大节省了创建高质量视频数据集和模型花费的时间和精力。
原文作者 Eric Hofesmann
原文链接 https://towardsdatascience.com/using-pytorchvideo-for-efficient-video-understanding-24d3cd99bc3c